How to make a cheap soil moisture sensor
15.1 years ago cheap, electronics, water

Soil sensors can be pretty expensive to purchase but a few minutes and a few cents worth materials around your house you can make your own accurate cheap soil moisture sensor.
UPDATE: Though this still a great sensor, check this post for the latest version of a more heavy duty soil moisture sensor.
I mentioned in a previous post that my previous soil moisture sensor did not hold up in my automated grow box update, so I needed to make a new one. After a little research there was the classic science class method of creating a homemade sensor by simply putting two galvanized nails in the soil and measuring the resistance between them. A major problem with this solution is the soil composition can significantly vary the resistance and keeping the spacing between the nails could be troublesome.
After a little more research I came across the method that has been working well for over 50 years. This method includes taking two metal probes and inserting them into a gypsum block and measuring the resistance between them. The gypsum absorbs the water and provides a decent range of resistance and moisture measurement.
Unfortunately I was fresh out of gypsum (sort of), so I looked around the garage and found a good substitute, Plaster of Paris. Plaster of Paris is created by heating gypsum to around 150 degrees where it becomes calcium sulfate hemihydrate. After adding water and allowing to dry it magically turns back into gypsum with the added bonus it also has the ability to mold to any shape I could come up with . On to construction…..
Materials for cheap soil moisture sensor:
- 1 tsp Plaster of Paris
- 1/2 tsp cold water
- Disposable cup for mixing
- wide straw (I used one from McDonalds, but most fast food straws should work)
- 2 small pieces of metal (I used wall hangers, but nails, paper clips, etc will work as long as they can fit inside the straw with room for plaster to form around)
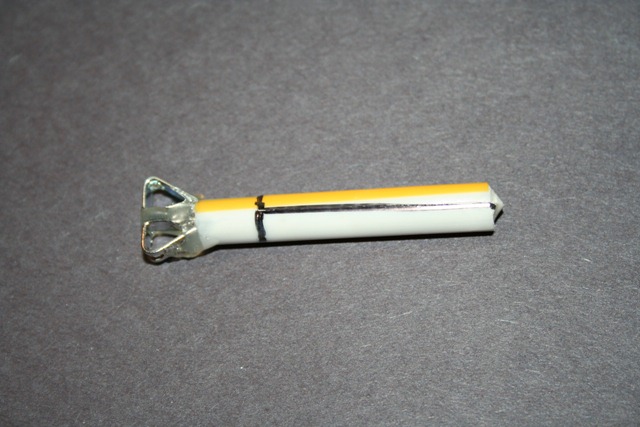
I straightened out one end of both wall hangers the best I could with some needle nose pliers. I then carefully positioned them approximated 15mm apart, the exact measurement is less important though if you are creating multiple sensors I would recommend making them the same gap to ensure consistency of measurements without having to individually calibrating each sensor. I then used some hot glue (insulator) liberally at the top and at the bottom just enough to keep it in place during while pouring the plaster and while the mold solidifies.
Now insert your secured metal probes into the straw, ensuring that both metal probes are equal distant from the sides of the straw. The great thing about the wall hangers is they do this automatically due to their wedge shape at the top. Once you have them centered apply gobs of glue to keep the probe in place but also to seal any gaps between the straw and the bottom of the straw. This needs to be water tight since this will be the bottom our your mold.

Prepare the Plaster of Paris according to the instructions on the box. On my box it said 2 parts mix to 1 part colder water. Given the small size of the mold 1 tsp of mix and 1/2 tsp of water which gave you more than enough to make one sensor. I used a bamboo skewer to stir since I would have gotten in trouble for trying to use our new silverware.
Now it is time to pour your mold, depending on how steady your hands are you should be able to pour the plaster right into the top of the straw. Fill about 1/4 of the length then tap the probe gently to help the plaster settle between the gaps. Repeat the previous step until the straw is full. If you have problems pouring you can also dip the skewer into the plaster and scrape it against the top edge of the straw. This step is optionally but I wanted to give my sensor a little point so I carefully added plaster beyond the end of the straw to provide a sharp point. Once you are done filling the straw, use your glue gun to secure the probe onto the paper you are working on and allow at least 1 hour to set.
After about an hour you can remove the bottom part of the probe. Do this by carefully cutting around the diameter of the bottom 3/4 of the straw, along with a lengthwise cut as shown in the lines marked above using a utility knife. You must be very careful in your cutting going too deep can result in cracking the plaster and you need to start all over.
Allow the plaster to dry for 24 hours and it should be ready for testing. With my probe it is essentially an insulator dry (beyond what my ohmmeter can measure) and a reading of 957 ohms when slightly damp which was a great range for measuring moisture level in my computerized grow box.

Finally, I attached attach wires to my analog measuring device (in my case a PS2 Controller) and I started getting readings. At this point you should calibrate the sensor by getting a reading with the probe dry then again when it is full saturated in water. Ironically, the probe I made was almost exactly specifications as the one I re-purposed from a cheap commercial soil moisture sensor so I didn’t even have to modify the constants on the automated computerized grow box software.
Given you can make hundreds of these things with a regular sized box of Plaster of Paris, box of paper clips and a few trips to your favorite fast food restaurant. The cost of each of these things would be pennies and given the cost of buying a commercial product seems like a very economical alternative.
Tags: cheap, growbox, vegetables


15.1 years ago
It’s brilliant!
15.1 years ago
Glad you liked it. Hope this holds up better than the last.
15.1 years ago
How well does the sensor track soil moisture as the soil dries out?I have been trying to build similar sensors using plastic film canisters as my mold but have been disappointed in how long the plaster stays wet after the soil begins to try.
15.1 years ago
Unfortunately I was fresh out of gypsum, so I looked around the garage and found a good substitute, Plaster of Paris. It has much the same properties of gypsum and also has the ability to mold to any shape I could come up with . On to construction…..It has much the same properties, it has the same composition, it is made from gypsum, and after molding it into desired shape and drying it, it becomes gypsum.I seriously doubt the original method involved drilling in gypsum instead of using plaster.
15.1 years ago
dogsop, so far it seems to be working great a get a good variance in moisture levels and with a little calibration have determined the level at which I need to alert myself I need to water. I haven’t tried it myself but I would presume that the small the gypsum block the faster the sensor will respond. Given the low cost and fun of making these I probably will do some more experimentation with different sizes/metals and I will be sure to report my findings.Leon, you are correct sir. That was my assumption was that as well but looking at the box and only seeing calcium sulfate hemihydrate on the box I was thoroughly confused. After a quick chek on Wikipedia (should have done before) calcium sulfate hemihydrate + Water + drying = Gypsum. Thanks for bringing this to my attention and I have updated the post to avoid confusion to others.
15.1 years ago
Very nice….this is how some of the commercial (expensive) ones work. Aren’t you worried about the hangers rusting? I think I’ll try making a few of these for my greenhouse but use a some stainless steel instead. Kudos!
15.1 years ago
Great DIY work. I did the same thing – http://www.franksworkshop.com.au/GWS/Phase3/MoistureSensor.htm, with realtime data here http://www.franksworkshop.com.au/WebWater/Default.aspx. I used thick copper wire from some heavy AC power cable. I’ve had it running for about a year now. I’m still watering manually when the moisture gets low. I hope to update it soon to a fully automated system like yours.
15.1 years ago
With my probe it had 0 ohm resistance when dry and a reading of 957 ohms when slightly dampNow that’s exactly the opposite of what I would expect.
15.1 years ago
0 resistance = short circuit, right?infinite resistance = no circuitwhich I think is what you’d be looking for, then the resistance going down to 975 when wet, 975 = wetter 1500 = dryer5000 = dryerinfinite = dust
15.1 years ago
Web4Deb, I would definitely recommend stainless steel since yes these will rust eventually curious what will hold out longer the block or the metal. Galvanized would be good for rusting but imagine it may create a low voltage battery, might be a fun science project though. Given the cost to create these not too worried if I rust one out after a few months. But definitely planning on trying out a few more designs.Armandas and Anonymous, yes that was a typo should have said infinite. My brain typed the number my ohmmeter said instead of reality. I updated this in the post a few hours ago. Readers definately get the award for careful reading of this post 🙂
15.1 years ago
I get some motivation, but I wish I had your DIY spirit. I just got a cheapy $10 ph/moisture/light sensor for my coco coir experiments.
15.1 years ago
I’m building an Arduino-based system to monitor lawn moisture and automatically irrigate as needed. I want to eventually add several sensors in the garden to the drip irrigation system. These little sensors work GREAT! I made a bunch of them two days ago. A couple broke apart because I cut a little too deeply when removing the straw. I used solid wire instead of picture hangers, but the design is very very flexible. Thanks for a consistently interesting blog!
15.1 years ago
Glad they worked for you. Mine is doing well, holding up much better than the commercial probe I hacked.
15.1 years ago
Hi, i’ve put a few together but i don’t seem to be getting any reading when wet. just a solid 1 not matter what. the plaster seems to be quite water proof and not taking on any water. how long did you soak yours for? I used some think wire rather than the hangers, i’m wondering if there isn’t enough surface area for the current to travel through. Any ideas?
15.1 years ago
Hi Chris,I’m assuming you used bare wire and not insulated wire. Also make sure your ohmmeter is set on a higher than expected range. My first ones were as much as 40Kohms right after curing. If your meter autoranges, try selecting the range manually. The plaster soaks up moisture fairly fast, but you might have to be patient. Some commercial ones I use at UCR (Irrometers @ $32 each) require a couple soakings for hours before they accurately respond.
15 years ago
hey this is a great idea!well done!my parents have a big garden, and i’m thinking of laying out an array of these things to track the moisture in the soil, fed into a microcontroller.nice work!
15 years ago
Ihave built a similar sensor. I am getting a range of 100-150 Kohms when the sensor is dry and around 22Kohms when wet. How did you go about using this change in resistance to influence your actuator?I am trying to use a very simple circuit with a Wheatstone bridge to compare trigger a relay to a separate watering circuit but have just found out that the Wheatstone bridge gives far too low a current to be of any use.The other option I was thinking about was using a voltage comparator. Do you have any thoughts on this? I have limited knowledge of electronics and any input would be greatly appreciated.
14.9 years ago
What do you mean by “seal any gaps between the straw and the bottom of the straw”? Do you mean completely seal the bottom of the straw with glue?
14.9 years ago
Ken, the basic idea is you want to ensure the plaster fills in any gaps between and around the metal probes. In most cases gravity will take care of this for you unless someone gobs so much glue on the probes to create a water tight air gap.
14.9 years ago
I made one of these to monitor the soil in a hanging basket. I’m always letting it get too dry. My plant now tweets its status on twitter daily as feedmeseymour.
14.9 years ago
Very cool!Would it make sense to use thick copper wire, with bare ends, inside of the probe?
14.9 years ago
You could use copper wire but the picture hangers make it easier to fabricate and give convenient connection points.
14.9 years ago
I’m also very interested in putting my flower beds and vegetable patches on an automatic Arduino-based solar battery-powered moisture feedback loop. Your sensor idea is similar to other’s I’ve discovered, but more well-thought out. I do have a question about regulators, though. I seem to luck out on finding any information on small (say 1/4″ tubing) localized solenoid valves for drip irrigation hoses. What do you use to switch your irrigation? The bulk of what I’ve seen are 24VAC 1″ tubing under-ground sprinkler solenoid valves. Any suggestions on what to use to control water flow for a given zone?
14.9 years ago
Thanks CVG for the probe descriptionlanmat, if you want a 12VDC system check out Intellitec.com for a pump controller to save your batteries. If money is not an issue check out the Rainbird TBOS 9VDC localized system.Anonymous or anyone, which microcontroller are you using? I want something with flash memory.Thanks,iri-gator
14.9 years ago
thanks for the write-up, here's one in action.http://71.194.86.121:8080/ un: public pw: test
14.9 years ago
Chris, awesome setup will have to check again when the lights are on. I need to setup some internet connectivity to my grow box, but unfortunately no internet in my garage.
14.9 years ago
yeah, you really don't need much. I'm using a Make Controller connected to a switch, with a 100' cat5 cable running to the router. The cameras are wireless.
14.9 years ago
"Real" moisture sensors use a.c. rather than d.c. to obviate polarization problems. They have circuitry to generate it. I wonder if the resistance readings don't get whacky after a while from the effects of polarization.See also…http://www.plantsense.com/ and http://www.decagon.com/ Thanks for the write up. I'll have to play around with it (think I stuck some wire in gypsum board some time back but can't remember the results.)
14.9 years ago
Ooops. Correction:1. How does the ECH2O probe measurevolumetric water content (VWC)?The ECH2O probes use capacitance tomeasure the dielectric permittivity of thesurrounding medium. The volume of waterin the total volume of soil most heavilyinfluences the dielectric permittivity of thesoil because the dielectric of water (80) ismuch greater than the other constituents ofthe soil (mineral soil, 4; organic matter, 4;air, 1). Thus, when the amount of waterchanges in the soil, the ECH2O probe willmeasure a change in capacitance (from thechange in dielectric permittivity) that can bedirectly correlated with a change in watercontent. Circuitry inside the ECH2O probechanges the capacitance measurement into aproportional millivolt output.sensors measure watercontent using a dielectric measurement; theEC-5, EC-TM, 5TE, and 10HS use ameasurement frequency at 70 MHz,compared to the EC-10 and EC-20 sensors atabout 10 MHz. Because of this increasedmeasurement frequency, the 70 MHz sensorsare almost completely insensitive todifferences in electrical conductivityhttp://www.decagon.com/pdfs/app_notes/FrequentlyAskedQuestionsAboutECH2O.pdf
14.9 years ago
So i guess we're just measuring the EC of the soil, but it still gives a general idea moisture content.
14.9 years ago
Great blog, I love it! I have several questions:1- Could you use a genreal humidity sensor instead? something like this:http://www.phidgets.com/products.php?category=1&product_id=1125Would it work or is it just for the atmosphere?2- If I build your moisture sensor, how could I connect it to the phidgets interface?http://www.phidgets.com/products.php?product_id=1018I love gardening and electronics, but I'm just 17, so my knowledge is rather limited (by the way, I live in Portugal, so i'm an international visitor!)Thanks in advance
14.9 years ago
Bernado, I wouldn't recommend putting a humidity sensor under ground not sure if it would work…though would expect it would stop working after a few waterings.As for phidgets, there is no reason this wouldn't work with one of the analog inputs. Though to wire it you would need to create a voltage divider, basic idea hook up one end of sensor to 5V, other end up to analog sensor and ground. May also need to add resistor on ground/analog side to get better accuracy but not sure how accurate you need moisture content to be 🙂 I have done something very similiar using Arduino (similar idea as phidgets but half the cost, I am the Cheap Vegetable Gardener) Hopefully in the next week or so I will post an update with some of my grow box improvments including addition of Arduino.
14.9 years ago
Thank you for your reply! Let me just ask you what is the purpose of puting a reistor between the other end of the sensor and the ground? I'm looking at Arduino, seems a little bit more complicated to interact with than phidgets, but thanks for the advice. It will eventually depend on my father, cause he is the one paying!
14.8 years ago
can you teach me in detail how to build my own automatic garden watering system using your moisture sensor in detail… i really interested (>.<)this is my email: fakaratuldeath@yahoo.co.uk
14.8 years ago
CVG- awesome website!lanmat re: your post on May 22, 2009 6:46 PM I'm having the same problem finding cheap, electronically-controlled valves. This one looks promising:https://www.surpluscenter.com/item.asp?UID=2009063019314890&item=20-1306&catname=water(and cheap)
14.8 years ago
Bernado, the voltage divider is to decrease the amount of voltage going to the analog sensor. What you want to ensure is the maximum measureable voltage is at 100% not 50% so you use the resistor is used to reduce the total voltage to make a more accurate measurement.Burn, stay tuned I should have a more detailed write-up for what you are looking for.
14.7 years ago
am trying to buid a soil moisture sensor.in the recent edn circuit designer contest,the second prize winner has constructed a wireless moisture probe wherein he has used the galavanic moisture probe to measure soil moisture content.according to the author"The galvanic probe is essentially a coaxial tube with a center rod, each made of dissimilarmetals. A galvanic potential is developed between the rod and tube, depending on the moisture5content of the soil.can i construct one such to measure soil moisture.
14.7 years ago
From anonymous up there:"0 resistance = short circuit, right?infinite resistance = no circuitwhich I think is what you'd be looking for, then the resistance going down to 975 when wet, 975 = wetter 1500 = dryer5000 = dryerinfinite = dust"^^^^^^That was about exactly what mine turned out to be. When bone dry I was getting in the 4 Mega ohm range…..and as it got progressively wetter the resistance went all the way down to around 250 ohms. I am surprised at the functionality and range of this probe.I used basic solid core wire, I used paper clips and spaced them about 1 mm from each other….this seems to yield the best result that I have found so far….+1 CVG, thanks for the great ideas, love the blog….
14.6 years ago
Trav, glad it worked out for you. I have been very happy with them as well.
14.6 years ago
Hi Mr. Cheap Vegetable Gardener.. I'm happy i saw this cheap soil moisture sensor.. I'm all about to this, but how am I going to measure its resistance without using the ohm meter or multi tester. Any alternatives?
14.6 years ago
Freddie, depends on how you want to use it. You could hook it up to a PS2 Controller and check the resistence with it. Or basically any other device that accepts an analog input (basic stamp, arduino) If you stay tuned I will be providing some more info on how to do this with arduino.
14.6 years ago
I understand you used picture hangers for your electrical contacts. I wonder how critical the surface area of the electrical contacts in the gypsum is? I was thinking about using a standard 3 pin protoboard header instead of the picture hangers. It will definately hold it's shape and the metal ends are about 1/4 inch long and about 1/4 inch apart ( if you ignore the center post ). That and I have about a dozen of them in my tool box.
14.6 years ago
Chip, I have experimented some this summer with a few different designs and size and distance does not appear to change the readings much. Though the type of metal (rust prevention) probably should be considered. Galvanized/stainless steal are definitely preferred.
14.6 years ago
I've read that you should be using AC for the signal (as in a low voltage transformer secondary), or the calibration begins to deteriorate and you get inaccurate results. You end up measuring AC voltage instead of resistance (and you'll need a resistor in series with the sensor — about 1K in your case — to pick the signal off of).Have you been using this long enough to validate or disprove that?GREAT blog, by the way.
14.6 years ago
jwb7605, That is definitely a true statement using AC current does provide more accurate results though for my safety I avoid using high voltage when possible. The low voltage method though less accurate is much safer and easy to setup. Though accuracy all depends on your needs for me, I just need a general range when I need to turn on a water pump to water my plants so a percent or two is no big deal to me.
14.6 years ago
jwb7605 – the major reason for AC current is electrolysis, and electrolytic corrosion of and salt/crud buildup near one of the electrodes (anode, +, just like with car batteries, the red cable is the one always messed up, never have a problem with the negative black one). AC current is neutral in this sense – whatever ions from the metal force-corrode/pass into solution when the electrode is positive, are pulled right back out when the electrode becomes negative on the other part of the AC cycle. The net result is no pollution of the solution with foreign ions no corrosion/deterioration of the electrodes.
14.6 years ago
http://www.vegetronix.com
14.6 years ago
Andrew, those sensors are great check how I used on this post where I used one with an Arduino
14.5 years ago
Hello people. This is exactly what I was looking for. Thanks a lot!!! I haven't build it yet though, my only concern is how long does it take to setle once you water the soil. And how is the relation between the soil ant the probe regarding the drying. I mean, once you water the soil, does the probe stay "wetter" than the soil? or does it act similar to the soil?I know I may not be very clear, please let me know if you don't understand my question.Thanks in advanced
14.5 years ago
They spike when you first dump water on them (as they probably should) though they quickly (within a minute or two balance out when the soil absorbs it.
14.5 years ago
hello mr cheap vegetable gardener… i used this soil moisture sensor the the ps2 controller.. the metal i used in the soil moisture sensor is only a barbed wire.. and after few days.. in my experiment, the values are getting wrong..on my ps2 controller:32767 = max resistance0 = min resistance..i got 19967 value even it's wet..im expecting 1000 – 3000.. i double that the metal i used got rusted inside the gypsum block..
14.5 years ago
fred, well when metal and water combine rust will happen. Even with the rust the soil sensor remained accurate for the season (9 months) before I created a new version, which reminds me I should do a new write-up on it. Concept is still the same though used small galvanized nails and made the block a little bigger. Stainless steel is also a good option for probes.As for your measurements, that is true that you should have a range of 0 to 32767 though if you still have the stick attached or more importantly the potentiometer, which when centered is at the midway point 16383 so this in place you range is 16383 to 32767. So completely dry you should expect a value of 16383 and full saturated (basically sitting in water) a value of 32767. So you 19K number does sound in the right ball park if the soil is simply moist.If you want more accuracy you can try removing the potentiometer, though I chose to not mess with this so I can’t really help with the wiring. You may also consider using an arduino which is the method I am currently doing now, though the PS2 Controller worked fine I wanted to clean things up and move all my controls to a single component and for $30 pretty nice piece of hardware. Here is a write-up of my grow box controller using an Arduino.
14.5 years ago
thanks for the reply mr cheap vegetable gardener.. i would like to use to your arduino project for measuring the soil moisture (we have here at our country [philippines] (im)duino which is also an arduino based board.. im thinking.. where am i going to buy a vegetronix. since i'm dealing for the low cost project (such this cheap soil moisture sensor) it will take bunch of bucks out of my pocket just to deliver the vegetronix sensor from there. 🙂 any alternatives for vegetronix? ok i'll read your linked article.. thanks for the help!
14.5 years ago
if full saturated.. the value should drop down to zero right? zero resistance basis..
14.5 years ago
thanks! i got a new answer.. i used 2 galvanized iron and it works great!
14.5 years ago
fred, glad you got it working. I am sure I responded to a couple of your other questions before not sure what happened. So did you go with galvanized rods in the ground and skip the gypsum or rods in gypsum?
14.5 years ago
Hey GuysInstead of looking for a cheap water solenoid (valve) how about using a windshield washer pump? they are 12v and cheap. OK the flow rate is not great but should be adequate.
14.5 years ago
AcmeUK, great idea. Effective, cheap and low voltage so less worries about electrocuting yourself.
14.4 years ago
yeah, thanks for this useful blog. By the way, i would like to test my probes durability too. I've seen your revised cheap soil moisture sensor. I'll try that 🙂
14.3 years ago
If you try and measure it with a normal digital voltmeter, which uses DC excitation, then what you will notice is that the reading drifts continuously due to polarization of the block (movement of ions towards the electrodes).In all workable gypsum block resistance measurements, you need AC excitation to prevent this ionization occurring (if you keep changing the direction of the electric field, average ionic movement is zero).
14.2 years ago
If you wanted to dump your left-over plaster might it be a good additive, like agricultural lime, for your lawn or garden?
14.2 years ago
I would probably recommend sticking to agricultural lime since plaster of paris does have some additional additives which I am not sure would have adverse effects on your lawn/environment
14.2 years ago
McGyver, eat your heart out!
14.1 years ago
Amazing sensor, not tried yet will definately try it. I needed to discuss a project. I am planning to use the commercial sensor. could you send me your e-mail id for further discussion.
14.1 years ago
I needed the output in voltage to interface it to AVR controller. I have the synopsis just needed you to have a look could you reply to my e-mail i.d.
14.1 years ago
Joel, how about I answer here so everyone knows the answer 🙂
If you make your own sensor it is probably best for you to calibrate it by getting a value of it dry and then a value after sitting in water for a couple minutes. That should be a good range to determine your various water saturation.
14.1 years ago
Sir basically i wanted the output of the sensor in voltage which will be send to the AVR microcontroller, then the output will be given to the LCD to display the percentage of soil moisture content. It is a third year mini project and i really need help since i have a presentation on 6th March and God gave me you. Could you guide me for the programming and how do i measure the output in voltage if not how do i program the code based on the resistance value.Please guide me. Does the value change with size of length.
14.1 years ago
[…] automation on my side. When I was looking into what some other people had done I came across this DIY Soil Moisture Sensor on The Cheap Vegetable Gardener site. There is also lots of cool information on the site for […]
14.1 years ago
[…] automation on my side. When I was looking into what some other people had done I came across this DIY Soil Moisture Sensor on The Cheap Vegetable Gardener site. THERE is also lots of cool information on the site for […]
14.1 years ago
We are experimenting. We bought a $10 Rapitest moisture sensor through the web, and connected it to Networked Robotics’ Low Voltage Probe. While we get good reaction to water, we also get a lot of other crazy stuff. Like everytime we came into work on one of two plants we tried,the voltage would go up. We found that this happened when the lights were turned on or off. Anyone know why? What is the principle of this type of sensor?
14.1 years ago
I have seen that on my sensors as well. My guess is the temperature change can make the value vary.
14.1 years ago
In the case of these Rapitest sensors, I don’t think temperature is the cause. Our business is network monitoring of temperature, so the room’s temperature is always recorded. The light-effect is instantaneous, or at least within one minute, which is our sampling interval. We can generate the voltage change in the middle of the day simply by turning the lights in our mostly windowless office on and off. But we are seeing this only with 1 of our two (the same product) sensors, and only with one of the two plants we are monitoring.
Networked Robotics
14.1 years ago
We decided to implement the suggestion by Bernardo in this post and use a humidity sensor to try to detect soil moisture. So we put one of our humidity sensors under a cup as shown in the picture below. The data is really not
showing to be all that valuable yet, but its in realtime on our demo server for anyone to see.
Things may change if we let the plant dry out.
Plnt1
http://www.networkedrobotics.com/humidityrapitestmoisture.jpg
Plnt2
http://www.networkedrobotics.com/rapitestinfern.jpg
To see realtime data, on Windows XP download our Tempurity Monitor Version 2
and point to Tempurity Server “demo.networkedrobotics.com”
You can see:
Plnt1H20 = rapitest moisture not light sensitive
Plnt2H20 – rapitest moisture light sensitive
825Chgo – room temperature
Plnthumid- humidity sensor in the bottle in Plnt1
Roomhumid – room humidity
14 years ago
Not sure what else could be affecting the sensors. I might have to play with mine a little, only thing I can think of is electrical interference, maybe a little shielding could help out…
14 years ago
Hey, Mr. CVG! A solution to the AC excitation versus DC excitation reading variation theory is to simulate the AC. Since you are programming a microcontroller to read your sensor, use it to develop the “AC” excitation. Connect each of your wires from your sensor to a different OUTPUT pin. Alternate each pin – one high; the other low and vice versa. You will need an additional pair of INPUT pins to read the sensor depending on whether one OUTPUT drive is low or the other.
14 years ago
Does anyone know how these Rapitest sensors work?
Has anyone considered the fact that these sensors are GENERATING .3 to .7 volts on a pretty much permanent (so far for us) basis? (not sure of the current or total power yet)
If we shade the plant, the output voltage from the moisture sensor goes down, regardless of whether our lights are on or off in the room.
Networked Robotics
13.8 years ago
[…] […]
13.5 years ago
Is this a tensiomteter of sorts?
13.4 years ago
Quite a nifty DIY moisture probe! I found a Curtis LCS liquid level control in a box of electronics, and I’m planning on using it as a automatic sprinkler controller, since it’s sensitive to small resistances found in liquids and liquid foams and adjustable, it should work well with a sensitive soil probe. Began to wonder if I could use a gold-plated edge connector, soldered to tinned copper wires as a probe of sorts, with the durable inert metal gold plating helping to keep the probe accurate during the summer months.. It would be nice to be able to take off without worry about the garden drying up, and this article inspired me to try something to solve the dilemma! Thanks again!!
PS – probably the Rapitest probe works by using two dissimilar metals separated by an insulator ring near the tip, and the wet soil acts as the electrolyte solution, hence the probe becomes a “soil battery” of sorts, generating the .3 – .7 volts. Interesting to hear that shading the plant affects the output!
13.3 years ago
[…] […]
13.2 years ago
what is the range of that moisture sensor. i mean to say that how much area that cover?
13.2 years ago
ramana, it will only measure the immedate surrounding area. Though if watering (or rain) is consistent and you don’t have any strange differences in slopes or soil types you should be able to make an assuption that a good distance away from the sensor should have a similiar reading.
13.2 years ago
Hey, I’m working on a cheap durable moisture sensor myself. If I make a few, can I send them to you and have you test them to see if you get similar results? I’ll pay postage
13.2 years ago
we are using a moisture sensor like yours for a school project. i was wondering if you hooked it up to some kind of valve using an electronic circuit. like a JFET or how we could do that?
13.2 years ago
I use a common pond pump to do my watering using a solid state relay as the trigger. I did pull the water valve out of my old dishwasher before it was hauled away to use though never got around to it. Though no reason I can think of why it wouldn’t
13.1 years ago
hi, I tried to make the moisure sensor, and i’ve connected to the arduino.
Not working!
Immersed in water or totally dry it measure the same resistance.
The plaster is completely waterproof?
What’s wrong?
13.1 years ago
Simone, if you have a voltmeter I would check the resistance…if you have none then most likely the metal is touching so you will not see a different reading no matter how wet/dry the sensor is.
13.1 years ago
Thank you for the reply.
Using my tester noting change, the resistance is still the same (1,5 mohm)
Probably should be a plaster translation problem.
Translating plaster in italian, become GESSO the material to write on the blackboard at school…
But here there is another material called french plaster(STUCCO FRANCESE) made with plaster with other stuff glue etc..
iv’e used the first pure plaster.
putting water in the plaster dried, it does not dissolve even if rubbed.
I’ll try with the second one.
thankyou
13.1 years ago
The stuff I am working with is “Plaster of Paris” which when dried is gypsum which is what has this decreased resistance when wet. The GESSO you mention I would think of as caulk which from my knowledge is not permeable to water.
13 years ago
but can u tell me about the response time. that is how much time it(pop) takes to become dry.
13 years ago
Hi, I am Brazilian and I found this site through a
research. I am an engineering student and I liked this
method of measuring soil moisture. Now I wanted to know
If you have any study on the variation of accuracy
measured in soils with different levels of salts and
some oxides. More is to be congratulated, I did tests with
clip beauty and function. Now I will test in different
depths. If I can, send your mail to my.
12.7 years ago
I started experimenting with moisture meters recently. I use two six inch galvanized nails about 2 centimeters apart mounted on a block of wood. The resistance reading was hopelessly variable. However it gave more reliable readings on a “diode” test found on all multitesters. I presume it tests the voltage accross the probes at a fixed d.c. current. Any reading below 0.4 volts is reasonable wet soil.
after reading the above comments I will test it as a capacitor to avoid polarization since it uses an a.c. current of about 1000 hz.
Comment on Rapitest mentioned above. I have one of these and I believe it works on the principle of a “thermocouple” i.e. Its made up of two different metals and thus creates a small current when joined together depending on the temperature. However at room temperatures it should hardly change. Here the two metals are not joined together but instead separated by a small gap of ceramic. the wet soil in a way bridges this gap and thus a small current is generated depending on the conductivity of the soil. the current generated is in microamperes region and thus polarization is not a problem for instantenious measurements. I cannot understand the effect of light, this is a surprise to me so I will check it when ı get home.
12.6 years ago
[…] ———- Soil moisture http://www.elp.uji.es/paperspdf/2002%20APL80-2785.pdf Make it youself The Cheap Vegetable Gardener ———- Post added at 16:35 ———- Previous post was at 16:34 ———- Plant + Insect […]
12.4 years ago
[…] […]
12.2 years ago
Gooday Mate, Your How to make a cheap soil moisture sensor write up above is great have you got a RSS Feed
12.1 years ago
Great tutorial, there are just two things that are not clear to me. 1.) http://lh3.ggpht.com/_Xcv0VbxbRcc/Sa8kxgtBTdI/AAAAAAAAAvw/98418HYQqVE/s1600-h/image%5B4%5D.png on this image, what are those things between the wall hangers?
2.) “Once you are done filling the straw, use your glue gun to secure the probe onto the paper you are working on and allow at least 1 hour to set.” What exactly do you mean by that?
12.1 years ago
Ivo, #1 Just a bit of hot glue to make sure the metal doesn’t touch while in plaster. #2 Just let it dry at room temperature to harden for one hour.
12.1 years ago
[…] […]
11.9 years ago
SIR i really need ur help , i have trying to make soil moisture sensor as u have suggested , i am writing down my problems , sir plss help me out
1- you have taken mc donalds straw then u say that the metal which are placed inside straw should be 15 mm apart , sir how is that possible ? sir is it the diameter of the straw?
for placing metal 15 mm apart i used pvc rubber pipes of 15mm dia.so sir plss tell me what should i use ..
2-sir in one of the comments replied u mentioned that metal should not touch pop filled … so u used hot glue … sir i wanna know should i dip whole metal stick in hot glue then put it in straw?sir i am not sure that it will work after that…
3-i have tried using silver wires.i just bend silver wires from the top n place then in the straw making wire touch the boundary of the pipe … sir m doing it rite way ? because sir the way i am doing it my silver wire is placed naked in pop and i am nt using any hot glue…
4-what should be lenght of the metal wire used ? if i using 4 cm length of the wire , what should be length of the straw in which i am filling pop . generally i hv taking 1 cm more length of the straw….plss tell …
5-sir last thing , my desired resistance is 100k ohm minimum for dry state to indicate that my plant needs water and in when state it should be less than 100k ohms.sir i am attaching the link of my project which i want to create soil moisture sensorhttp://www.redcircuits.com/Page18.htm . plss help me specifications also if its possible for you..
thank you sir, seeking ur quick reply
11.8 years ago
hmm, in just new to this innovation since our way irrigating our lawns and gardens is prehistoric, just want to ask if those probes works at larger range of areas? how large the area it can detect the moisture?
11.4 years ago
Just wanted to know relationship between the distance between the probes, the length and the resistance it creates when placed in soil . Is it related to permittivity?
11.3 years ago
[…] moisture sensor there are a few options. First is the classic two galvanized nails, second is the cheap gypsum soil moisture sensor which I have written up in the provided link. Lastly if my personal favorite the Vegetronix soil […]
10.7 years ago
Great idea! I can make several of these for my garden, can I use clear tubing instead for a more professional look?
10.5 years ago
Nice site, reminds me of my early research about 10 years ago. I found any porous ion rich material like gypsum or plaster of Paris do not dry out as quickly as the soil, plus they clog in time from small soil particles. Flash forward 10 years, and I now am selling an affordable watering system based on soil moisture – meant to be affordable and dependable. See https://watergreat.com BUT, no one give up on their experimental dreams – we all learn.
10.3 years ago
[…] moisture sensor there are a few options. First is the classic two galvanized nails, second is the cheap gypsum soil moisture sensor which I have written up in the provided link. Lastly if my personal favorite the Vegetronix soil […]
10 years ago
[…] I have been happy with my homemade gypsum soil sensors I decided to try out a commercial option hoping for better accuracy and longer life. This is […]
10 years ago
Waoh! Actually i feel very informed about the sensor. I have tried to make one since 2009 but now i will coz am comfortable in handling it bt can we improve it in such a way that it can also be used by a BLIND PERSON ??
8.8 years ago
Awesome!! I have been struggling with the insertion of nails myself for years! I never could keep the distance between the nails consistent and always got varying readings. Eventually I ended up buying this soil moisture sensor. Though it has worked fantastic for me, I can’t believe that all this time I could have just created a gypsum mold as a container for my previous sensors!
8.8 years ago
Good to see you like your purchased sensor. Be aware that capacitive sensors, used in low frequency will produce incorrect readings with varying soil salinity (including fertilizer concentration). Also, the gypsum sensor will take much longer to dry out than your soil, and will plug up after a few months with ground water micro debris. Believe me I tried them all when designing my WaterGreat line of moisture controllers. See and a general comparison of sensor technologies at
8.8 years ago
[previous post cut off] See and a general comparison of sensor technologies at
8.8 years ago
[Links not posting right] Good to see you like your purchased sensor. Be aware that capacitive sensors, used in low frequency will produce incorrect readings with varying soil salinity (including fertilizer concentration). Also, the gypsum sensor will take much longer to dry out than your soil, and will plug up after a few months with ground water micro debris. Believe me I tried them all when designing my WaterGreat line of moisture controllers. See http://www.wrri.nmsu.edu/research/rfp/studentgrants07/reports/Sevostianova.pdf title: Accuracy of Moisture Sensors in Saline Soils – University of New Mexico and a general comparison of sensor technologies at https://watergreat.com/5soilsensor.php title: Soil Moisture Sensing and their limitations
8.7 years ago
[…] just stumbled across a DIY soil moisture sensor project, using the way moisture affects conductivity through a piece of chalk. Not sure it would […]