Search Results

Money-Saving Tips for the Organic Gardener

image

Organic gardening is a hobby many find relaxing and rewarding, and you can take a bite out of your produce bills by eating the delicious fruits and vegetables your efforts yield. However, between the many different planting and gardening tools and supplies you’ll need, the costs can really add up, and anything you can do to save a buck or two here and there will help. Fortunately, there are all kinds of simple money-saving gardening tips for the organic gardener looking to keep expenses under control.

Save Money on Seeds and Planting

If you’re looking for plant trays, hold off before buying brand-new ones. Many garden centers and nurseries will be more than happy to give you their used ones, so be sure to ask if you’re heading out there to pick up seeds or supplies. You can use them as starting pots; they work especially well for kicking off a hardy plant’s growth cycle.

Reusing household items for your gardening whenever possible is one of the best ways to save a few bucks. For example, rather than purchasing seed storage containers, you can use empty film canisters, which you can label to ensure you know which seeds are which. Separating individually started seeds in yogurt containers, plastic bakery trays or ice cube trays is another strategy you can use.

More Money-Saving Organic Gardening Tips

If you’re new to the world of organic gardening, it’s a good idea to get secondhand tools and supplies; you may also find it worth your while to choose plants that are easy to grow and care for so you’re not wasting time and money on finicky, fragile and difficult plants. Mint, lemon balm, thyme, sage and rosemary are excellent beginner herbs. Garlic, radishes, kale and potatoes are recommended vegetable crops for new organic gardeners.

You can cut down on your water usage by harvesting rainwater and creating tiny irrigation moats around your garden that allow you to store water and direct it to where it’s needed. Plants thrive when they’re given rainwater to drink; it’s naturally softened, free of chemicals and additives, and it’s pH-neutral, which in turn helps you maintain the proper pH level in your soil.

Get creative to save even more. If you have old tree stumps, make them part of your garden plan instead of paying several hundred dollars for professional removal. Simply hollow out the center of the stump and grow plants in it!

About the Author

Dontel Montelbaun is a lead writer for www.livetogarden.com, and is an advocate for organic gardening. On LiveToGarden.com you can find articles from Dontel focusing on flowers, outdoor living and landscape design.

Do have have to follow the directions on the back of my seed packet?

image

Though the advice on the back of a seed packet gives some great information, they are recommendations and their advice may not exactly apply to your garden.

First is row spacing, many times you read something like “plant seeds 3 inches apart in rows 1 foot apart”  This brings up some immediate logic of why can the plants be 3 inches apart one way but 12 inches in another.  This sort of thinking the premise for intensive gardening techniques such as square foot gardening.  This is where instead of growing your plants in rows you plant them in a grid pattern making best use of your growing space.

Now even these spacing requirements are actually optional.  All plants compete for resources to survive.  This can be sunlight (or even shade from sunlight), nutrients, water, airflow, etc.  Depending on the quality of your soil and frequency of watering you can push the limits of your growing space.  Assuming you add some fresh compost easy season and possibly do some side dressing with an organic fertilizer like fish emulsion or alfalfa pellets you can easily reduce this space and still have high yields.  I did just that with my cherry tomato plants whose seed packet is above.  I planted these about a foot apart and got great growth and yields.

One other factor is how you grow.  If I was growing my tomatoes in cages my foot space probably wouldn’t even be technically possible but since I grew them on a netting this allowed for spread out much more naturally and provide adequate sunlight and airflow.  Keep this in mind when growing sprawling plants such as cucumbers and squash using some vertical space can free up the valuable growing space on the ground.

The last factor depends on when you are going to pick them.  If you are growing onions to simply pick as green onions you don’t have to give then the 3-4 inches needed for their bulbs to grow.  You could easily plant an inch apart since you are going to pick them before they are competing for resources.  A similar idea is growing for micro greens, plant picked when just a few inches tall.

Though I wouldn’t say to completely ignore the back of your seed packets, just make sure to use it as a guide not a requirement.

Finish outdoor seed planting with coffee grounds

It has been a blessing that the competition for free coffee grounds at the Starbucks at my work has increased now the weather warmed up and I have freed from the temptation to grab yet another free shiny silver bag of grounds.  The reason is, I have put four bags in my compost, worked generous amounts into my vegetable garden and I still have six bags left.  Now I am looking at inventive ways to use the rest up.  I tried mixing with perlite to make a cheap potting soil (failed still no room for roots) but I believe I have come across one success I thought I would share.

When you are finished planting seeds outdoors apply a thin layer of coffee grounds.  This will deter slugs from going after your new seedlings and keep cats from mistaking your nicely loosened and raked soil for their kitty litter. 

I have done this for my larger seed plants (peas, garlic, onions, cilantro) but for the small seed plants (carrots, lettuce, spinach) I used the coffee grounds as a seed covering.

So far the results are great.  All of my peas/garlic/onions/spinach have sprouted with no signs of pests (four-legged nor zero-legged).

Growums seed gardening kit for kids review

023

I am a sucker for kids seed growing kits especially when I pass by them on clearance.  The one I found was the Growums Herb Seed Kit at Lowes on clearance for $2.49, though typically they run for $5 so not a bad price at retail.

The kit includes 8 peat pots, bottom watering container to hold them, and ~20 seeds of basil, cilantro, oregano, parsley (each with matching labels for each peat pot with colorful characters on them. 

image

It also came with a secret code that gives you access to an online site where the kids can watch for directions on how to start their plants and some additional advice on topics such as watering and pest control in short animated videos which had a bit of a Veggie Tales feel to them (minus the religious stories)  The site also features a few garden related games for the kids to play.

Overall I like the design of the planter as it is very easy to setup basically place it on a sturdy container (cake/pie pan) and add a cup or so of water and watch the peat pots grow and plant 3 seeds in each pot and then water as needed and bring outdoors.  I think the online portion is a nice touch to get your kids/grandkids dig a little more into the caring part of the plants versus planting some seeds and heading on their way.  Given this uses standard sized peat pods you can easily use the planter again and again with the remaining seeds or any other variety you choose.

Along with the “herb garden” we got they also offer a “taco garden”, “salad garden”, “pizza garden”, “ratatouille garden”, and “stir-fry garden” which offers different selections of seed varieties associated with the theme.

How to determine your seed germination rate

Whether you are trying to determine if those seeds you have been stored for 3-4 years are still good or questioning your ability to harvest seeds on your own testing germination is a great way to take away from of the guesswork and avoid disappointment next spring.

The process is very simple, I believe I did the same thing in second grade during our plant section.  Though that was to observe how a seed sprouts/roots the concept is exactly the same.

IMG_4124

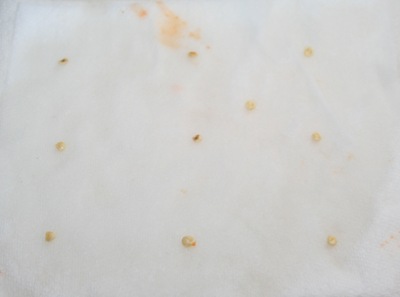
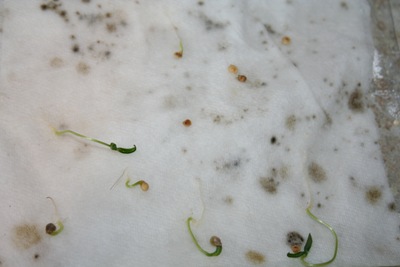
Take a wet paper towel and place 10 seeds on it and place the wet paper towel in a Ziploc bag.  After a few days (or weeks depending on the normal germination rate) check back on your seeds and count how many sprouted.

IMG_4165

In my case six out of ten of the jalapeno seeds sprouted.  So just do the simple math using the following formula:

Germination rate = (# seeds sprouted/# total seeds sprouted) X 100

So in my case:

(6 seeds sprouted/10 seeds total) X 100 = 60% germination rate

Of course the more seeds you use in your “trial” the more accurate the results will be for my purposes the error rate is good enough for me.

If I was a seed seller this would be disastrous since most distributors have germination limits (90-95%), but given these are for my own use and I have about 300 more seeds that I will use no major loss.  Though I will need to remember when I plant these out I will want to plant 2 seeds per cell to have good odds one of the seeds will germinate.

Another option is to give your 4 year old a handful of seeds and a pot full of dirt and see if most of them sprout.  Much less scientific but my daughter didn’t seem to notice.

How to save onion seeds from the garden

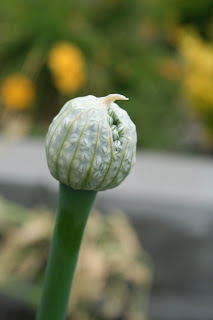
In the past I have harvested seeds for cilantro which worked so well I have decided to try more this year. Now my gigantic onions are producing seed stalks and umbels are beginning to open seems like a good time to try harvesting my own onion seeds.

To save these seeds it is pretty simple, when the umbels have dried out and begin to open. At this time carefully cut them off (making sure that seeds do not fall) and place in a them in a cool dry location for 2-3 weeks. I prefer to put my harvest seeds in the refrigerator in a paper bag. It is a good idea for onions to cross pollinate so I will plan on buying some other onion seeds to mix with the ones I am harvesting to allow for cross pollination.

Onions take 100-120 days from seed to maturity, if you start from sets which you grow from the previous year can shave 3-4 weeks off that time. I could make my own onion sets by planting 30-40 seeds in a square foot area during late summer. After two months rake over the tops and let them turn brown and dry out then store them in a dry place until next spring.

My PC grow box will be empty 10 weeks before my last frost date so planning on starting my onion seeds in there moving them outside 4 weeks before the last frost.

If you want to learn more about saving seeds for onions or other vegetables be sure to check out International Seed Saving Institute which has great advice about saving seeds from dozens of different plants.

IKE