Drying peppermint leaves
14.1 years ago dehydrator, herbs, peppermint

Excited to try out my new to me food dehydrator, I collected some peppermint leaves from my 2 year old peppermint plants which is fighting the confirms of the 1 gallon pot I have used to keep it from consuming my entire flowerbed, lawn, house, etc.
For the best potency, it is best to collect mint right before they start to flower and first thing in the morning when their oils are at their peak. Given it is a couple months before they will be flowering I picked them in the early afternoon.
If they were dirty you should wash them off and pat them dry with a paper towel and add directly to your dehydrator. In my case we had a rain the night before and they were very clean so I skipped the washing step.
Next I simply put them into the dehydrator at 100F degree and in a few hours later they were all crumbly and looked like what you see below.

To store the leaves I went with the poor man’s vacuum packing technique…Ziploc bag and sucking the air out with a straw which should keep the herbs fresh for a few months.

Lastly I tried out the product by taking a pinch of the leaves and quickly breaking them up with my fingers and added them to a tea strainer.

After a few minutes of steeping I had some good looking and tasting peppermint tea.

I would say my testing of my new dehydrator was a success…now off to see what else in the fridge I can dry out.
Tags: cheap, garden seeds, herb garden, outdoor plants, pepper plants, peppermint plant, vegetables
Sometimes it is cheaper to not make something yourself
14.1 years ago dehydrator
Though I will be the first to agree it is much more fun to make something homemade, but in my case this weekend I was better off just making a purchase.
I am growing plenty of herbs this season and want to dry some for convenient use during the cold season. I got the idea to make my own herb dryer. The basic design was to make several one foot squares out of cheap 1” by 2” lumber and attach some window screen stapled to each. Then simply stack as many as needed on a base which consisted of a couple CPU fans and heat source (actual heater coil or light bulb)
In the end my projects was going to cost about $15, which was a great improvement over the $200 price tag on a non Ronco infomercial food dehydrator which requires rotation of trays due to uneven heating.
In an attempt to kill a little time with my two daughters while I know my wife was taking a nap at home I was drawn in by a Garage Sale sign in the distance and found this beauty for the low price of $10.

For those in the food dehydrator circuits this is an original Equi-Flow 7010 and after plugging it in appears to still work great given dark wood construction, I am guessing it just a few years younger than I am.
Time to play with my new toy…
Tags: cheap, herb garden, led, vegetables
Earth Day in the garden
14.1 years ago cilantro, cold season crops, garlic bulbs, onions, peppers, tomato
I decided to take the day off to catch up on some things at home and as I ended up outside of course I went right to the garden.
We have seen a few warm days here in the Northwest and in my area we haven’t dipped under 40 degrees at night so seemed like a good time to plant a few of my tomatoes spending their time this winter in the grow box.


Above are a New Yorker and Persey both of which are new for me this year. They have been growing great even with my neglect during their youth. I also have some Green Zebras, Husky Cherry, Sweetie Cherry, and Yellow Cherry. I did attempt Red Brandywine but the seeds I got appear to be duds.
Given it is always good to have a Plan B so I have twins of these tomato plants still in puts which I can bring if a cold snap comes and kills off the plants I ambitiously planted in the ground.

Elsewhere in the garden I have some herbs: Parsley and Oregano, with Basil being an unfortunately casualty which I will plan on buying from the store and try again next year.

Next I checked out my larger garden bed to see my peas, cilantro, onions, carrots, lettuce, strawberries and garlic


Lastly I checked out the peppers in the grow box which they will stay until we have some warmer nights (at least 50 degrees) otherwise can cause significant stunting of growth. So until then they will remain happy in the grow box and given they are still pretty small, still plenty of room to grow…


Tags: cheap, cilantro, garden seeds, garlic bulbs, growbox, herb garden, outdoor plants, pepper plants, strawberry plants, tomato plants, vegetables
Life in the growbox
14.1 years ago indoor growbox, peppers, tomato

Right about now the temperatures outside should be increasing and I should be thinking about start hardening off my summer plants over the next few weeks.
Unfortunately we seeing hail the past few days along with some pretty cold nights. Looks like even though I was fairly pessimistic about my last frost date I may have another battle of tomatoes/peppers over taking the growbox or bring them out into the elements a little too early…
To make a little room I did move my herbs (oregano/parsley) out to the cold frame with the basil struggling to survive in the growbox I will give it a little time to bounce back.
Tags: cheap, growbox, herb garden, outdoor plants, pepper plants, tomato plants, vegetables
Robotic Wheel Barrow
14.2 years ago arduino

If you ever have spent a day hauling soil/gravel you know this can cause some serious pains in your back. Now with the Lawnbot 400 you can save some pain and let the evil robots do the hard labor for you.
The project started as an arduino powered lawn mower with a custom PCB motor driver powered by a couple of wheel chair motors, which mike many projects he just couldn’t stop improving. Great work…
Tags: arduino, cheap, vegetables
Solar Powered automated Rain Barrel watering system
14.2 years ago electronics, water
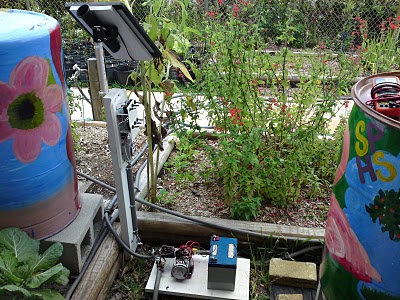
This is a very cool project, grab a few rain barrels, timer, water pump, and a solar panel and have automated the tedious task of watering. With all the rain we get (especially this week) in WA could fill up a dozen barrels in a short time. My only suggestion would be to add a moisture sensor to only water when it has not rained lately.
Might be another project to add to my ever growing list…
Tags: cheap, vegetables


