Using used coffee grounds in your garden/compost
15.3 years ago cheap, compost, fertilizer
 I have wanted to leverage used coffee grounds in my garden/compost but not being a coffee drinker myself I never seemed to be able to have the right timing to find any at local coffee shops. Recently a colleague taunted me with a picture from his cell phone of a few bags in the coffee shop in our cafeteria at work and my quest began.
After just two days I have accumulated 40 lbs of coffee grounds, now how can I use this stuff in my garden?
- Throw it in your compost: Coffee grounds are 1.45% nitrogen and contain calcium and magnesium to add some trace minerals you may not get from your other organic material. Coffee grounds are a green material (I know coffee is brown, but same idea as grass clippings) so you should add with at least equal amounts of brown material (leaves) but if you are like me my browns are way to high already.
- Add it directly to your garden: I have seen some arguments that coffee grounds are acidic, but others claim it loses most (or all) of its acidity during the brewing process. Due to my natural curiosity I need to know the answer. So the answer is, it has an average pH of 6.9 so for all intents and purposes, it is neutral. Though if you are really tired and forget to brew it, it will be somewhat acidic.
- Fertilizer: Sometimes your plants need a little boost in the morning as well. Simply add a couple cups of coffee grounds to a bucket of water and let it seep for 24 hours and apply to plant in the same way you would compost tea. Using gardener terms I can’t think of any better name for this as “coffee tea” If you are busy/lazy you also can use it as a side dressing on top of your soil and let the rain seep it for you.
- Annoy your pests to stay out of your garden: It has been said that coffee grounds can deter cats from using your garden as their own personal commode. There are also reports that it can deter slugs as well. I am not sure if it is the abrasive soil effect on their sensitive underside or just the cruel reality that with their slow pace they can’t do anything with the caffeine rush they get. Coffee grounds may annoy ants to convince them to move their home elsewhere.
- Feed your worms: To worms this stuff is like ice cream, if you listen carefully you may hear them cheer your name when you add a handful to your worm bin when your greens from the kitchen may be a little lacking.
According to Starbucks brochure I picked up on my last visit, you should use the coffee grounds within 3 weeks to get the most nutrient value, though if you are composting I am sure you can start out the process in the bag if you really want to. Given that 16.34 billion pounds of coffee is produced each year there is plenty for you to save from ending up in a landfill. This is a great way to help the environment while also adding value to your garden without affecting your pocketbook.
Tags: cheap, coffee grounds, compost, organic vegetables, outdoor plants, worms
Control two 120v electrical outlets with your computer
15.4 years ago computer power control, electronics, solid state relay

Here is one more component for "Project Everbearing" which requires the ability to toggle a 120V power source using my PC. Now there are a few interesting applications for this, home automation, music synced Christmas display, or just the nerd factor of being able to say I can turn on my coffee maker from your web enabled phone. Whatever your need, hopefully with these instructions you can do this yourself.
If we had lawyers, they probably would want us to say this:
WARNING: I am not an electrician and do not pretend to be one. I do not know the specific building electrical codes of your area, so please be sure your wiring is completed under the proper safety code for your area. As always, using high voltage electricity can result in self-electrocution or burn down your house if not done safely so if you are not comfortable doing this wiring please contact a qualified professional.
Materials:
- 2 – 20 amp solid state relays (got off eBay for $4.00 each)
- 1 – Outlet box (Home Depot for $2.00)
- 2 – 20 amp outlets (Home Depot for $1.25 each)
- 1 – 2 outlet switch plate (Home Depot for $0.50 each)
- 1 – PC power cable
- 2 – LEDs (optional)
The outlet I am plugging this into is 15 amps, though my use for this project will be considerable under this but best to place for worst case scenario and I would rather trip a circuit breaker than who knows what happens when solid state relays or outlet exceeds their limits. I could have saved a couple dollars and gone with cheaper mechanical relays but solid state will last much longer even with frequent toggling on/off.
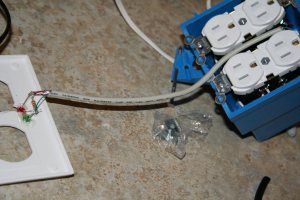
Now for the build, this was actually surprisingly easy and took less than an hour from start to finish. I first fed the power cable through and three stands of low voltage wire through access in back. I cut about 6 inches of wire off the end of the power cable. Using the continuity feature of my voltmeter I verified the hot, neutral, and ground, then checked one more time. I attached the neutral and ground in parallel to both outlets. I then connected the hot from the power cord to left side of both SSRs. I then used the 6 inches of wire I cut off to connect from left side of SSR on both and connected a wire from the left side to the corresponding outlet.
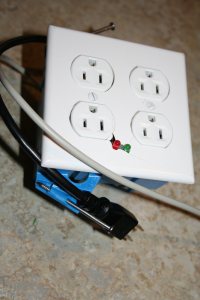
Now to add the ability to turn the things off/on using low voltage. I hooked up the wires fed through the back (which will later be hooked up to computer’s parallel port) green to positive SSR #1, red to SSR #2, and black to both grounds. Now with 3-12 volts of power to these connections will activate the SSR and provide power to the outlet. For a little added effect and easy confirmation everything is working (even with the unit unplugged) I also attached corresponding red/green LEDs that match the wires (I am getting old color coding helps) I was doing this hack indoors though first thought was to use my soldering iron to burn a nice little hole into the outlet plate but didn’t want to stink up the house, so risked using a drill instead. As you can see from the pictures I should have gone outside. With a little solder and hot glue everything seemed to be staying together. 
With all the wiring completed, I carefully packed everything into the outlet box. The SSR were already pretty snug but I added little but of hot glue in case they feel like shifting around after everything was put back together. Being careful that wires are staying secure and no shorts are being created carefully screw the outlets to the outlet box. Finish it up with a (cracked) outlet plate and the assembly is complete.
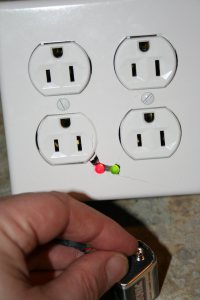
Now the scariest part still remains, which is testing, first part is plugging this monster in. If you plug it into the wall and no sparks occur you are in pretty good shape but not in the clear yet. Plug something like a nightlight into your switchable outlet box, should be off now. Using a 9-volt battery connect black to (-) and red to (+) if you didn’t cross your wires anywhere the red LED should come on and appliance plugged in should get power. Now switching to the other side do the same with the green wire and appliance comes on with sparks or fires looks like a successful build. 
Tags: cheap, coffee grounds, led, vegetables


