Hardening off plants in the grow box
15.1 years ago computer, computer power control, cucumbers, electronics, indoor growbox, tomato
When you have seedlings growing indoors or a greenhouse during their life they have had the opportunity spending it in a near perfect environment with controlled temperatures, consistent lighting, no wind, etc. If you take this happy plant and move it directly into the wild (your garden) it can, and probably will, go into shock leading to its sudden death. The solution to this problem is to hardening off the plant. This is a process of slowly getting the plant accustomed to the real world environment a couple hours at a time.
You start by bringing the plant outside for two hours in the late evening or early morning hours. If the plant begins to wilt let it recover indoors until it appears healthy again. Each day increasing the amount of time it is exposed to the outdoors over 1-2 weeks period, or until the plant can survive a full day/night outside. At this time it is ready to get its permanent home in your garden.
This process takes a lot of patience, which as they say is a virtue. Unfortunately I believe I am missing this virtue. My history of hardening off plants follows a similar pattern; bring out a plant in the evening with the full intentions of bringing it back in after a few hours, unfortunately I forget and it spends its first day out in the cold all night which normally the demise of my summer plants.
![image[18]](http://www.cheapvegetablegardener.com/wp-content/uploads/2009/03/image18.png)
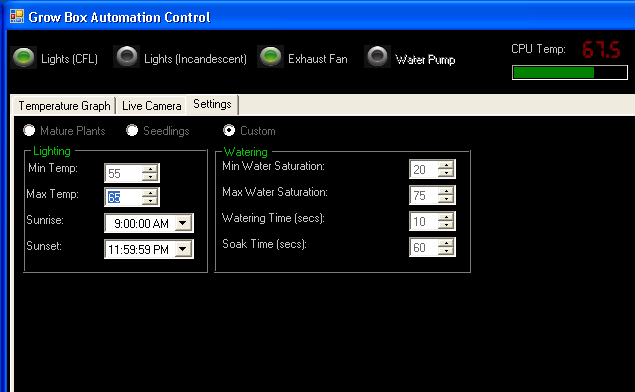
This year I am using my grow box to harden off my plants. Normally the grow box runs at about 68-72 degrees which is a great environment for my seedlings. By allowing some hot air to vent and lowering the maximum temperature setting in the software I am able to bump the temperature down to a range of 57-65 degrees. After a few days I will drop the temperature a few degrees until it has similar low temperature to the outdoors, while still staying at a safe temperature for the plants.
Given today using an unknown neighbor’s weather station we had a high of 48.2F and low of 35.1F I still have some time before I can safely bring my tomatoes/cucumbers outside but they should be toughened (hardening) up and ready to go when it is.
Tags: cheap, garden seeds, growbox, led, outdoor plants, tomato plants, vegetables
Tending your garden with am army of robots
15.1 years ago computer, electronics, garden maintenance
I must say gardening and robotics are a couple of non relating interests, well at least until now. Fortunately some smart students at MIT have joined these two areas into one. I am a little skeptical about the real world implementation of this, I guess if production cost was low enough and you had a large enough green house; a little army of plant tending robots would be a cool site to see.
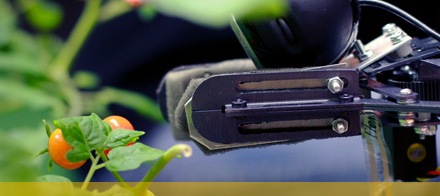
Either way, this a really cool academic project. See the video below for the robots watering and harvesting some tomatoes.
“The idea for the project came from work done by Nikolaus Correll, a postdoctoral assistant working in Professor Daniela Rus’ Distributed Robotics Lab. Correll, who came to CSAIL in 2007, saw the possible applications of swarm robotics to an agricultural environment. In the long view, the researchers hope to develop a fully autonomous greenhouse, complete with robots, pots and plants connected via computation, sensing and communication. Each robot is outfitted with a robotic arm and a watering pump, while the plants themselves are equipped with local soil sensing, networking, and computation. This affords them the ability to communicate: plants can request water or nutrients and keep track of their conditions, including fruit produced; robots are able to minister to their charges, locate and pick a specific tomato, and even pollinate the plants.”
[via MIT via Make via Gizmodo]
Tags: outdoor plants, tomato plants
EasyBloom plant sensor review
15.1 years ago computer, EasyBloom, electronics, gadget, garden planning, product review

I will admit, I have a weakness for electronic gadgets, when I got wind of the EasyBloom I just had to try it out. The EasyBloom plant sensor is a device with built-in sensors to measure light intensity, humidity, temperature, and moisture content in your soil. It has three basic modes: Recommend, Monitor, and Water.
With the Recommend setting you place the EasyBloom into a location you want to grow something, let it sit there for at least 24 hours, plug it into your computer, and it will provide a detailed analysis of your planting area and provide a list of plants that would thrive in that location.
The Monitor setting allows you to diagnose problems with a particular plant. You first define the type of plant you want to monitor, turn on the device and place it next to the not so healthy plant, water, return 24 hours later, and plug it again into your computer. It will use the data stored in the sensors to give you a diagnosis to what the plant’s ailment might be.. Of course, this will not diagnose various pest or disease issue but can let you know if you have planted a little too early, in the wrong location, or are not watering enough (or too much) based on your soil structure.
Finally it has the water setting which the name should imply, will notify you when you need to water your plants.
To test this thing out I had three locations in mind to take measurements, each of which would provide a huge diversity of readings.
First, I put the EasyBloom in my grow box in the Recommend mode. I have complete control over the temperature and lighting I definitely could confirm the devices accuracy and I expected to see decent diversity of plants recommended. After placing the device in my grow box for almost 24 hours (see missing results below)

Overall the readings were nearly exactly what I expected though I was hoping to get a full sun rating, guess I may need to add an extra bulb to the box. Even with my conditions it did recommend 176 plants that I could grow inside it to maturity, though I am going to demand a rematch after adding a little more light

Second, I brought the sensor and set it up next to my office window. Currently I am growing Lemon Verbena I transplanted from my garden. I wasn’t concerned about moisture content so for this reading I didn’t include the moisture sensor and here were the results that were returned.

After this result I felt a little better about my grow box since it at least it was beating of an eastern facing window sill. With this result the program recommended 92 shade loving plants with Lemon Verbena not being one of them, though I have been providing some supplemental light to the plants.
Finally, I used the EasyBloom on my southern facing fence line plot (where I normally grow my cucumbers and tomatoes) This is where I wondered of the usefulness of EasyBloom to actually give good information about planning a garden in the offseason. Though I can not grow tomatoes outside right now due to cold, would it still let me know that it was still possible. Well here are the readings:

When I put the sensor outside it was raining pretty hard so passed the “weather proof” test. Though it did clear up the next day which is reflected in the “Full Sun” light reading. This was the obvious winner with 3458 plants recommended with the over 5000 in their database.
In conclusion, I will be the first to admit that the EasyBloom would not be on the necessity list for gardening tools, but for a beginning gardener it could provide some valuable incites to help your first few years be much more successful. For nerds/geeks like me it is a pretty cool toy, that I will be sure to be using in testing new lighting and grow box designs in the future.


Tags: cheap, growbox, led, outdoor plants, tomato plants, vegetables
Vegetable Gardening Software Review
15.2 years ago computer, garden planning

When it comes to planning my vegetable garden I must say this is definitely one of my weaknesses. I make a good attempt to map things out on graph paper ahead of time only to decide to add/remove a crop and eventually resort back to my memory and then get a surprise when I find I planted carrots and cilantro in the same place.
Given I am required to spend around 10 hours a day in front of a computer my first thought was to find a solution online in the form of some sort of vegetable gardening software. I tried some trials of several products and got so frustrated I was about to create my own when I came across GrowVeg.com. After signing up for their 30 day trial within 15 minutes I had my gardens planned out and saved for future reference.
Now if when I change my mind on planting preferences I can easily modify my plan to the new desired configuration. When I see easy I really mean it, it completely passed the “I am a man and don’t read instructions” test but there are some helpful video tutorials for those with more patience. I can honestly say it is so easy a 4-year-old can do it. She saw me “playing” with my garden and asked if she could “play” the gardening game as you can see below.

Once my daughter was done with her garden I proceeded to check out some of the other features. The next feature I came across was by clicking on any of the plants it would return helpful plant information from how to plant, how to harvest, and even how/when to apply fertilizer.

Definitely the feature I was most impressed with was the planting schedule it automatically generates after you have added plants to your plan. Not only does it tell you when to plant but also when to expect your harvest. What I love about this is, if you are like me, you can’t decide what your frost date is, you can simply change it in the settings and the schedule automatically updates. Now if you are forgetful like me, there is even a feature to notify you by email when it is time to plant your seeds.

Once you have built your history of garden plans throughout the years, the program will use this information my warning you if you are planning on planting the same type of plant in the same location you did before. This enforcement of crop rotation can significantly help reduce the accumulation of soil borne fungus/disease.
For more information see GrowVeg.com
Tags: cheap, cilantro, garden seeds, outdoor plants, vegetables
How to determine your own personalized last frost date from local weather station
15.2 years ago computer, last frost date
There was a discussion in comments on my previous average last frost post on how to determine an accurate last frost. A great point was made by Daphne where every garden can have its own microclimate so the date you find online or in a book could be many weeks off for your microclimate in neighborhood.
To be able to predict your last frost date accurately it takes some history, if you have lived in your current residence and happened been capturing your temperature data accurately by memory or paper you may the information to predict your last frost date.
For people that are relatively new to their residence, like myself, I felt there I had very little information to determine an accurate prediction of my last frost date. This was until I remembered Weather Underground which logs results of schools or private individual that register their weather stations.
After a quick search I was able to find someone who had a weather station in my neighborhood. After doing a custom query of the full range of the of the weather station, which in my case was a little over 4 years, I had all the information I needed. By carefully adding a horizontal line at freezing using a graphics program (Microsoft Paint) I could easily see where the low temperature dipped below the freezing mark.
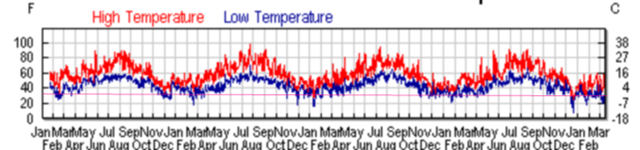
From a quick glance at the data it appears that the first week of April is a pretty safe date for past few years. But if you look the the irregular low temperatures we have had this month this might be harder than I thought.
Now of course your neighbor may a different microclimate than you, but should get you in a better ballpark than the generic number you find fro your city. You could always spend $500-$1000 on your own weather station to get some better accuracy, but for me seems close enough to me. Though the weather station would be a really cool gadget to have.
Tags: cheap, vegetables
Remote monitoring of computerized grow box
15.2 years ago computer, indoor growbox

My wife saw this wireless indoor/outdoor thermometer on clearance at Eddie Bauer and knew this was something I could use. I simply put the wireless sensor in the computerized grow box and instant temperature monitoring where at a quick glance I can be sure my summer vegetables are toasty warm in the garage. Sure, I could connect to the machine remotely, or look at the backup digital thermometer inside the box, or check the LCD panel on the box but this definitely gives some piece of mind at a quick glance. This may be a somewhat lower tech solution, but it works. At least until I get around implementing my other ideas and then I can actually know what the temperature is outside.
[As you can see from the indoor temperature we are not just cheap in the garden.]
Tags: cheap, growbox, vegetables


