Computer controlled grow box – Part 1

The Idea and Design
My PC Grow box was very effective though it did have some shortcomings along with my desire for tinkering caused me to create a new version code named “Project Everbearing” after the test subjects for the project, several Everbearing strawberry plants I propagated from my garden last Summer/Fall. The specific shortcomings I wanted to overcome were temperature control and limited size. My grow box has to live in my garage so on cold nights the temperatures can fall low enough to kill my summer seedlings (tomatoes/cucumbers) Size is an easy fix just make it bigger though it is more difficult to keep a larger grow box warm and still well lit.�
My solution to both of these problems was the addition of a computer to the system. First computers generate heat, using this along with computer controlled fans and incandescent lights (heater) allow me to regulate the heat to my desired levels. This is the point a normal person may have just stopped, but I am far from normal and decided a few more features, which I will explain more below.


The Structure and Insulation
First comes the structure, upon inheriting a set of shelves from my sister, we ran out of room for some of our existing storage shelves (see above), though we used the buckets to store loose toys on our new shelves we had the structure of the old one sitting in the garage for some time. After many passes by in the garage not knowing what do do with this shell, it finally came to me that this would be perfect for my new grow box, (Reduce/Reuse/Recycle) in action. The only customization required was the removal of a couple of the wooden dowels and I was ready to add some hardware. Of course you could do the same thing with an old bookshelf, cabinet or just with construct your own frame with a 12”X1”X8’ foot board cut in two along with two 1”X1”X8’ pieces of lumber cut into two. Screw one 1”X1” in each corner and should should have a pretty solid frame. For the top I used pegboard mainly because I bought a 4’ by 8’ sheet when I only needed half of it but worked really good to use zip-ties to secure various components and provides decent airflow between the computer and growing areas.
Second comes insulation, after some not so careful calculations and measurements I determined I could cover the 3 exposed areas with 2 sheets of 2’ by 4’ sheets of insulating Styrofoam. I glued and taped (duct tape of course) the Styrofoam which was cut using a utility knife and straightedge to cut to size making sure I made the top straight and flush. I then created an exactly copy of the other side and one more piece for the top. Using a long strip of duct tape I created a hinge for the top and glued side of the box. The last piece I simply fit into place using a tool box to ensure a tight fit but also allows easy access to plants when needed.
The Lighting
I went cheap on the lighting taking from the success of the PC grow box I decided to go with a similar setup using $2.00 home depot wired sockets hooked up to an couple old computer power cords. I went with two 24 watt CFL bulbs and one incandescent bulb. Though the incandescent is not as efficient and the CLFs it does provide a full spectrum of light and a little extra heat which the box can use in the many times cold garage where it lives. The CFLs and incandescent exist on two separate circuits so they can be controlled independently by the software.
The Software — Grow box brains
Now I know all of this could be done with a Basic Stamp or Arduino pretty easy, but I wanted the ability to track history and have a decent user interface to look at, so I wrote a windows form application using C#. To cover the basic functionality of temperature control I used the parallel port outputs hooked up to the computer’s parallel port to give the software the ability to turn the lights on and off. By configuring a “sunset” and “sunrise” time which I am in complete control over the lights will turn on and off as appropriate. I added some logic to ensure the plants stay at a comfortable temperature (thresholds configurable) by turning on the incandescent bulb when it is too cold and an exhaust fan when it gets too hot. In order to allow the computer to know these temperatures I used a PS2 controller to create two temperature sensors one for the area the plants are growing and another for the top area where the CPU resides (computer was too old to have onboard temperature sensor)
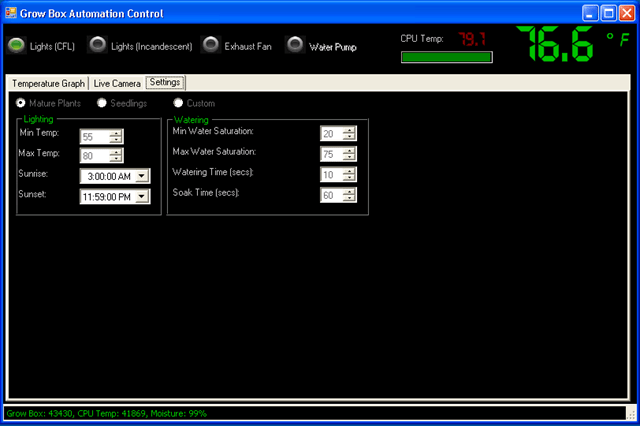
My daughter thought it would be cool if we have some sort of automatic watering system. I agreed, so I added a moisture sensor and created an algorithm to periodically check the moisture level and activate a water pump to add water until it reaches the specified moisture level. I still need to buy and hookup the pump but coding portion is complete and tested.
I live in the Pacific Northwest it rains a lot and can get cold in the evenings and I don’t want to trek out to check on my plants. solved this by adding the computer to my Wi-Fi network now I can take look at them by connecting to the machine wirelessly and see how they are doing through it’s webcam. I also take periodic pictures of the plants so I can create cool time-lapse videos of progress like the one below. I also have the ability to browse through pictures taken at specific time periods.

Finally to store all of this data I installed SQL Server 2005 Express (free) which allows me to track historical data of the conditions and images over time. If you have data, you definitely need some graphs. Being too lazy to do this graphic work I leveraged ZedGraph (free) to allow some visual tracking of temperatures and moisture content.

Features for future versions (Beta 2?)
- Finish automated watering
- Add automated red LED lights for flowering stage
- Install LCD Panel
- Make box look better (real door which does not require tape to open/close)
- Create single USB controller for lights/sensors
- Better/additional camera
Video of grow box “booting” up, personally I like the flashing lights when the computer sends signal through the parrallel port. If you are old enough to ever have a printer that used a parallel port this is when it would make its annoying sound letting you know it was alive.
Updates:
Computerized Grow Box Update #1


Uh, I think you need to change your blog name to the High-Tech Vegetable Gardener! That’s really impressive. Seattle Garden bloggers mtg. is all set, if you can make it – Sat. Feb 7, 12:30, Miller Library. Check my site for more details if you want to come!
Are you going to post this software?
I usually don’t comment on the hacks that are posted, but I would be a hater not to say I am impress with what you have going on. Nice!
First, that is very impressive. As for future ideas, incorporating a cistern would be a relatively cool and easy idea. Using the toilet innerworkings, you could have it monitor itself and fill with tap water if you were ever in a drought. Also posting the pictures online in real time would be interesting.
Wow! That’s cool.I would love to get a copy of your software. I have a similar project I’m working on using an ioBridge 204.It’s nice to know I’m not the only weirdo!
parallel ports are the only way to roll. I like to hear every peice of equipment connected to my PC boot everytime I reset.
Do the CFLs put out adequate light for fruiting plants? I tried a halide grow light for my cucumbers and they wouldn’t grow larger than an inch.
Karen, well the snow is melting so might be able to talk about dirt and seeds soon :)As for posting the software it is not currently in a state I would want to give it out and have the task of free tech support. Possibly when I come up with a more standardized USB controller or something likr ioBridge 204 that Joe mentioned then it could be easier for someone to leverage without being too painful.As for the light intensity of CFL, cucumbers are definately on the high enf for required lumens to flower. I normally grow those outside, though I am thinking of trying peppers inside the box during Spring/Summer since we don’t have the heat for them to due well here up North. Red LEDs could help with the cucumbers though haven’t tried it, still have to make my red LED grow light.
I'm living in the northern Norway, and we're mostly using electricity for heating … by the laws of thermo dynamics, it is extremely wasteful to convert low-entropy energy (electricity) directly into high-entropy energy (heat). For some years I've been thinking that one should use such "grow boxes" for the general winter heating. It just makes perfect sense for me – it's dark almost all day around, so to get fresh vegetables one anyway needs to use artifical lighting, and the energy cost for generating light + heat -> vegetables + heat should be just about the same as for generating just the heat. 🙂
Dont you need bees to get new berries/fruits growing?
Tobias, these things put out some heat but not sure how much it would help on a heating bill, maybe if you had really, really good insulation and you were not in a big hurry to get things warmed up :)As for pollination, yes most fruits require pollination to produce their fruit. Bees are one of the options, there is also wind and manual pollination. On my daughter’s science project just having a small CPU fan pushing in a little breeze was enough to pollinate, but for some plants might need to pull out a paint brush or vibrating toothbrush and take care of business yourself.
I guess you noticed your video got taken down, probably you had some illegal information on growing drugs (strawberries are considered an illegal drug in many countries). Please post again on another site like vimeo and update Hackaday.com too, you were featured there.
Tom, looks like they brought it back up. Sounds like a story line from a 60’s claymation TV Movie:King Lolipop has outlawed all fruits and vegetables from his kingdom and only our hero Fruit Man can restore the citizen’s health.
Hm.A friend of me were growing some other kind of plants, he was using more than 1500W of halogen lamps in a very small room, he claimed it was professional lamps formerly used in a greenhouse … and he had quite some problems ventilating out all the heat.I never thought of questioning why he couldn’t use some more energy-efficient lamps instead … I just assumed halogen was needed to get sunshine-bright light.
Please post the finished software this is remarkable I have wanted something like this for my green house for some time
At this point You should read about hydroponics, that is the way to automate gardening! You will need some containers, small aquarium water pump and a few items more, most of which are easily obtainable.For start you do not need automated monitoring of nutrient pH and salinity, it works fine for me without it.I have built quite a few systems without real automation, using just a simplest timer for pump.Unfortunately I do not have time to build a proper system with moisture sensor and microcontroller.As for a moisture sensor, better choice would be a “gypsum block” – those are available readymade, or can be easily made yourself, using stainless steel screws and some gypsum. That way it is possible to build many sensors that will be more-or-less identical.As for lightning, better choice would be standard luminescent tubes (not compact bulbs) – those are usually more efficient, and have much bigger surface.
KPL, just realized I didn't mention it in my list of upcoming features but hydroponics should have been on the list as well. One of the reasons I didn't just pickup a cheap fountain pump and got the automatic watering feature up and running sooner, want to have a pump that I can reuse for EBB & flood hydroponic setup.I have seen the gypsum block technicque but not sure where I can go pick some up, any suggestions?As for lights, hopeing to go ultra cheap with LEDs but see how that goes.
You do not need anything fancy for ebb&flow, cheapest pump works for me:) Ebb&flow is the simplest way to build that, my windowsill systems do not have any hoses at all.Get two similar plastic containers that fit one inside the other, rise one of them a bit on some kind of stand-offs. Height must be chosen so the pump fits between them.Lower container is a nutrient storage, pump sits in it; Upper container has a tight-fitting hole in bottom, where pump's outlet is mounted.Pump moves nutrient from the lower to upper container, after that it just flows back.You need a few more holes in bottom to make sure nutrient can flow back a bit so pump does not run dry.You need some screen above the pump outlet so it does not get any debris when nutrient flows back.That's it, you can put any kind of pots in the upper containers, and easily replace or move them as needed. I use clay pebbles as medium, since those were cheapest here.For gypsum blocks do a search on google, but I did not find cheap enough so built myself.LEDs will not help you, theay are much much much more expensive then ordinary straight luminescent tubes, preferably T5.I have some pictures but their location would not handle big traffic:(
Thank you for the post and the Ideas.I am thinking of trying something like this for tomato’s and green peppers. Have you thought of using Linux?It has apps for 1 wire sensors and home control as well as MySQL, Apache, PHP etc.You could write a daemon to do the work and a windoze client to monitor it from any where you have Internet as well as a web site on the monitor/control PC.If you decide to look in to that let me know I would be interested.
Do you monitor your carbon dioxide level? In an enclosed box like this with a long light cycle, plants could be deprived of it. (but if you've got fans…may be that's enough?) I've seen LED grow lights out there that claims to be more energy efficient and better for plant growth, I wonder if that could take the place of the CFL at some point. For insulating the box, I wonder if you shouldn't add a skrim (those reflective film) on the inside of your box. Looks like your box is leaking light right now. This may help in intensifying the light in the box and fit better with plants that have high sunlight requirements. A note about hydroponics, I personally am fond of ebb and flow, but the water containment (so that algae don't grow in it) and nutrient monitoring makes me think that good old soil growth is more hands off. aeration is needed in most easy to construct ebb & flow, that that equates to another pump, and another energy consumption on the system. But if I were to go with a hydroponic system with a computer monitoring program, I'd really love a system that monitors nutrient composition of the soil/water, and cartridges full of fertilizer components. One for nitrogen, one for phosphorus, one for potassium, etc. etc. I would think that some sort of printer part can probably be hacked to do this….
Please Please Please post your software somewhere, I think its great and would love to tinker with it. Sweet project! My wife is going to love her new automated garden…once I finish building it! ;P
AwesomeYou could look into using Arduino and processing to automate your grow box, I’m working on converting a wine barrel into a grow box, and then using the arduino microcontroller “system” to automate and manage ityou can have a look at the arduino on http://www.arduino.cc and http://www.processing.org Will put up a blog when i get my it working 🙂
you should look at what weed farmers have done concerning indoor gardening. consider a 400 W lamp and automated watering system (dangerous combination but worth it)
DanielDK, actually I mentioned the option of using arduino but doesn’t give as cool a UI :)Anonymous, they definitely know their stuff. Funny how money is always a good motivator. Good to remember more is not always better, perfection is not when you have added all you can but when you have taken away all you can.
man i agree. you should change the mane to hightech vegetable gardener. you are making something great, really im very skilled on electronic digital and analog. nothing of software programing. im amazed for your project, is complex and an total solution for automatized gardering facility, very complete!thanks for post your project!!!!!
Anonymous, thanks for the compliments, really need to work more on the digital/analog side though the PS2 controller solution works though it takes up a decent amount of space in the box and would prefer a cleaner solution. Sounds like I need to dust off my PIC programmer.
Have you considered posting your code to Sourceforge and making the whole project open source?You could release it and not feel pinned down by tech support. I think there is a large community waiting for open source software like this.Cool project. I love the plaster of paris moisture sensor!
Trivial edit: “duct table” should probably be “duct tape”. The rest of your (very interesting!) post is well edited, so I noticed the slip-up.Thanks for sharing your work!
Matthew, thats it I am fireing my editor…oh wait that is me…I have fixed the typo, thanks fro letting me know. I am sure I have hidden a few more out there for, uh people to find 🙂
Great project! I’m thinking about trying to put something similar together this weekend. I’m basing mine on a linksys-wrt54gl using openwrt firmware. If you open it up its also got 2 serial ports on headers that can be brought out. I’ll probably just use a cheap pic uC on the other end of serial to toggle the relays, read sensors, etc. The best part is it has built in wireless so you can just add to the web interface to check on you’re plants! No usb port though so camera is out of the question…
Please post your software. If you don’t want to support it, then just post the source code. Those who can compile it probably won’t be bothering you for support.At the very least, consider posting it on CodeProject or SourceForge to give others the chance to play with it and expand its usefulness.
With a box that small, adding CO2 might be cheap enough to get a good return on investment.
Hans, I am currently working with upgrading my parallel and the PS2 controller with an arduino along with some UI improvements to the software. Hopefully this will allow me to share my software in the near future.Anon, CO2 does sound interesting addition, though for my crops ~20% increased yield takes a while to get ROI.
Please consider posting your software, even if it isn't complete! I stumbled across this doing research for my own Arduino-automated gardening project and I would love to have some place to start.I urge you to embrace the OpenSource community, as we can get much farther porting this to the Arduino together! Please consider posting to SourceForge.Thank you for all of your work so far.
Who knows where to download XRumer 5.0 Palladium? Help, please. All recommend this program to effectively advertise on the Internet, this is the best program!
great stuff. thanks. especially like the christmas light LEDs.
Nice project !
ROI of CO2 ?
You could grow grapes and make wine 🙂
I’ve not automated my growbox that far yet, but it actually is pretty cheap to get CO2 & wine from sugar & yeast. It’s a bit tricky at first to get a constant flow of CO2, but hey, you could see it as another variable to monitor & control 🙂
I also wanted to use a PC to control my room, but I guess it’s going to consume more energy as the room itself 🙂
So, I hope to get the job done with an Arduino. It probably will be tricky to be confined to 32KB programming-space & 2KB of RAM while being used to lots&lots more.
But the prospect of discovering I2C, SPI, and lots of other techniques sounds very appealing.
Peeking at sites of weed-growers there sure are enough toys to tinker with 🙂
Still don’t know what I’m gonna ask when I sell my tomatoes though.
Yeah the 90 or so watts the computer uses is a but of a power waster though I like the cool graphics and data logging. I have thought about making a web based solution with arduino only though I agree 32KB could get used up pretty quickly.
As for CO2, sugar and yeast or vinegar and baking soda are defiantely options but sure if you do the math in the long run getting tanks is probably much easier in the long run. Have also though about using CO2 to regulate pH in hydroponics while also giving the plants a little boost. Maybe when I retire and don’t know what to do with my free time and free money 🙂
Green light not so green.
Recently, the BBC showed how you can roast a complete chicken in 90 minutes in an oven made of a 2-ft square box with 4 inch insulation, and 2 incandescent 100W bulbs. This goes to show how proper insulation will reduce heating needs considerably and how traditional lights waste energy.
Lighting with blue and red LEDs will reduce energy consumption further (some plants need blue light for flowering, the green light found in the ‘complete spectrum’ is a ‘complete waste’ as you readily can see: plants look green as they reflect green light.
Cooling your LEDs will give enough heat to keep a well insulated housing at the right temperature; venting off excess heat will be needed. An arduino-derivate will gladly replace that 90W PC and consume only 1W?
Wow, now I love projects that are just for the hell of it-you love projects that are just for the hell of it. I am not sure where exactly live but I imagine there are a certain type of green thumbs in your area that would love to pick your brain.
Really nice work. I’m working on a very similar project and can appreciate your software. I’m going to totally jack ZedGraph as I have been banging my head on the wall trying to teach myself to make those graphs with little to no luck. Great work and thanks for sharing!
Would you send me a copy of your program, with the understanding that I wont bug you for support stuffs? I am going to try to adapt this idea to a slightly larger scale, walmart here has some large plastic cabinets on sale, and I’m thinking about using that. If you’ll give me a copy of the program send it to euphoric_misanthropy@yahoo.com. Thanks ahead of time!
Wow, this is so high tech and so very cool!
Cool, but does it run linux?
Wow. This is the most elaborate, awesome thing I’ve ever seen. What a great idea. Have you posted the code out on Github yet? 🙂
Wow! I’ve never seen such a thing. From the number of comments posted, I must be the only one.
You mentioned using a PS2 controller… you know, a video game console puts off loads of heat. What about using an old console as your heat source?
I guess necessity really is the mother of invention!
Best wishes,
Jordan M.
Man, I know I’m coming late to the party, but that is freaking amazing, even before the LEDs and other improvements you mentioned making. This is seriously impressive, kudos.
This is really impressive. You basically took the gardening out of gardening. I can see the future of home gardening in this post. I agree with Karen the first poster you should change the name of your blog to the High-Tech Vegetable Gardener.
-Bo
Webmaster @ Inflatable Boats
Have you posted the C Sharp for this yet? Even though you say they’re “just forms,” for instance, what do you use to take your photos and store those? Is there a piece in dotNET that does that? There are many questions I have regarding the back-end code guts. Would love if you could even share us some pseudo code! That could help.
How did you place a camera in your program?
what soil did you used in your strawberry?tnx!!
check out digikey they have screw mount cree leds that put out more than 3000lumens using about 40 watts
Its awesome regardless very impressive .
Those LED grow lights are crap.. about the only honest and usefull thing they can do it maintain an outdoor plant inside during the winter months. save your self some time and wasted money and get a metal halide for vegetative growth and a high pressure sodium for flowering/fruiting.
this advice is for all plant life not just lighting required for cannabis.
I certainly enjoyed the way you explore your experience and knowledge of the subject! Keep up on it. Thanks for sharing the info!
Are you willing to share you coding and design? Are they open source? I would love to try something like this myself.