Home gardening statistics infographic
12.9 years ago Uncategorized
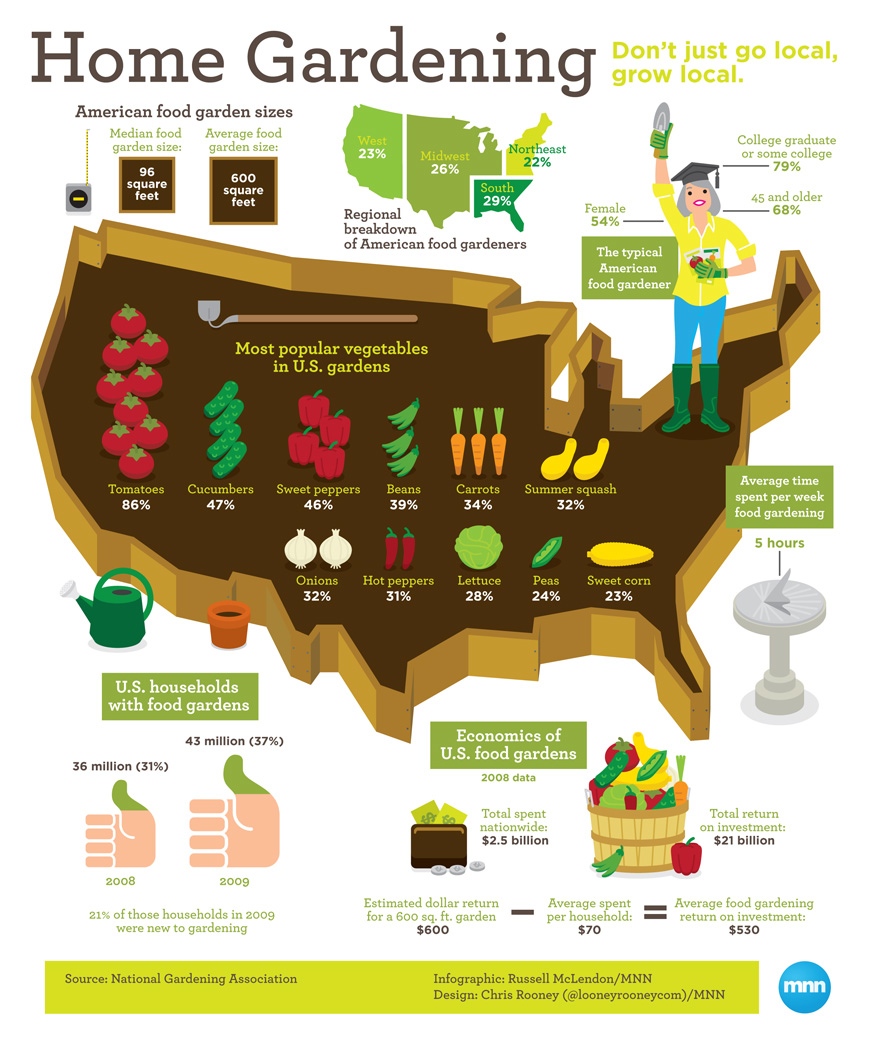
I came across this interesting infographic showing pretty cool information about the home gardener I thought I would share. I couple of interesting items were the average garden size and the economics of U.S. food gardens.
UPDATE: Some resources to see how profitable your garden can be: most profitable fruits and most profitable vegetables.
Removing pests from your garden using animal traps
12.9 years ago guest post, pests

Unfortunately, at one time or another, most homeowners will encounter the need to defend their turf from some four-legged nuisance. Animals wreak havoc in yards and gardens, feasting on vegetables, seedlings, flowers, bulbs and trees. Some animals even burrow and create tunnels, effectively destroying the roots of plants. One of the best ways to get rid of an unwanted animal is a live animal trap. In this article, learn how to use live animal traps, including how to choose the right trap, bait it, and find its most effective location.
Animal Traps
Live animal traps are designed to capture the animal alive and are typically composed of an open mesh, rust-resistant steel frame. The mesh opening will vary in size depending on the animal being trapped. Smaller cages have smaller mesh doors for trapping smaller animals while larger cages have larger mesh doors for trapping larger animals. The most effective traps will have smaller openings to prevent the animal from escaping with stolen bait.
Food bait is used to lure the animal into the cage. Upon entering the cage, the animal activates a trigger, causing the door(s) to shut. There are a variety of different traps. Single entry traps are only open at one end and are designed for safe, secure catch-and-release while 2-door models allow the animal to enter from either direction. There are also collapsible models that are easy to transport and take less space to store when not in use.
Animal Trapping: How To Get Started
First, determine what animal is causing the damage in your yard. This will help you choose what size animal trap you need, in addition to the proper bait. The following is a general guide for each trap size: consult the manufacturer for the precise size needed according to the trap’s specific dimensions. An x-small trap is ideal for mice, chipmunks, voles and rats. A small animal trap will catch squirrels and rabbits. To trap opossums and skunks, use a medium trap. Large traps are used for capturing raccoons, armadillos, muskrats, groundhogs, cats and larger opossums. An x-large animal trap works for raccoons, groundhogs, opossums, armadillos and dogs.
Choosing The Right Bait For The Animal Trap
Choosing the right bait for the animal you are targeting is essential to a successful trapping experience. Here are a few bait suggestions for the most popular unwanted creatures.
- Squirrel Bait: cereal, nuts, grains, sunflower seeds, apples, peanut butter, popcorn
- Rabbit Bait: carrots, brussel sprouts, lettuce, apples
- Raccoon Bait: fish, watermelon, honey-covered vegetables, corn, fatty meat, marshmallows
- Cat Bait: fish, meats, sardines, tuna, chicken
- Armadillo Bait: worms, maggots, sardines
- Skunk Bait: chicken entrails, canned fish, beetles, bacon, cat food
- Vole Bait: peanut butter and molasses on whole wheat bread
- Chipmunk Bait: sunflower seeds, peanut butter, prune pits, cereal, popcorn
- Mice Bait: cheese, nuts, peanut butter, gum drops
- Groundhog Bait: string beans, lettuce, peas, cantaloupe, strawberries
Choosing The Ideal Animal Trap
When choosing your trap, there are a few things to keep in mind. Select an animal trap that is easy to set and release. The best traps allow you to set and release with one hand, making it less complicated to use. If the animal is being released, these types of animal traps provide the user with more safety and protection. With a full hand guard and a galvanized steel barrier separating the user from the animal, an easy set trap allows the user to stand behind the trap while single-handedly releasing the animal back into the wild.
Look for a trap that is sturdy and rust-resistant, as these traps will last through many years of trapping in all types of weather and climate conditions, offering better value for your investment. Spring-loaded doors with sensitive triggers are another important feature when choosing an animal trap. These traps ensure a quick, secure capture, preventing undesirable catches. Finally, keep in mind animal traps with smooth internal edges can protect trapped animals from injuries.
Capturing Animals with Animal Traps
Test all new traps prior to use to ensure they are working and you have set them properly according to the directions. An easy set animal trap is practically infallible and the ideal solution to virtually any animal problem. First decide the placement of the trap, which is crucial to performance. Place the trap away from human traffic and pets. Locate places where animals congregate or travel along paths and place animal traps along these routes in dark, shaded areas. Since animals often stay close to water, traps placed near water sources are also more successful.
After the spot has been selected, camouflage the trap with leaves, branches and dirt to give it a conditioned look. Choose the proper bait, spreading the bait around the trap and leading into the trap. Then activate the trap. A brand new trap may need a few nights to be effective, so be patient. If trapping is unsuccessful, move the trap location and/or change the bait.
Remember to check traps often. Trapped animals should not be left exposed to heat and cold. In addition, wild animals can become increasingly stressed out when left in traps too long, potentially injuring themselves.
When an animal is caught, place a towel over the trap to calm and shield the animal during transport. Contact your local state game commission to determine the lawful method of releasing a captured wild animal. If releasing the animal with an easy set animal trap, simply stand behind the trap and single-handedly release the animal. After every use, the animal trap needs to be washed and disinfected with a bleach solution and thoroughly rinsed with water.
Guest Post By: Havahart®
Growing carrot patterns with DIY seed planting sheets
12.9 years ago carrot, outdoor seed starting, seed planting sheets

My daughter likes to plant seeds but when working with smaller seeds it can be difficult to plant these seeds especially the farther the location is from edge of the garden bed. I have been thinking about solving this problem with a seed strip which can be made using burlap, newspaper, toilet paper, or any sort of paper for that matter. Next you simply stick the seeds to the paper at the appropriate spacing, let them dry and roll out as far as you want to plant. This allows you to get your seeds ready in the comfort of your favorite chair to prepare your seeds and not hunched over your garden with an aching back.
I a simple seed planting strip would have done well for what I was planning but I decided to go with the creation of my own carrot seed planting strip template that allows you to grow in the pattern of the vegetable you are growing. Completely not necessary I know but it kept my daughter occupied working on the “craft” indoors this morning.
Step 1: Get you materials. Start by downloading and printing a carrot seed planting strip template. In the picture below I printed out two copies and glued them together for a few extra carrots. Next you need some glue, a great option is to mix a little flour and water together to the consistency of toothpaste, but I wanted to keep the mess to a minimum and used good ole school glue stick.

Step 2: Glue on the seeds. Take a small dab of your glue and put a drop on each circle on the template. Drop a 1-2 seeds on each glued circle and allow to dry. Once dry I give the paper a quick shake to find any seeds that did not stick and reapply if needed.

Step 3: Plant your seeds. Make a flat surface with your trowel moving a small layer of soil from your garden bed. Lay down your paper carefully on the soil.

Finally over your paper with a small layer of soil that you removed previously.

Step 4: Water Thoroughly. You need to hydrate the seed to begin germinating but you also want to start breaking down the paper and glue to not inhibit those young roots from penetrating the paper.

This was a fun project to do with my daughter, but also considering this is a good way to get some prep work done ahead of time to make the take of planting (here in WA is many times in the rain) a much quicker task. This can be great for crops you grow multiple times per season. You can get your seeds out once, make your seed planting sheets with the appropriate planting dates and bring them out to the garden as needed.


