How to save Bhut Jolokia peppers seeds
14.4 years ago Bhut Jolokia, ghost pepper, harvest, seed saving
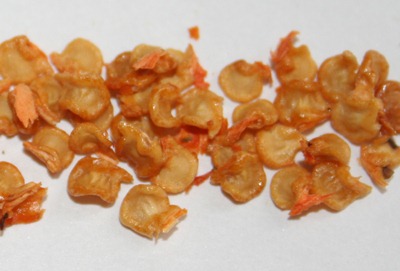
I was lucky enough to win some Bhut Jolokia pepper seeds from Red Icculus. In case you haven’t heard of these they are the hottest peppers on earth having a heat rating of over 1 million scoville units. Just to put that into comparison jalapenos are around 5000 scoville units. One property of this pepper is the way the heat builds after consumption, on first bite it is spicy but takes a few seconds until you really feel the burn which is where it gets the name “ghost pepper.”

Now when dealing with these peppers I recommend using extreme caution I have some pain in my nose hours later just from breathing around these things so vinyl gloves and possibly even a mask would be recommended.
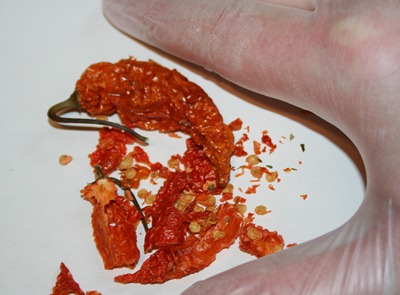
Once you have the safety precautions in place the process is actually very simple. Just break them up and pick the seeds up and store in a homemade seed packet. Now eating the pepper whole is not a challenge I want to take though saving the dried pepper flakes and adding a pinch so some chili might be up my alley. Though if you want to watch some people in pain taking see these videos of people taking the Bhut Jolokia pepper challenge on YouTube. Here is my favorite and my inspiration to not take the challenge.
I am planning on trying to grow one of these using my new hydroponic setup, well at least once I get around to building…so stay tuned.
Tags: cheap, garden seeds, pepper plants, vegetables
Teaching children patience with gardening
14.4 years ago germination, hydroponics, kids, seeds
It shouldn’t be a surprise that kids these days are not as patient as previous generations. Personally I feel this is less on a change of parenting but a result of children’s expectations created because of the advance of technology. For example, When my daughter asks to watch a particular show “On Demand” and then 5 minutes later asks me to “pause it” so she can go potty. This makes me think back to the days of having a single TV station we could pick up with our antenna, which seemed to play reruns of MASH 24/7.
The great thing about gardening is with the exception of seed hybridization, synthetic fertilizers, and maybe techniques like hydroponics the hobby hasn’t changed too much in the past few hundred years. It still takes 1-3 weeks for seeds to germinate not matter what technology you throw at them. This is why I feel gardening is a great activity to share with the young ones in your life to help offset the instant gratification they see on a daily basis.
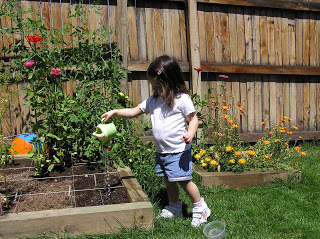
Here are a couple of ideas how to do this any time of year:
Cup of Dirt: Give your young one a cup of dirt and some seeds. To keep them interested give them a spray bottle to water everyday to keep them coming back every day to check how their plant is doing. The spray bottle will provide just enough water on the surface to allow the seeds to germinate and what kid doesn’t like to play with a spray bottle.
Sprouting in a Jar: I have a complete post on this topic, but the process is pretty simple. Get a mason jar and add some seeds. Rinse, drain and repeat. In just a few weeks you will have tasty and healthy sprouts you can add to your salads, sandwiches, stir-frys, etc.
Growing plants in water: Now this can be as complicated as setting up a hydroponic environment or as simple as taking a spider plant start and placing it in some water and letting your young one watch as the roots develop and transplant and care for it as a new plant.
Tags: cheap, garden seeds, outdoor plants, vegetables
Free tomato seeds
14.5 years ago cheap, free, seeds, tomato
 If you head over to Campbell’s Help Grow Your Soup site you can get some free tomato seeds and while you are at it vote for a barn which Campbell’s will give $250,000 to restore. So free seeds for you and one dollar for a barn restoration.
Tags: cheap, garden seeds, tomato plants
Best DIY cheap soil moisture sensor
14.5 years ago cheap, electronics, moisture sensor, water

My first version of my cheap soil moisture sensor has worked great for me but it did have a couple flaws. The first issue was construction, though I had great luck on my first attempt though after trying to recreate additional sensors given the small amount of gypsum between the sensor and the probes were so thin it was extremely easy to crack the sensor and I normally have about a 25% success rate on later creations (must have had beginners luck on the first one.
The second issue was durability. Given we are playing with gypsum and as it is suspended in water it will eventually breakdown and there is very little we can do about it. Though with my latest changes to my automated grow box which includes automated watering based on moisture content I want to ensure my measurements stay accurate throughout the season. To help with this I have decided to increase the sensors size and also am using galvanized nails to prevent rusting. After a few attempts I have come up what I feel is a pretty foolproof method of creating a moisture sensor.
How it works:
There were many questions in the comments in the previous post so hopefully I can clear this up a little here.

Technically a gypsum block measures soil water tension. When the gypsum block is dry it is not possible for electricity to pass between the probes, essentially making the probe an insulator with infinite resistance.
As water is added to the problem more electrons can pass between the probes effectively reducing the amount of resistance between the problem to the point when it is fully saturated where the probe has virtually zero resistance. By using this range of values you can determine the amount of water than exists in your soil.
Parts for cheap soil moisture sensor:
- Plaster of Paris
- 2 Galvanized Finish Nails
- 1/2 inch plastic tubing
- utility knife

Construction:
Take your utility knife and cut the tubing slightly longer than your galvanized finishing nails. Try to make the cut as straight as possible though it doesn’t have to be completely perfect.

Use your utility knife to cut the smaller plastic tube lengthwise, this will allow easier removal of your soil sensor after the mold cures.

Optional: Make the cut diagonally to prevent a potential vertical fracture line.

If you were very careful on you vertical cuts you can avoid this step, but to completely avoid spilling plaster onto my workbench I drilled four holes slightly larger than your tubing. I used these holes for support but also to catch any of the plaster in the gaps from you less than accurate vertical cuts.

Being careful that the tubing fits together where you split the tubing vertically, insert the tubes into the holes (or carefully on a flat surface) Mix Plaster of Paris and carefully fill with to the top. The friction between the tubing should keep a water tight seal where you made the cut, though if the plaster is a little thin and it appears to be leaking through wait a couple minute for the plaster to setup some and try again, at that time it should not have the viscosity to seep through the very small gap that may be causing the leak.

Take your two galvanized nails and push them through a small piece of wax paper. You may also allow the plaster to setup for a few minutes and then float the nails in the the plaster. I like the first method since gravity will help ensure they fall straight down and parallel to each other. As for spacing, I have done some experimentation with the gaps between the probes and my conclusion was, it doesn’t make much difference. As long as there is a gap (they are not touching) you should get reliable results.

After allowing the sensor to cure for about and hour remove it from the holes you drilled in the wood.

Gently pull back the plastic tubing and you have a nice clean soil sensor.

Lay them out to dry for 24 hours to cure completely and their construction is complete.

For attaching the wires there are a couple options. The best would be to solder them to the probes though to do this you need to heat up the nail hot enough to enable a strong solder connection. My little 15W soldering iron just can’t produce the heat for this so I am option for the wire wrap method. I take about an inch of wire and strip off about an inch of insulation and tightly wrap around the probe. Given copper will rust and could be a point of failure you will want to insulate this connection and the probes from the moisture. A few dabs of hot glue works pretty well. I am planning on trying liquid plastic, though I am currently out and when I have some on hand I will update with how it went.
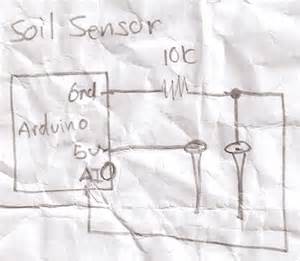
How to use your cheap soil moisture sensor
You can simply hook up a multi-meter and check the resistance though if you want to create anything automated you would need to use an integrated circuit (IC) or a electronics prototyping platform such as Arduino. By applying voltage to one side of the sensor and using a voltage splitting circuit connected to ground and an analog input you can then measure the voltage making it through the probe. The higher the voltage, the higher the moisture content of the soil.
Conclusion
The above should give you everything you need to know to create your own cheap soil moisture sensor and how to use it. This can be used as a moisture soil sensor for watering your indoor plants like I am using it. This same moisture sensor could be for monitoring your outside soil moisture content to trigger (or preempt your irrigation system) to save some money on your water bill and/or maintain consistent moisture levels in your plants which could drastically improve water sensitive crops such as tomatoes.
Tags: arduino, cheap, growbox, led, outdoor plants, tomato plants, vegetables
How to prevent weeds in your garden
14.5 years ago organic, weed prevention, weeds
I doubt there is anyone who enjoys pulling weeds, though now at the end of the season is a great time to do some preventive measures to prevent new growth next season.
Kill your weeds early: The sooner you pull your weeds the easier it is to keep up with them. In addition, if you pick the weeds before the mature and flower and drop seeds you will save a ton of time pulling weeds for every one of those seeds that drop. Call me old fashioned but I normally skip the whole herbicide method and just pull the weeds by hand. Not only does your lawn or garden immediately look better, there is no coming back to see if the weeds need another dose of spray and the whole environmental part of keeping some chemicals out of our water system.
Mulch: This is one I didn’t completely understand until I had been gardening for a while. I for one never have found “beauty bark” beautiful and have always preferred the more natural look and benefits of fertile soil. But that is entirely why you want to use a mulch such as ground bark, straw, pine needles, leaves, newspaper, rubber bark, or even some old carpet. This helps prevent weeds in twp ways. First, it blocks light from the potential little weed seedlings to make their way to the surface. Second, they are not fertile mediums to grow seeds, which is exactly what you are looking for for your large flower beds which like to create good crops of weeds. As a final benefit they help insulate and hold water down for the plants you want to thrive having great growth and eventually shading out those “poor” weed seedlings. just 3-4 inches during the fall and your back should be bending over much less next spring.
If you are thinking, “What about my vegetable garden? I want seeds to be able to grow in there next year.” For your vegetable garden I highly recommend chopped leaves and a vegetable garden mulch. If you happen to have a leaf blower/vacuum that will chop them up all you need to do is empty those bags in a thin 1-2 inch layer across your garden. I used to have one of these though accidentally sucked up a rock which didn’t “chop” well and broke it so the alternate method I use is the following. Bag your leaves throughout the fall and once the leaves stop falling dump them out in a long row in your yard. Then use you lawnmower with bagger attachment and run them over until they are all chopped up. You can also do this more frequently during the fall but I find this a good time to use all the gas in the lawnmower before the end of winter feeling more like I am doing something more meaning other than just letting the mower sit there until it burns off the remaining fuel. With these leaves on the surface you smother any weed seeds and also block out all light to the soil. When spring time comes you simply work in the decomposed leaves into the soil and your garden has a head start with some good organic matter.
Pre-emergent weed control: For some parts of your yard like your lawn mulching is not really an options so to protect against pesky weeds like one of my personally loathing weed, annual bluegrass. Which grows and seeds so close to the ground it is nearly impossible to pull the plants to prevent the spreading. Pre-emergent herbicides is the solution to this problem. Pre-emergent herbicides work by preventing weed seeds from germination by inhibiting cell division in their tiny root system. Given these plants are annuals a successful application can rid you yard of these weeds until they eventually blower over from a neighbors. Pre-emergent herbicides can be purchased as a chemical or the organic method is applying glutton corn meal which normally can be purchased from your local feed store. One thing to remember is that this also will prevent you normal grass seed from germinating as well so be sure to time your application after with with enough lead time to allow the pre-emergent from wearing off.
Grow a cover crop: Growing a cover crop has two major benefits to your garden. Various legumes, grasses, and buckwheat make good options for for cover crops to plants while you garden is empty. First it creates a natural shade from the sun making it hard (or impossible) for seedlings are the surface to survive under their great shadows. Second it provides organic mater as “green manure” to add nutrients to your soil. One recommendation is to make sure you do a little research on the plant you choose as a cover crop, if you accidentally wait too long to “harvest” your cover crop it could go to seed and you may have an entirely new weed problem on your hands.
Cook the soil: When all else fails apply some black plastic (thicker the better) covering to your planting beds and let them “cook” throughout the fall/winter. Like mulch this will prevent any light and most water from entering the areas covered. This will essentially cook the soil killing any weeds, seeds, fungi, or anything else living in that area. Though this is very effective in eliminating weeds and disease from your soil it also kills everything else including good bacteria that your friendly worms like to visit your garden, so you soil may take sometime to recover and return to becoming living soil. I would recommend this method as a last result when the previous methods have proven to be completely unsuccessful.
Just for some positive outlook, you can also think of weeds as green manure assuming you are adding these to your compost, so even out of control they still can decompose and help your garden…
Tags: compost, garden seeds, organic vegetables, outdoor plants, vegetables, worms
How to save pumpkin seeds
14.5 years ago harvest, pumpkin, seed saving, seeds
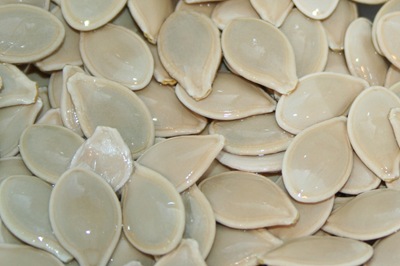
The kids and I carved several pumpkins this year but we waited carve the three pumpkins we grew in our backyard until Halloween since these were the seeds I wanted to save for planting next year. First, I know exactly how these pumpkins were grow, organically and free of any pesticides. Second, I was able to let these pumpkins grow undisturbed until the day I picked the seeds, so the seeds should definitely be mature.
The process is very simple, while getting the “goo” as my 5-year-old would say out of the pumpkin set the seeds aside and add to a colander. Give them a good rinse and remove any orange “goo” that may have snuck in. Pat dry with a towel and let the seeds dry on wax or parchment paper for a couple days. Once they are dry to touch put them layered on a paper sack and let them dry for a few weeks until putting them in homemade seed packets until the are ready for next year.
If you have way too many seeds than you need (I know I do) you can also use the great recipe to roast some of you extra seeds as a snack:
CVG’s Roasted Pumpkin Seeds
- Extra pumpkin seeds
- 1/2 tsp oil
- 1/2 tsp of Worchester sauce
- 1/4 tsp of seasoning salt
Directions: Add ingredients to bowl and mix well. Lay on a single layer on a cookie sheet and bake at 325 for about 25 minutes being sure to flip the seeds after about 10 minutes. Eat as soon as you can without burning your mouth.
Tags: cheap, garden seeds, organic vegetables, outdoor plants, vegetables


