How to make Homemade pumpkin bread

After having an abundance of cooked pumpkin after over purchasing on a couple of organic pie pumpkins I decided to make some pumpkin bread, here is the recipe I have always had great results with.
Ingredients
- 2 cups cooked pumpkin plus 1 cup or water or 16 oz can of canned pumpkin plus 1.25 cups water
- 3.5 cups all purpose flour
- 2 tsp. baking soda
- 3 cups sugar
- 4 eggs
- 1 cup vegetable oil
- 1.5 tsp. kosher salt
- 2 tsp. cinnamon
- 2 tsp. nutmeg
Directions
- Preheat oven to 350 F.
- Combine flour, baking soda, salt, cinnamon, nutmeg, and sugar into a large mixing bowl.
- In a separate bowl whisk eggs, water, oil and pumpkin.
- Slowly at wet ingredients to dry ingredients and blend until well combined.
- Pour into two lightly greased and floured bread loaf pans.
- Bake for 1 hour and test if done by inserting a knife into the middle of the loaf and when it comes out clean it is done.
- Let cool for 30 minutes, top with aluminum foil and place into your refrigerator and let cool overnight.
Simple pumpkin cheescake recipe
9.4 years ago pumpkin, puree, recipe
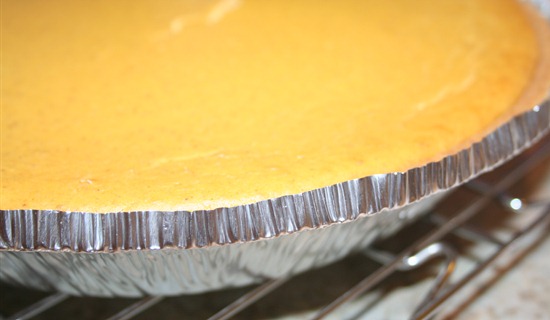
I made my first pumpkin cheesecake a few years back and has been a recurring addition to our Thanksgiving dinner ever since then…though baking cheesecakes can be/sound a bit intimidating with a few techniques mentioned below it can be pretty easy to have success on your first attempt. In addition this is also a great way to get rid of my masses of pumpkin puree in my freezer saved from this years pumpkins
Pumpkin cheesecake recipe
Ingredients
- 1 graham cracker crust (homemade or store bought)
- 16 oz. of crème cheese (2 – 8 oz. packages)
- ⅔ cup brown sugar
- 1.5 cup of pumpkin puree (or one can of store bought pumpkin)
- 1 teaspoon vanilla
- ¾ teaspoon cinnamon
- ¼ teaspoon nutmeg
- ¼ teaspoon ginger
- 2 eggs
Instructions
- Preheat oven at 350 degrees
- Beat cream cheese until it appears fluffy
- Add sugar, pumpkin, vanilla, cinnamon, nutmeg, and ginger and and beat until well combined
- Add eggs one at a time and beat until creamy
- Place empty graham cracker crust to a cookie sheet and place in oven with rack pulled out. Fill with mixture until full and carefully push rack (and cheesecake) into the oven. You can attempt this pour and move away from the oven but unless your day job is working on a bomb squad most likely this will lead to some filling on the floor and yourself.
- Bake for 50-60 minutes keeping a careful eye on the edges if you start to see some browning your cheesecake is done cooking.
- At this time I turn off the oven and crack open the door a few inches to let things cool down gradually, optionally you can pull it out and place the cheesecake on a cooling rack for 1-2 hours. Though if you are in a hurry you can speed up the cooling by placing your cheesecake in the refrigerator after 10-15 minutes though you significantly increase the chance of causing a ugly split down the middle of your nice cheesecake.
- After cooling for 1-2 hours cool or overnight(if you can wait that long)
Tags: recipes
How to make fermented ginger carrots

The end of this summer I planted a bunch of carrots one afternoon and I unfortunately pretty much forgot about them. Without proper thinning I ended up with quite a few short and/or twisted carrots which I decided would be perfect to make some fermented ginger carrots.
Step 1: Clean and peel carrots. Peeled and cut the ends off of the carrots and set them aside.

Step 2: Shed the carrots. With a food processor this speeds up the process significantly but you can also do this with a hand shredded or even some good knife work. The smaller the carrots the faster the fermenting process will be. After slicing place carrots into a bowl and mash them a little bit to get some carrot juices flowing. (personally I use a piece of wooden dowel) Finally toss in 1-2 tablespoons of fresh grated ginger.

Step 3: Fill with brine and wait. In a separate container mix 1 quart of distilled water with 1.5 tablespoons of sea salt and mix until dissolved. Pour over brine over carrots and cover jar with some cheesecloth. Typically with fermenting I would have to construct something to keep the vegetables from floating to the surface but I have found with carrots they are pretty good about sinking to the bottom on their own.

You can let them ferment on a warm counter for a few days or up to a week and a half. Then move them into your refrigerator where they will continue to ferment at a much slower rate until all are consumed.
Tags: recipes
Pumpkin pancakes with pumpkin spice whipping cream
10.5 years ago pumpkin, puree, recipe, Uncategorized

My seed collection from my Winter Luxury Pie pumpkin I purchased a few years back finally paid off and I was able to produce a couple of decent sized pumpkins which should provide me enough pumpkin goo (canned pumpkin) to make plenty of baked goods this fall. For those who have not made their own pumpkin goo the process is very easy…even easier this year with my new food processor (no need to add bit of water to help my struggling magic bullet I have used in the past)

So with about a gallon of pumpkin puree on hand I froze about 3/4 of it by spooning some into silicon muffin cups, freezing for a couple hours, adding to freezer bag and repeat.
With what I had left seemed like a good idea would be pumpkin pancakes which I made this morning with the following recipe.

Pumpkin pancakes with pumpkin spice whipping cream
Recipe type: Breakfast
Prep time:
Cook time:
Total time:
Serves: 6
Ingredients
- 1.5 cups milk
- 1 cup pumpkin puree
- 1 egg
- 2 tablespoons vegetable oil
- 2 tablespoons vinegar
- 2 cup all purpose flour
- 2 tablespoons brown sugar
- 1 teaspoon white sugar
- 2 teaspoons baking powder
- 1 teaspoon baking soda
- 2.5 teaspoons pumpkin spice (1 tsp allspice, 1 tsp cinnamon, ½ teaspoon ginger)
- ½ teaspoon salt
Instructions
- Mix milk, pumpkin, egg, oil and vinegar in bowl.
- In separate bowl combine flour, sugars, baking powder, baking soda, spices, and salt and stir until well combined.
- Stir flour mixture into pumpkin mixture and mix just enough to combine (over mixing can lead to chewy pancakes)
- Heat a griddle or frying/cast iron pan on medium-high heat and pour ¼-1/3 cup of batter into pan and flip when brown and serve.
Notes
For whipping cream simply add ¼ teaspoon of pumpkin pie spice to purchased whipping cream. Or make it yourself with 2 cups of heavy cream, 1 teaspoon powdered sugar, and ½ teaspoon of pumpkin pie spice and whip until you have medium peaks.
Making homemade applesauce
10.6 years ago apples, applesauce, recipe

This weekend we decided to head to our favorite pumpkin patch to get some obvious pumpkins, kettle corn, cider donuts, and about a dozen pounds of u-pick apples.

Now that I have amassed a plethora of apples we decided to make some homemade applesauce. For just a few apples I would just cut the apples by hand but with this many I break out my apple peeler which gets the assembly line moving much faster.

If interested here is the applesauce recipe I traditionally use for my applesauce…not super sweet but with nice hint of lemon.

Awesome applesauce
Recipe type: Dessert
Ingredients
- 5-6 pounds of apples (peeled, cored, quartered)
- peel of half a lemon
- Juice of two lemons
- ½ teaspoon cinnamon (more if desired)
- ½ cup white sugar
- ½ cup brown sugar
- 1.5 cup water
- 1 teaspoon of salt
Instructions
- Add all ingredients into large pot over medium high heat. Cover and bring to boil then lower temperature to low and simmer for at least 30 minutes. Note: This also works great with a crockpot (high to boil and low for 30+ minutes)
- Once the apples get a soft and mushy remove lemon peels and mash with a potato masher. For a less physical approach an egg beater (personal favorite), immersion blender, food processor, or blender (pulsing) can smooth things out real quickly
Good for on year in the freezer and probably good for a couple weeks in the refrigerator…though it has never lasted that long with my 11 year old daughter knowing about it. Great cold but I like it best warm with a bit of vanilla ice cream or a splash of cream or whipping cream.
How to make pickles
10.7 years ago cucumbers, pickles, recipe
 When my first cucumber started to rot in the vine when I was waiting for it to mature, I realized that I grew the smaller variety of which grows 6-8 inch cucumbers which are perfect for pickling to enjoy a nice nutritional snack. Having a few nice specimens on the vine this afternoon I decided to make myself a few pickles. Step 1: Clean the pickles. One of the surprises when I picked my first cucumber a few years back was the little spikes they have on them…you don’t see any of those by the time they make it to you in the grocery store. I quick bit of brushing of your hand should get these off. Finish this off with a quick wash in the sink and you should have a few clean almost pickles.
  Step 2: Cut the Pickles. If you have a small variety like mine you can get away with simply quartering (or cutting in sixths if you have an extra girthy one). For full size cucumbers you will probably need to cut it into two pieces and cut each half into sixths or eighths depending on how large of spears you desire.
  Step 3: Brine the Pickles. There are many good recipes for brines out there. Here is my favorite that provides a good balance of sweet/salty/spicy as well as some extra components to have a nice balanced flavor profile. Simply add the ingredients to a 1 quart mason jar, give it a little shake, then add your cucumbers. Secure the lid of the jar and give the jar another shake and place in your refrigerator.
My Pickle Brine
- 1 clove garlic
- 1/2 cup apple cider vinegar
- 1 cup water (or enough to cover the pickles)
- 3 T sugar (artificial sweetener works here)
- 1/2 tsp salt
- 1/2 tsp dill
- 1/4 tsp pepper flakes
- 1/4 tsp cloves
- 1/8 tsp cinnamon
- 1/4 tsp coriander
- 1/4 tsp mustard seed
- 1/4 tsp black pepper
Step 4: Wait. This can be the hardest part, you need to wait at least 3 days for your pickles to brine, possible a couple of days more if you needed to add much more than 1 cup of water to cover your cucumbers. As more cucumbers come in you can simply add them to the jar and have a non-stop supply of incoming snacks…at least until the end of summer. For something a little more traditional you can also try the following:
Alton Brown’s Dill Pickle Brine
- 5 1/2 ounces pickling salt, approximately 1/2 cup
- 1 gallon filtered water
- 3 pounds pickling cucumbers, 4 to 6-inches long
- 1 tablespoon black peppercorns
- 1 tablespoon red pepper flakes
- 2 cloves garlic, crushed
- 1 teaspoon dill seed
- 1 large bunch dill
Directions: Same process as above though probably going to have to wait 6-7 days before your pickles are ready and are good for about 2 months.


