Caring for your pet caterpillar – UPDATE
14.9 years ago butterfly, butterfly garden, caterpillar, cheap
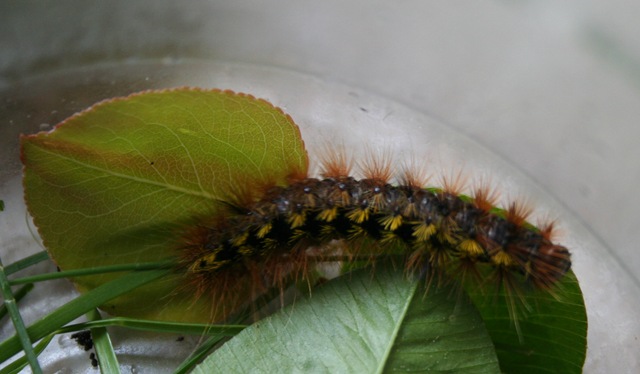
I would like to introduce you to the newest member of our family, named by the kids as “Emily”
Now normally these are some critters you want to keep out of your garden but with my kids asking for the “Live Butterfly Garden,” bringing in a caterpillar from inside and putting it into a jar seemed like a much more cost effective option.
Growing up I have caught caterpillars with the great hopes that I would be able to witness its metamorphosis into a butterfly. Unfortunately, the lack of the internet or a nearby library I never got the knowledge of the particular “butterfly” I caught wouldn’t eat just any leaves I threw in it . Caterpillars are very picky eaters and each specie only will consume particular types of leaves.
If you found your caterpillar munching on a plant you are in luck and you can just pick a couple leaves a day for your caterpillar. They will not eat old or dry leaves and must be replaced daily. In our case our caterpillar was found on a plastic play set, which sort of limited out options. My girls did pick some leaves of various plants in our yard, and if we are lucky we may find one our caterpillar enjoys.
To improve the odds I was able to identify this caterpillar as a Painted Lady, which enjoys nettles and thistle. Both of which grow great in my area, though none is growing in my yard (which normally would be a good thing)
This led to a nice walk in the woods to attempt to find some leaves for the caterpillars distinguished palate, unfortunately we did not find any nettles or thistles though came back with a good variety of leaves.
That Butterfly Garden is looking like a bargain at the moment.
UPDATE — May 31, 2008

We are happy to announce that “Emily” has started has started her transformation into becoming a beautiful butterfly (or moth if my amateur identification is incorrect). We were successful in finding their favorite food which happened to be the little clovers growing in our back yard. Definitely a case of good reason to not kill all weeds with pesticides in your yard, by the way the rabbits love the stuff more than my lettuce so added bonus.

As you can see in the background “Emily” has some friends with her (3 total) though currently unnamed, though I am sure by the time my daughter reads this post she will fix that.
Stay tuned in 7-10 days hopefully we will have a butterfly/moth release.
UPDATE — 06/26/2009
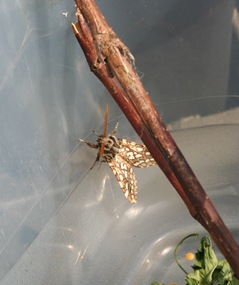
Well 7-10 days turned into more like 26 days, just when we were thinking the worse, Emily emerged as a beautiful brown moth.
For info on the flight lessons and release, check out this post.
Tags: butterfly garden, cheap, led, outdoor plants, vegetables
Butterfly Garden Update (Nasturtiums and Marigolds)
15.8 years ago butterfly, butterfly garden

My black-eyed susans and purple cone flowers didn’t survive being transplanted after being moved from the PC Grow Box, but the Nasturtiums and Marigolds are doing just fine. Even have had some sightings of a few butterflies unfortunately none have stuck around long enough to get a photo, guess there is still lots of summer left this year.
Read Other Butterfly Garden Posts
Tags: butterfly garden, cheap, growbox, outdoor plants, vegetables
Make your own cheap butterfly feeder
15.9 years ago butterfly, butterfly feeder, butterfly garden

As the days are getting longer (happy first day of summer) it is actually starting to get a little warmer even here in the Pacific Northwest so decided it would be a good time to add our homemade butterfly feeder to our butterfly garden, but first we actually had to make it.
If you want to make your own here is all you need:

– Plastic/glass container (baby jar, water bottle, etc)
– Nail
– Pliers
– Lighter (not pictured)
– Cotton or sponge
Steps to have your own buttery feeder in your garden:
1. Heat up nail with lighter (or candle) using pliers to avoid pain on your fingers.

2. Use hot nail to burn a hole through the plastic.

3. Stuff some cotton (swab, ball, shirt) or a piece of sponge in the hole and tight as possible.

4. Decorate with markers (make sure to have some red) plastic flowers etc (Optional but funnier for the kids)
5. Fill with some butterfly nectar (recipe below) and hang by some of your colorful flowers
Butterfly/Hummingbird Nectar
Ingredients:
¼ cup of sugar
1 cup of water
3 drops of red food coloring [optional]
Directions:
Add sugar and water to water bottle and shake. If you are using raw organic sugar bring water to boil and mix in sugar. Butterfly nectar is good for 2-3 weeks and water in feeder should be replaced a 3-4 days.
Does this all seem like too much work? Well you can also simply place over ripened fruit (bananas, apples, peaches, orange slices, etc) on a plate and your butterflies will love it.
Read Other Butterfly Garden Posts
Tags: butterfly garden, cheap, organic vegetables, vegetables
Planting our butterfly garden
16.1 years ago butterfly garden, indoor seed starting
Yesterday with the weather almost getting to 60 seemed like a good day to try sow some of our vegetable seeds outside for our butterfly garden. I tried to make things organized by grouping the Black-eyed Susan, purple coneflowers, zinnias, and nasturtiums, but my daughter decided to distribute the seeds a little more random. I am sure the butterflies won’t mind and guess it should look a little closer to how nature would do it.
I have learned from my years of gardening I normally am too optimistic about when seeds can be planted outside so as a backup plan we also planted some of the same seeds indoors which are currently trying to push their way closer to the PC grow box.

Read Other Butterfly Garden Posts
Tags: butterfly garden, cheap, garden seeds, growbox, outdoor plants, vegetables
Planning a butterfly garden
16.1 years ago butterfly garden, kids
I got the word this weekend we had enough vegetables and not enough flowers in our garden beds so got the idea to start a butterfly garden. Upon telling my 6 year old daughter she got very excited and started talking how we can charge admission for people to see our butterfly garden.
There are two ways to get butterflies in your gardens, provide nectar to eat and/or give them a great environment to lay their eggs. If you remember your grade school science classes those eggs turn into caterpillars which depending on what else you have in your vegetable garden this might not be exactly the pest you want to encourage to inhabit your garden. If that is your situation I would recommend only planting the nectar attracters. After carefully investigating what caterpillars eat by reading The Very Hungry Caterpillar from cover to cover I decided my risk should be minimal if we have our butterfly garden on the other side of our yard away from our strawberries.
To attempt to get the butterflies to lay eggs, we bought Snapdragons and Daisies. To provide butterflies with tasty nectar we picked out Black-eyed Susan, purple coneflowers, zinnias, and nasturtiums, Lavender, Daisies (as well), and Mint. We are also planning on creating a butterfly feeder by taking a small jar and drilling a hole in the top. Put some cotton snuggly in the hole and fill with solution of 1 part sugar to 9 parts water and cheap butterfly (or hummingbird) feeder is ready for visitors.
Will keep posted with progress on the butterfly garden and I anticipate the butterfly feeder will have plenty of “decorating” involved. If you want something that might look a little more attractive in your garden you might want to take a look at the commercial butterfly feeders.
Read Other Butterfly Garden Posts
Tags: butterfly garden, cheap, outdoor plants, strawberry plants, vegetables


