Ultimate Plant Cage/Stake/Plant clip review
10 years ago planter, product review, trellis
This nice people at Global Garden Friends were nice enough to send me a few of their product to try out with my garden this year and given today I was bringing out my cucumbers, tomatoes, zucchini, and pumpkins from the grow box it seemed like a great time to put them to the test.
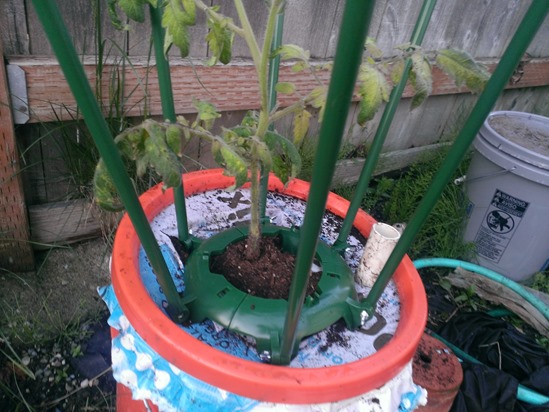
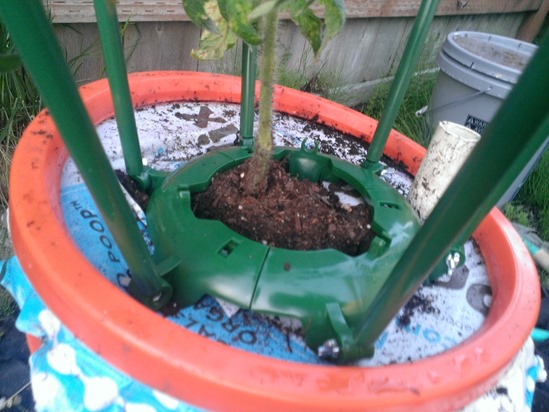
The first product I tried out was their Ultimate Plant Cage which is a plastic ring that comes in four parts with spikes you can stab into the soil. I used this on my self watering planter which I just planted a tomato plant into today.
What I like about this system is you can actually assemble this around your plant which is helpful if you are a bit late adding a plant cage to your plants. Also on this right are six small posts which you can attach their Ultimate Plant Stakes (included with the kit) where you can adjust the height and the width as needed to support your growing plant.
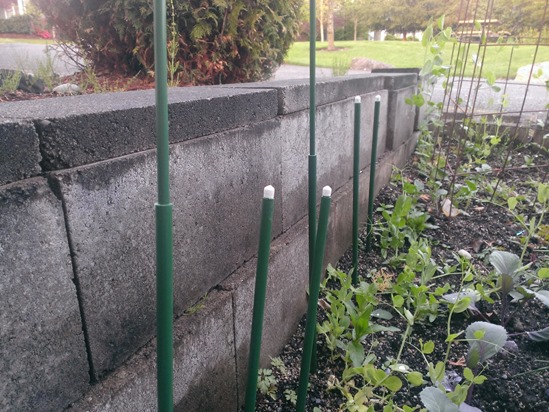
I also use a few more of their Ultimate Plant Stakes to give my peas a little help as they start to take off in the next couple weeks. The only complaint I have for these is there is not a lot of resistance when you extend these stakes so supporting from an angle may work ok but if your weight is a direct downward force I could see these potentially collapsing under some load.
In addition they also sent me some plant clips which you can use to assist your vegetables to climb their trellis until they have adequate support on their own. I have done twine and zip ties in the past but what I like about these is they are much easier to remove when the time comes and also pretty large so easy to find to reuse on other plants as needed.

I suspect I will be able to use them to help my peas, tomatoes, and cucumbers find their trellises when the time comes.
Tags: re
Growing tomatoes and getting to grips with the green tomatoes at the end of the year
12.5 years ago indoor seed starting, product review, sponsored post, tomato
October tends to see the first frosts in much of the UK and as tomato plants won’t survive a frost, gardeners growing tomatoes not lucky enough to have a heated greenhouse are struggling to get those stubbornly green tomatoes to ripen.

Figure 1 – The end of the growing tomatoes year – green unripen tomatoes
If you are wondering how to grow tomatoes so that they have the best chance of turning red you will be interested to know that temperature has a major impact on ripening. If your fruits are too cold they will not turn red. To give your tomatoes the best chance of ripening properly you should ensure your tomato plants are maintained at the correct temperature throughout the entire growing process. Tomato seeds need a temperature between 18°C and 22°C (68°F to 75°F) to germinate and tomato plants won’t survive below 10°C. It is also important to grow them somewhere where they are exposed to as much natural sunlight as possible to aid photosynthesis.
A Helpful introduction to tomato growing
Many growers make use of seed propagators such as the Greenhouse Sensation Vitopod to ensure their seeds are kept at the optimum temperature for germination. The Vitopod is particularly useful compared to traditional tomato pots in a basic propagator, because it is large enough to be used for hardening-off and protecting young tomato plants from late frosts. The shock of a late frost to a young tomato plant just out of a heated propagator can kill the plant, resulting in you having to start again.
Obviously greenhouses, polytunnels or even a conservatory are the ideal environment in which to keep your tomato plants warm but many people do grow outdoors, just make sure you choose a bright spot and be aware that they will take longer to ripen because of the cooler temperatures.
Even though October can be a particularly bountiful month and with aids such as the self-watering tomato pots such as the hydro grow system you can sometimes harvest fruit through to December providing that the plant is located in a heated location such as a greenhouse. The season is never long enough to ripen every single tomato you grow on the vine. Consequently no matter how particular you are with caring for your tomato plants it is inevitable that if you have produced a bumper crop you will end up with a lot of green fruit. If your vines are groaning with green tomatoes there are a couple of methods you can employ to encourage them to turn red:
One solution commonly advocated in gardening circles is harvesting the green tomatoes and placing them in close proximity to a banana. This works because ripening bananas give off ethylene — an odorless gaseous organic compound which also occurs naturally in tomatoes and catalyzes the ripening process.. Tomatoes produce their own ethylene once they have reached the mature green stage of their development but the process can be speeded-up by placing tomatoes near ripe bananas, the ethylene produced by the bananas stimulates the ripening process normally stimulated by the tomatoes own ethylene, this can be blown away if they are being grown in a windy environment.
How to get green tomatoes to ripen
One way of employing this method is by selecting three or four green or yellow tomatoes and placing them in a box with a banana which is starting to ripen. Ideally the banana should be at the stage where it is still green in places but turning yellow. This process will take one or two weeks so you may have to change the banana at some point. Alternatively you could just place a few tomatoes in a sunny spot near a bunch of bananas. Many growers use apples instead of bananas for this technique due to their abundance in British gardens (unlike bananas)!
Another way of encouraging your green tomatoes to turn red is by placing the fruit in a closed paper bag on its own. This traps the ethylene which the tomato produces itself and accelerates the ripening process. Simply place the fruit in a brown paper bag, folding the top over it twice to seal it. Regularly checking to see if the fruit is ripening is important to ensure that it doesn’t start to rot, especially in a humid environment such as a home.
If you are thinking of growing tomatoes at home the Greenhouse Sensation site has some excellent information about the varieties to grow, how and when to sow tomato seeds.
Tomatoland: How modern industrial agriculture destroyed our most alluring fruit review
12.7 years ago book, organic, product review, tomato
There is a very good reason why tomatoes are the most popular vegetable grown in the home garden, you can’t beat the taste of a home grown tomato. Tomatoland provides and exposé of specifically the Florida tomato industry showing many of the negative, though there are still a few positives explaining the history and the process of getting this previously alluring fruit to your local grocery store. After reading I can now add several other reasons to avoid purchasing those perfectly round and red commercial tomatoes at my local grocery store which I will explain in more details below.
Matter of Taste
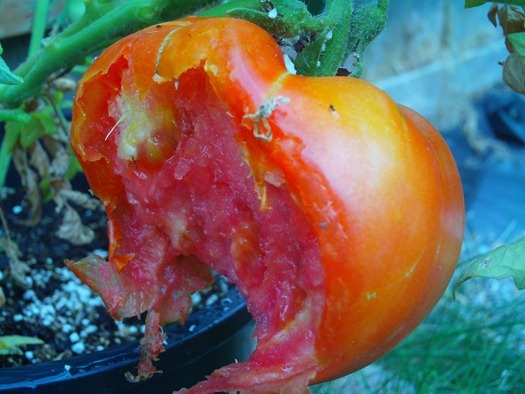
As many of you may or not know below is what your delicious red tomato looks like when picked from the vine. By picking the tomatoes young this helps prevent fungal diseases prone to the humid Florida area where a good portion of our tomatoes from grocery stores and restaurants are grown. This also assists in the transportation of these tomatoes without damage to areas like where I live which is about far away from Florida as you can get. So how does these less appealing tomatoes look like the perfect ones we see in the stores? Once they reach their destination they are gassed with ethylene to give them their nice red appearance.
There have also been decades of breeding to produce a perfectly round, high yielding tomato, disease tolerant, and of proper size. Unfortunately during this process taste has not really been a consideration into this breading process. Along with taste tomatoes have lost much of the nutritional value they have had in the past. “According to analyses conducted by the U.S. Department of Agriculture, 100 grams of fresh tomato today has 30 percent less vitamin C, 30 percent less thiamin, 19 percent less niacin, and 62 percent less calcium. So you grandmother may have been correct telling you to eat your vegetables back in the day…sadly maybe this is no longer the case.
Human Factor
Most people are aware that insecticides and pesticides are used to grow most of our commercially produced produce. We have been told that end up on our fruits are so small that there is no risk to humans. This statement is definitely an easily arguable statement but in this book the author goes into great detail of the effects of these pesticides on the farm workers who were forced to go into fields too soon before application and in many cases pesticides actually being sprayed directly on the workers. As a result this led to many cases of reproductive issues with the farmers leading to many cases of abnormalities of children at birth as well as sickness and injuries, rashes during the immediate exposure.
The book also details the outright slavery existing in the Florida tomato fields as less than a decade ago. This is something that surprised me that I had not heard about this. There are also examples of modern day indentured servitude by offering an appealing wage but then extorting money from the workers for simple items such as water, “showers” (using a garden hose to rinse of pesticides, food, and premium rent at living quarters which normally would include sharing a small trailer with several other men.
Overall
Overall I thought Tomatoland was a great book and help reinforce my reasons for growing my own produce and supporting my local organic farmers. It also encouraged me to me aware of who’s hands my food my travel as I decide to make a purchase at my local grocery store. I would recommend this book to anyone who feels that paying a little extra for organic products is just too much to pay or anyone simply interested in how the tomato industry is run.
Fiskars 6201 Momentum Push Reel Lawn Mower review
13 years ago lawn, product review, push mower, reel mower, Uncategorized
Last weekend my old gas mower finally gave its last breathe of exhaust and so it was time to get a new mower. Provided I have a relatively small yard and a very cramped garage I decided to give a manual push lawn mower or more well known as reel lawn mower. After some research on the reel mowers on the market I finally ended up buying the Fiskars 6201 Momentum Push Reel Lawn Mower.
Though at a retail price of $199.99 you could easily get a gas powered lawn mower for the same price, but you also have to consider the maintenance cost on a gas mower which I estimate I normally paid out $25-30 a year between oil, air filters, spark plugs, and gas (with fuel additives). As a side bonus a push mower also produces no emissions so it is a much more environmentally friendly option.
What finally sold me on the mower were the two features that seemed to be lacking from the cheaper reel mowers. First was the ability to adjust cutting height from 1” to 4” this is important for a couple of reasons. First you should only cut 1/3 of your grasses length or this can stress your grass causing damage to the roots. If you grass is 4 inches tall and you mower has a static height of 2 inches this is not possible. Second I like to keep my grass cut at around 3 inches to help shade out the weeds that may be trying to poke up from below so with the other models this was also not a viable option for me.
The next thing that I liked about this mower is its construction, I am a pretty strong guy and looking at the design of some of the other models I could easily see myself barreling through some thick grass and have to end up bringing the mower back to the store in a couple of pieces. With this bad boy weighing in at just over 50 lbs it has some solid steel construction which should easily be able to withstand my man handling.
Upon opening the box the mower took about 5-10 minutes to assemble which was basically attaching four bolts to put the handle together and attach it to the main part of the mower. After adjusting the height to 3 inches I headed out to try the mower out. My lawn was about 4 inches tall and I was able to easily mow through my yard with minimal effort. Though the clippings were not as small as my gas mulching mower would create they still created a small enough mess that I didn’t think raking was necessary. To put the mower through its paces I moved the level down to 2.5 inches, this time it was a bit more of a workout to get through the grass and they size of the clippings were a bit larger (as expected) compared to when I was mowing at 3 inches but still at a reasonable mess to avoid raking. I also was impressed on how the mower easily cut through the few dandelions that I hadn’t pulled by hand yet without any problems.
Overall I was impressed with the Fiskars 6201 Momentum Push Reel Lawn Mower and did not experience any buyers remorse after my first use on the lawn. Overall the effort to push this around was not much different than a typical push gas mower when mowing 1” of grass, though can provide but of a workout when it exceeds that amount, but it is solid and has no problems barreling through the grass and weeds.
Disclosure: This review was conducted with no association or compensation from Fiskars or representatives.
Catching garden pests in the darkness with OutbackCam night camera
13 years ago infrared, night cam, pests, product review
In the past I have had a few critters scale or crawl under my fence to snack on my tomatoes. Without knowing what is going after my crops it is difficult to figure out how to attempt to prevent these attacks. When Swann approached me to review their OutbackCam I decided this would be the perfect tool to answer this question.
The OutbackCam is a small device that holds a digital camera which with the help of motion sensor and an array of infrared LED lights can take quality pictures/videos of anything that moves within its range during the day or night.
Installation of the devices is very simple, you use the provided strap to attach the device to a fence post, tree, etc. and pull snuggly to keep it in place. This is fine for catching animals in the act, but if humans are your target you may want to provide your own cable and lock or protected enclosure to prevent someone with a pocket knife walking away with your camera and evidence it may have captured.
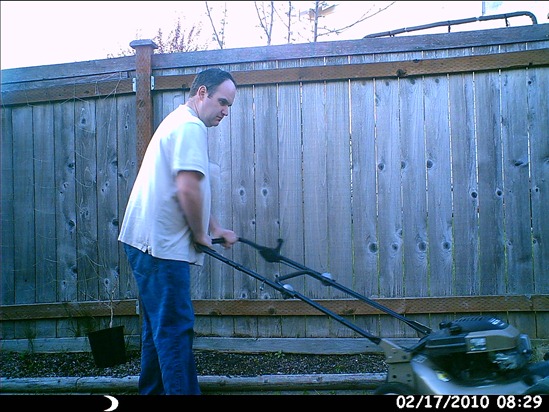
The camera provided numerous settings to allow you to choose between taking photos and videos and also the amount of time you want to delay between photos to prevent using up the whole card while lets say you are mowing the lawn. This configuration I would not call intuitive (meaning I actually had to look at the instructions) but I would consider no more difficult than setting a new digital watch. Once you understand the settings and the flow it is very easy.
Though it is a few months before I will be able to catch any animals going after my tomatoes I did turn it on and captured some less threatening creatures to confirm the image quality and the number of false positives.
Overall the device was very accurate there were very few false triggers and after I was unable to catch any critters in my garden I decided to simulate a zebra attacking a seedling in my kitchen which was pitch black when the picture was taken.
One things I did notice when taking the picture above the camera does make a mechanical noise when it takes the picture. Which could scare away the trespasser (which in my case could be a good thing) but if you are looking to catch many pictures of Bigfoot in your back woods this may not be the camera for you.
The camera uses an SD memory card (same used for many digital cameras) which you can plug into the media slot of your computer to view as needed.
Overall I think this is a great gadget for capturing wildlife (wanted or unwanted) and is easy to setup is pretty effective at capturing photos based on movement in its range. It is rugged we have had some pretty intense weather here over the past few months (hard rain, hail, snow) and the enclosure has stayed completely dry. As for using for “human pests” I would recommend using this due to the internal storage of photos and the ease it is for the “pests” to walk off with your photos and your camera. Though if you are able to install this in a location that is not easily reachable or visible it could work as a standard security camera.
Disclosure: I was given a free sample to review this product but not compensated or affiliated with Swann Communications Inc for this review.
John & Bob’s Grow Green Review and Giveaway
13.2 years ago fertilizer, giveaway, product review
If you have been growing organically for several years your garden is probably beaming with beneficial bacteria and various microorganisms. Though if you are just starting a garden using bags of sterilized soil/compost or are starting with soil that has undergone many decades of chemical fertilizers, John and Bob’s Grown Green might be just what you need.
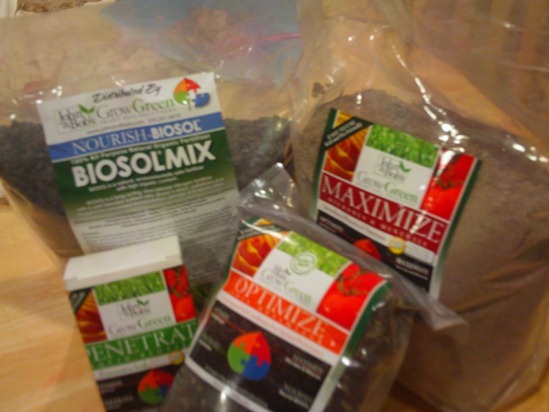
The product comes in four parts: Optimize, Maximize, Penetrate, and Nourish.
Typically when I do a review I will include some of my own experiments to prove or disprove the products I am reviewing. Provided this is a product which can at least a few months to prove its effectiveness I will be doing the following experiment this spring/summer. My lawn contains very bad clay soil (thank you home developers) and is a challenge to keep life growing on it. This seems like a great challenge for the Grow Green products and will do a this half treated, this half treated with my normal alfalfa pellets and we will see which side thrives the most. Though my vegetable garden plots should have good number of microorganisms already established I will also use the product on half of one of these plots where I will be growing tomatoes and identify the benefits for a more established garden.
The great people at John and Bob’s Grown Green have also agreed to giveaway the same sample of the products I have pictured above with include all four Optimize, Maximize, Penetrate, and Nourish products.
There are multiple ways to enter:
- 1. Add a comment to this post
- 2. Like CheapVegetableGardener on Facebook (add an additional comment to the post)
- 3. Like this contest in facebook (add an additional comment to the post)
- 4. Mention this giveaway on your site/Twitter (add an additional comment to the post)
A winner will randomly be picked on 02/21/11.
