What I am growing in my winter garden
12.6 years ago bok choy, cold season crops, garlic bulbs, leeks, lettuce, onions, winter garden

I normally get burned out over the spring/fall and don’t do much for the fall/winter season. This year I decided I want to have a nice selection of winter veggies so I am going all out and start my winter garden.
In the garden now are kale, broccoli, bok choy, carrots, spinach, romaine lettuce, arugula (one of the most profitable vegetables), bunching onions, garlic, and leeks. I wanted to grow Brussel sprouts but I should have started those about 4 month ago.
I grew the lettuce, broccoli, onions, and leeks from seeds in the grow box and transplanted them a few of weeks ago. The bok choy, kale, and arugula were an impulse addition when I saw the plants on sale and struggling at my local grocery store.

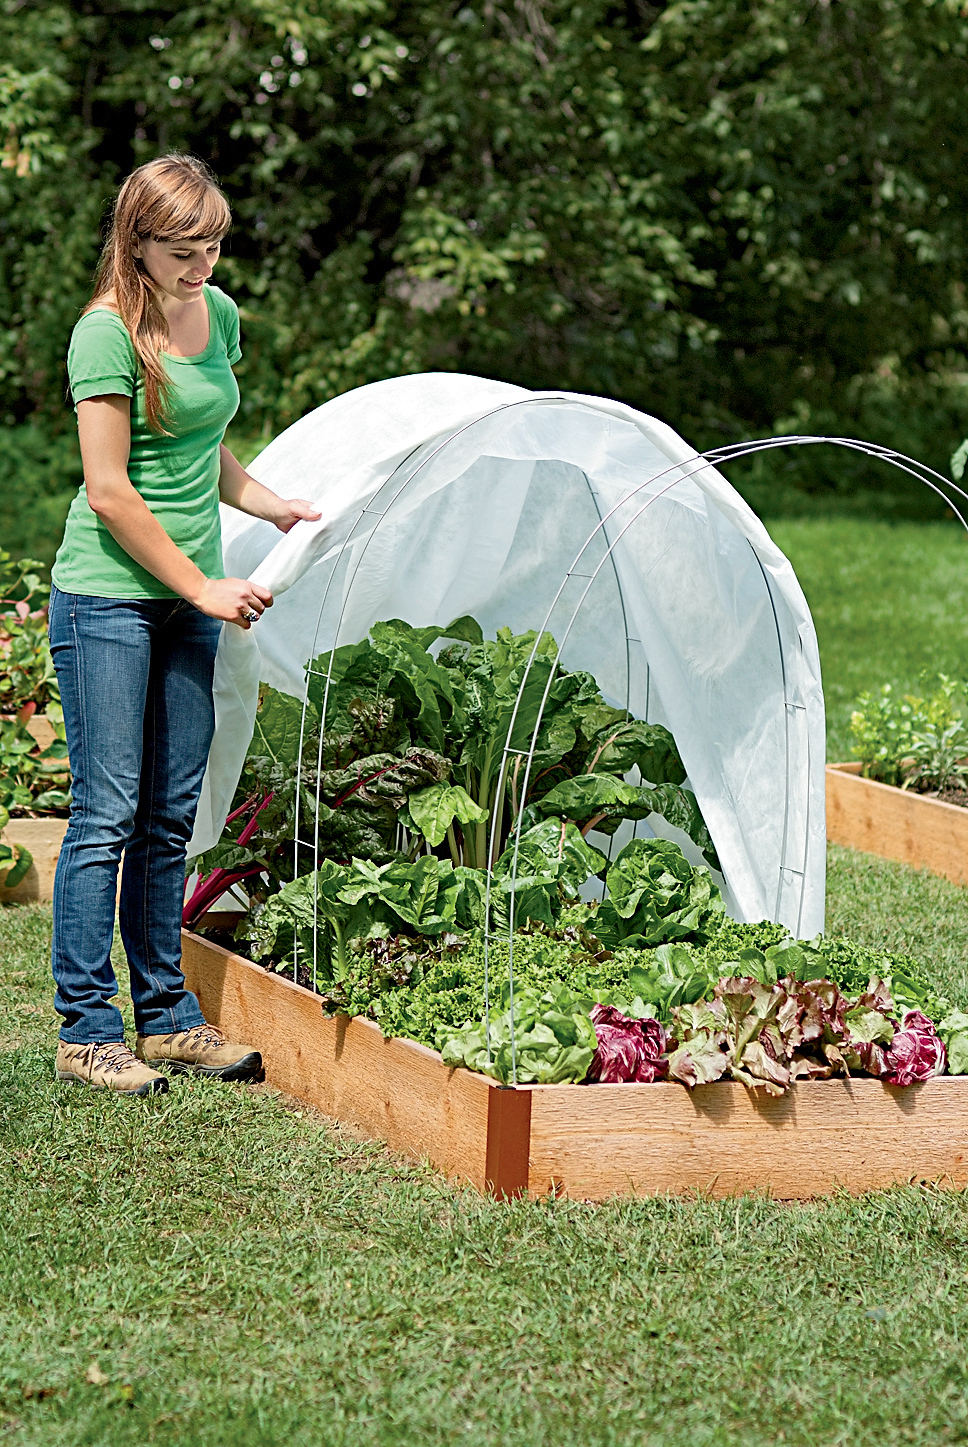
All of these plants should do pretty well with the mild winters we get here in the Pacific Northwest…but our hard rains and occasional snowfall could lead to their downfall. For this reason I came up with this structure which when the rains and/or low temperatures come I will cover with 2.5mm plastic sheeting. Though I plan on adding one more set of cross pieces to prevent sagging in the middle, I consider this design a bit of a hybrid between row covers and a full blown hoop house.

This will provide plenty of space for the plants to grow and ease of getting under the structure to harvest in the rain while not large enough to hopefully not catch a little wind and sail away.
I am excited to continue to collect my harvests all year round.
How to make tomato skin powder

Previously I have just thrown my tomatoes peels into the compost after peeling them, but fortunately I got wind of an awesome technique of repurposing these into some tomato peel powder. This is great when you want to create add some tomato flavor to a omelet or casserole without having to add the additional moisture raw tomatoes would include. As an added bonus these peels have awesome nutritional and health benefits:
Bioavailability of carotenoids from finely crushed peels homogenized in tomato paste appeared to be similar to lycopene from the tomato flesh. Such a peel enrichment of tomato products would be a means to increase the nutritional value of tomato pastes and to enhance the intake of carotenoids. 1
Step #1: Dry your tomato skins. If you don’t have a dehydrator you can dry them in the oven by setting it at its lowest temperature setting. For a bit slower drying process you can place a small fan in your dryer wedging the door open slightly and add a small desk fan to get some air circulating. For added heat place a ceramic reptile heater into the oven to get great results. Depending on the heat you are generating it should take about 12-24 hours for these skins to dehydrate and be brittle breaking (not flexing) when bent.

Step #2: Make some tomato powder. Place your dried tomato peels into a spice/coffee grinder. I personally went with my Magic Bullet with the grinder attachment. Grind until

Grind until until it becomes a fine powder.

You can store this powder for about 6 months in a airtight container, you can get more life out of these if you hold off grinding to just before use given oxidation can only occur where air is permeable so this will give you richer flavors longer. I enjoyed about 1/4 teaspoon of this powder on my omelet this morning and was a great flavor without the excess moisture raw tomatoes provide.
If you don’t have enough tomato peels to fill your needs for tomato powder, you can also do the same process on the flesh of the tomatoes by slicing thin and dehydrating and grinding in the same way.
Tags: tomato
Easiest way to peel a tomato
12.6 years ago peeling, tomato

If you have a lot of tomatoes to peel, I would recommend the classic method of quickly boiling and chilling the tomatoes. Though if you have just a few tomatoes and are making something like pizza sauce or making a little salsa here is the technique for you.
Step #1: Slice your tomatoes and remove seeds. Start by slicing your tomatoes down the middle and remove any seeds and membrane using a small spoon.

Step #2: Grate tomato. Use your standard cheese grater and shave off all the flesh. The skin should be thick enough to keep your fingers safe, but still be careful.

In the end you should have some nice grated tomato ready to make some tomato sauce or some fresh salsa with no chopping required.

All that is left if your tomato peels, but don’t throw them in your compost I have a post coming up with a great way to not waste these tasty part of your tomatoes.

Tags: tomato
How to start a winter vegetable garden
12.6 years ago broccoli, cold season crops, fall crops, freezing, leeks, lettuce, onions, spinach, winter garden

Why let your gardening season end, with a little creativity there are many vegetables that can continue growing right through winter. I find this fun as wells of a rewarding challenge bringing in some great produce from my garden all year round.
Choosing your winter vegetables
First we need to determine what vegetables to grow, given temperature and lack of light will be a reality we will have to go with the colder tolerate spring/fall options. below are some of my favorites and their typical hardy temperatures.
Arugula: Hardy up to 15F (-9C). Not only is this the most profitable vegetable to grow per square foot it is a tasty and nutritious addition to your garden salads a very good source of vitamin A/C/K, folate, calcium, iron, magnesium, phosphorus, potassium and manganese.
Beets: Hardy up to 20F (-7C). With beets you have a couple of options, eat the roots which are an excellent source of folate, potassium and manganese. The other option is to eats the beet greens which are an excellent source of vitamin A/C/E/K/B6, thiamin, riboflavin, calcium, iron, magnesium, potassium, copper and manganese
Bok choy: Hardy up to 24F (-4C). Bok choy is a great source of vitamin A/C/K/B6, riboflavin, folate, calcium, iron, magnesium, potassium and manganese.
Broccoli: Hardy up to 10F (-12C). So many options here and great eat fresh and if you get too much at once it is easy to freeze your excess crops while being a great source of Vitamin A/C/K/B6, folate, potassium and manganese.
Brussels Sprouts: Hardy up to 0F (-16C). If the thought of Brussels sprouts sicken you, don’t give up on these until you try some fresh from your garden. As an added bonus this is a great source of vitamin A/C/K/B6, thiamin, folate, potassium and manganese.
Cabbage (Winter): Hardy up to 5F (-14C). Use for raw for coleslaws or cooked in stews or soups to add some vitamin C, folate, potassium and manganese to your next meal.
Carrots: Hardy up to 15F (-9C). Great in salads, stir-fry, or raw as a quick snack and is also a great source of Vitamin A/C/K and potassium
Collards: Hardy up to 24F (-4C). Great sautéed with a little oil with salt and pepper and a great source of vitamin A/C/E/K/B6, riboflavin, folate, calcium and manganese.
Endive: Hardy up to 5F (-15C). Great addition to salads as well as making or a great addition to sounds. Endive is high in vitamin A/C/K, thiamin, riboflavin, folate, pantothenic acid, calcium, iron, potassium, zinc, copper and manganese.
Kale: Hardy up to 8F (-13C). Sauté as a great side or even bake to make some delicious Kale chips and is high in vitamin A/C/K/B6, calcium, potassium, copper and manganese.
Kohlrabi: Hardy up to 15F (-9C). The taste and texture of kohlrabi are similar to those of a broccoli stem or cabbage heart, but milder and sweeter, with a higher ratio of flesh to skin. The young stem in particular can be as crisp and juicy as an apple, although much less sweet1. Kohlrabi is a great source of vitamin C/B6, potassium, copper and manganese
Garlic: Hardy up to 8F (-13C). One of the most useful aromatics to use in your kitchen and high in vitamin C/B6 and Manganese.
Leeks: Hardy up to 8F (-13C). Great additions/bases for many soups and stocks. Has flavor of onion though not quite as overpowering. It is also a great source of vitamin A/C/K, folate and manganese.
Lettuce: Hardy up to 24F (-4C). Staple for a quick winter salad. Choose varieties with darker leaves for more nutritious goodness of vitamin A/C/K, thiamin, folate, iron, potassium and manganese.
Onions (Bulb): Hardy up to 0F (-18C). Plant these out this fall/winter for some nice large bulbs next spring summer. These provide a great deal of versatility and vitamin B6, folate, potassium and manganese, and a very good source of Vitamin C.
Onions (Bunching): Hardy up to 10F (-12C). Plant a bunch of these and your garden and they will continue to spread and provide additional produce to your kitchen. With just a little bit of protection you can have onions all winter.
Peas: Hardy up to 35F (2C). Can be shelled and cooked and eaten as is or added to some nice soups in the wintertime or kept in the shells and eat raw or a great addition to a nice stir-fry. Peas also provide vitamin A/C/K, thiamin, folate, iron and manganese.
Spinach: Hardy up to 8F (-13C). Just recently got turned back to eating spinach, previously just used in an occasional salad but now I add to omelets every morning for some great taste but are also packed with nutritional potency being a very good source of protein, vitamin A/C/E/K/B6, thiamin, riboflavin, folate, calcium, iron, magnesium, phosphorus, potassium, copper and manganese.
Swiss Chard: Hardy up to 20F (-7C). Vitamin A, Vitamin C, Vitamin E (Alpha Tocopherol), Vitamin K, Riboflavin, Vitamin B6, Calcium, Iron, Magnesium, Phosphorus, Potassium, Copper and Manganese.
When can you actually grow these vegetables
Now that found the vegetables you want to grow now is a good time to check those hardy temperatures of the vegetables you have chosen compared to your average winter temperatures. If your average low for the day is going to fall at or below that limit you may want to consider skipping that one or invest in a little protection.

Using a site like WeatherSpark, you can determine what your average low is for your area and then determine what vegetables you can grow during the winter. As you can see above on average in my area the average low is 36F which allows me to grow most of the cold season vegetables mentioned above. Though it is possible to get an occasional cold streak which cold mean death to my vegetables over the winter.
By using some row covers you can provide a little extra temperature (5-10F) depending on the thickness of the plastic and the volume of air you are attempting to keep warm. The thicker the plastic the better the temperature retention though allows less light to get through. For my area I am going with 2.5mm which should provide some decent protection while still allowing needed light in. When things really go bad you can also supplement with a light blanket at night and/or a couple strings of regular old Christmas lights (no LEDs for this application) to provide a few more degrees.
How to start your vegetables
Though your plants may grow well in the low temperatures germination can be incredibly slow at lower temperatures even for cold weather plants. For this reason you should start your vegetables indoors and bring them outdoors with some minimal hardening off.
As a general rule here are the plants you should be able to start as seeds in the ground now (September):
- Carrots
- Garlic
- Lettuce
- Onions (sets for green onions, seeds for spring onions)
- Radishes
- Spinach
Other plants should be started indoors and planted out as starts. These can be brought out right now so check you local grocery store…this time of year I have found 4-packs of winter vegetable starts as low as $0.25 as the stores are making room for the Halloween pumpkins coming in. Since you will want a continuous harvest you can also start seeds now and every few weeks for a constant supply of winter vegetables all winter long.
Summing things up
By taking maturing and harvest time into account and creating continual planting you should supply yourself with delicious and nutritious selection of vegetables all winter long. I was going to go into what I am growing this year…but this post is already getting long so will write about that later…
How to ripen tomatoes indoors

With temperatures starting to drop and heavy rains on the way it has come time to start pulling some tomatoes to ripen indoors. Tomatoes need ethylene to ripen, this occurs naturally by the tomatoes plants releasing this during the later stages of growth thus causing the tomatoes to change color.
You can do this indoors with the by simply taking your tomatoes that are just beginning to blush and place them in a convenient container. Though you might get some ethylene from the stems remaining on the plants I also will add a ripe banana which also naturally releases ethylene which will assist to the ripening process.
I do this in a contraption I like to call my ethylene tomato gas chamber…

Ok, I know it is just plastic shoe box with a banana in it…this provides a portable area I can add my tomatoes as needed and also able to put a lid on it to contain the ethylene while also keeping fruit flies away from the nice ripening banana.
This technique gives the tomatoes adequate humidity not dry enough to create sundried tomatoes, but low enough to prevent the tomatoes from being too moist which would lead to rotting.

After just a couple days your riper tomatoes should be fully red and ready to eat, now these will not taste quite as good as the ones ripening on the vine, but little tastier than the ones you get in your local grocery store and you know exactly what was sprayed (or better yet…what wasn’t sprayed) on the plants.
Update (Day #2)

Update (Day #3)

Update (Day #4) Put in a new banana

Update (Day #7) Already ate a couple of tomatoes

How to freeze spinach
12.6 years ago freezing, spinach

I made the same mistake I did with the broccoli, by purchasing more spinach (2.5 lbs) than I could eat within a week or two at most before it goes bad. To not be wasteful I decided to to freeze some of the extra.
Start bringing a large pot of water to a hard rolling boil, add as much spinach as you can fit and cover with lid and cook for 2 minutes. Strain into colander and spray with cold water for one minute to stop cooking process.

Allow water to draining out for a few minutes then squeeze out excess with your hands and lay out on some paper towels. Place another paper towel on top and press firmly to remove all additional liquid.

Separate spinach into easily consumable portions (I went with two 5 oz servings) and place into a Ziploc sandwich bag and place these bags into a one gallon Ziploc freezer bag and place into your freezer

As far as cost savings go I can buy chopped or leaf spinach for $1.49 for a 10 oz. package (same amount I made myself) This works out to $2.39 per pound, I can buy a 2.5 lb. bag for $3.00 ($1.20 per pound) or roughly half the price for a pretty simple process.


