Making your own potting soil
10.3 years ago cheap, compost, fertilizer, soil sifter

The last few years have bought a bag or two of potting soil for my spring planting though each year I am disappointed when I open the bag containing a bunch of bark , twigs, gravel, and even several pretty large rocks.
This year I have decided to make my own potting soil with very little effort and much less cost. Given I just recently harvested my compost bin and got about 15 gallons of screened compost as my starting point to make my own mix.
CVG Potting Soil Recipe
Ingredients:
- 15 gallons of screened compost
- 1 brick coconut coir (hydrated)
- 4 cups of vermiculite or perlite
- 1 cup organic fertilizer
Directions:
Add all ingredients to 20 gallon trash container. Mix thoroughly with large shovel until everything is well incorporated. Cover with lid with several holes drilled in the top (otherwise moisture+no light = mold growth)

You can use a smaller container than 20 gallons but would not recommend one smaller or it can be a decent reach to get the last of the soil out of the bottom…
the best fertilizers for carrots
12.2 years ago carrot, fertilizer, guest post

Most of the gardeners love to grow carrots because of the low-maintenance efforts. However, you need to pay some attention one week after sowing the seeds. Carrots need some specific soil conditions in order to be healthy and tasteful. Therefore, before sowing the seeds and also after the seed germination, you need to check the soil to see if it is proper for the healthy growth of the plant. A light sandy soil with lots of potassium and some amount of nitrogen, phosphorus and other micronutrients works best of carrots. So, a soil test is necessary before you plant your carrots, so that you can add the nutrients that are deficient in the soil. Some of the fertilizers that are most suitable for carrots are:
Potash
Potash is a fertilizer that provides potassium. Carrots need a lot of potassium for their growth. If your soil is deficient in potassium, you need to add potash in it. Potassium helps carrot plants in their photosynthesis, water as well as nutrient transport and also plant cooling. Deficiency of potassium can make the leaves to curl and their margins will have a burnt look. Stems also become abnormally short and stunted. Alkaline soil, however, does not require a lot of potassium, but if you have an acidic soil, add potash to make it alkaline before you sow the carrot seeds.
Kelp
Kelp enriches the soil with micronutrients such as calcium, magnesium and boron. These are required by the plant for chlorophyll production. If your soil has a micronutrient deficiency, you need to add kelp. Calcium deficiency can cause stems to collapse and leaves to wither off. Less magnesium can lead to yellowing of the leaves. Carrots with boron deficiency have leaves that have a rosette pattern and they usually turn orange when they grow old. So, to help your carrot plants to grow better, nourish the soil with kelp. Avoid overuse of this fertilizer, as it causes the carrots to become fibrous.
NPK fertilizers
Nitrogen, phosphorus and potassium are the three main macronutrients that are required by the carrot plants. Before sowing your seeds, make sure that your soil has a proper percentage of these macronutrients. These nutrients help in photosynthesis, proper root and leaf formation and the overall development of the plant. Their deficiency can lead to pale leaves and stunted plants that can die soon. NPK fertilizers release all the three nutrients and make it suitable for the growth of carrots. This fertilizer can be added to the soil 30 days after the germination of the seeds. For carrot plants, the amount of nitrogen in the fertilizer should be less than potassium and phosphorus. NPK fertilizer with 1-2-2 label can be perfect. Carrot is a root plant and too much of nitrogen can enhance the growth of leaves and make the carrots hairy and cracked. However, take care not to even overuse phosphorus, as it leads to water pollution.
Therefore, before planting carrots, ensure that your soil has all the nutrients required for the proper growth of the plant. If there is a deficiency, add fertilizers. With little care, you can enjoy tasty, healthy and nutritious homegrown carrots, which are far better than the carrots you find in the market. Always avoid over-fertilization, as this might ruin the flavor of the carrots. Remember to water your plants properly after you add fertilizers.
About The Author: Alia is a blogger by profession. She loves writing on luxury and Designer Rugs. Beside this she is very particular about her fitness and exercise daily to stay in shape. She frequently writes articles related to plastic pollution for her blog Ecofriend.
10 Tips for growing tomatoes in the Northwest
13 years ago alfalfa pellets, blight, blossom end rot, disease, fertilizer, indoor growbox, Pacific Northwest, tomato

Unfortunately we do not have no where near the preferred climate to grow tomatoes. We have extremely mild temperatures with summer maximum average high of 78°F and maximum average lows of 59°F. Take that with our very short window of consistent rain (bringing blight) tomato plants are lucky to even be surviving when planted in our area let alone have a tremendous yield, though with a little planning and care you can be eating delicious tomatoes from your garden.
1. Pick the right variety. You want to choose a plant that has has a low number of days to maturity. Given we have a very short growing season this can significantly improve your chances of growing some ripe red tomatoes. Some good examples of tomato varieties to try followed by the average days to maturity Early Girl (52), Goliath (60), Juliet (60), Oregon Spring (58), Sugary (62), or Sunsugar (62). You may also want to consider growing smaller tomato varieties such as cherry or globe which can be beneficial given the smaller the fruit the shorter amount of time is takes to ripen which could allow you to harvest your tomatoes before the rains along with the diseases.
2. Start with big plants. Paying a couple dollars more on your tomato plants can shave off a 2-3 weeks off your “days to maturity” number so go for the largest plant you can afford. On a budget (or just cheap like myself) plant your seeds early and make use of a greenhouse or grow box to make your own more mature tomato plants and save yourself a considerable amount of money. If you do purchase a larger plant, don’t be in a hurry to get it into the ground…let they nursery keep it alive for you until you have optimum environment to plant it in your garden.
3. Plant at the right time. Even more important that the air temperature is the temperature of the soil you can actually plant tomatoes with a soil temperature of 50°F but the closer you can get to 60°F the better your plants will respond. When it comes to measuring your soil temperature you can use a standard inexpensive soil thermometer but personally I just use my handy digital grill thermometer and if you are concerned about using the same probe in your meat than your dirt you can always pickup a extra temperature probe.

4. Work in the trenches. The temperature of the soil can vary by 5-10°F as you dig deeper into the soil. By planting your tomato plants in a trench no only do you get the benefits of a larger root but also a root system much closer to the surface of the soil which can provide several additional degrees to your advantage. One disadvantage to this method is you do need to be diligent with your watering due since the ground will obviously dry out on the area closest to the surface.

The process for planting trenched tomato plants is very simple. Dig a shallow trench about an inch lower than the root ball. Lay the plant on its side removing an stems that are about to be buried. Cover with soil and pack down lightly and use some sticks to help support the plants until they get adapted to their new orientation. Unless it is pouring down rain when you plant them like I did be sure to water your plants well after planting.

Note: I intentionally took the photo of these plants a few hours after planting to show the expected shock they should encounter…this is normal don’t be alarmed they will perk up in a day or two.
5. Keep your plants warm. As mentioned before the temperatures are almost ever warm enough but fortunately there are a few products to help out a little for this:
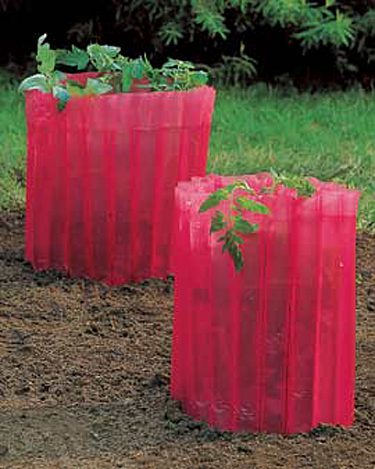 |
These Red Tomato Teepees are simply filled with water and absorb heat during the day and then slowly release it during the night and is advertised to help bring you yields up to 6 week earlier than without them. This provides more adequate temperatures for your plants and also some insurance for cold spring mornings. These are fairly inexpensive and can easily be collapsed and stored away when not needed. |
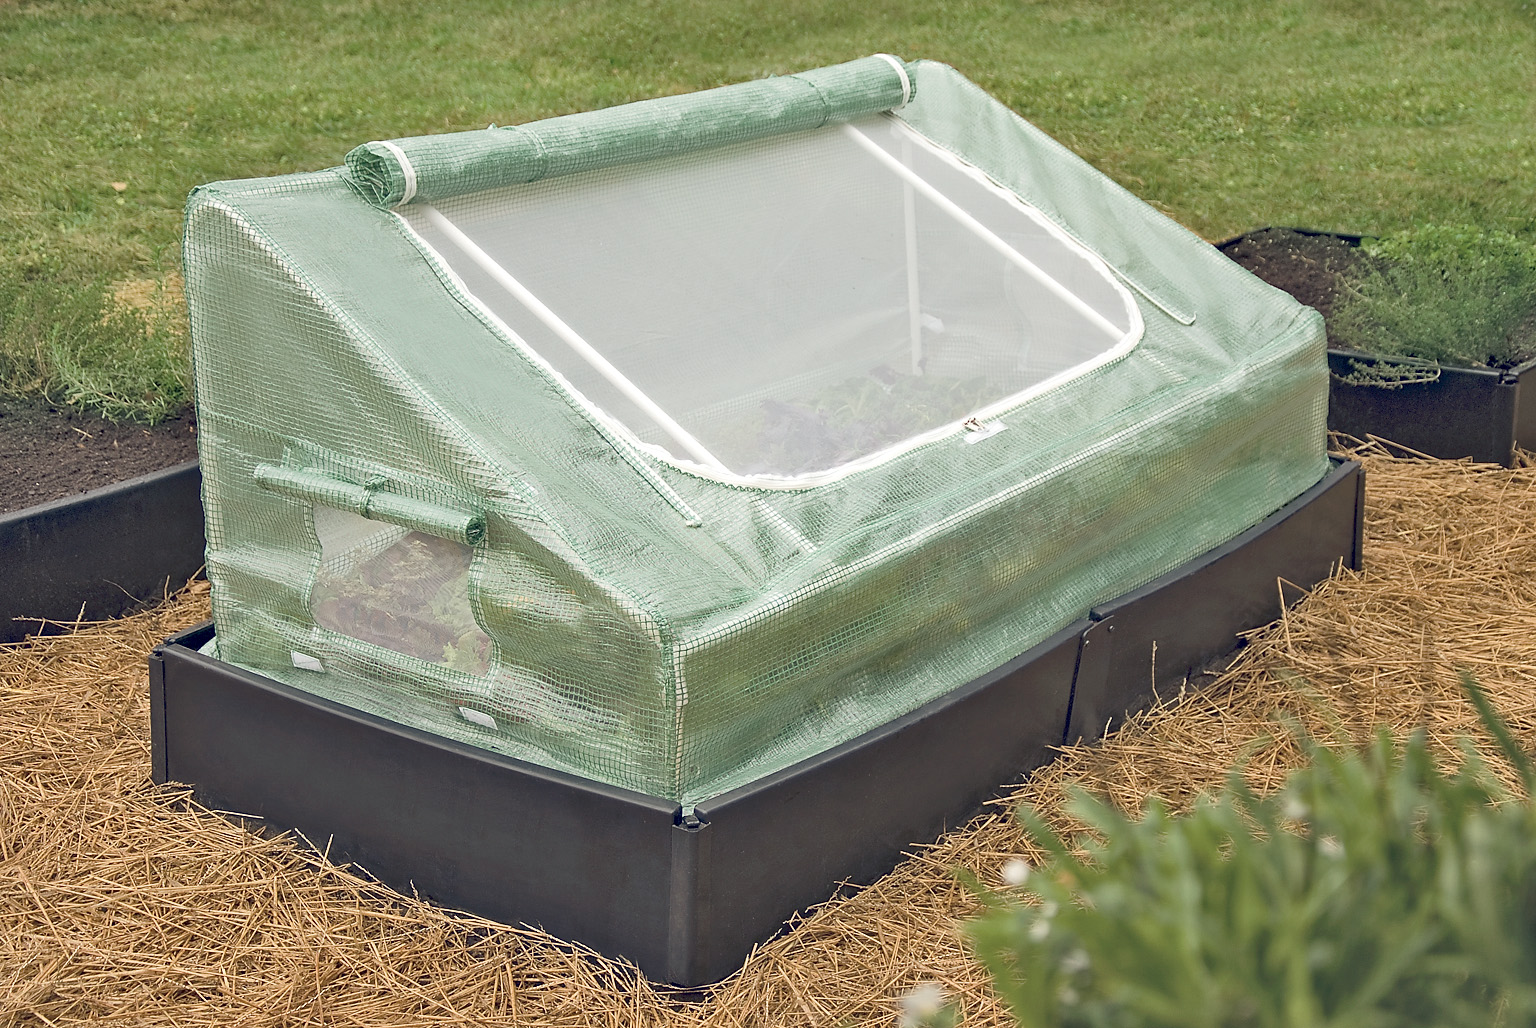 |
If you have a small number of plants to provide a little shelter you may want to consider a cold frame. These provide a few extra degrees of protecting during the cold nights but also protect the plants from high winds and hard rains. You can also use this as a little hot box for your peppers once your tomatoes are more established. |
 |
If you really want to go all out you can also consider soil warming cable this is simply a cable you bury into the ground and plug it in and will provide heat underground where the roots need it most. Now I will be the first to admit this may be more of an extreme measure for your tomato plants but if you are considering growing crops all year round this could be a good investment. |
6. Grow your tomatoes in upside down planters. One of the advantages of growing tomatoes upside down is the planter is exposed to the heat from the sun thus increasing the soils temperature providing better temperatures for the roots of your tomato plants to grow. Now whether you opt to make your own upside down planter or use one of the commercial versions such as the TopsyTurvy, this can be a great way to sneak your plants out at least a couple of weeks earlier.

7. Don’t let your tomato plants get wet. Living in the Northwest, rain happens and there is not much we can do about it. This moisture can spread disease and promote fungal growth so the less moisture you can get on your plants leaves the better. There are a few things you can do to reduce the amount of moisture on your plants. First, when watering your plants avoid getting water on the leaves. Simply water the soil right at the surface, this can be easily done with a soaker hose, long wand spray nozzle, or even a simple watering can. If you are experiencing some hard rains at the end of your season you may be able to delay blight by installing a slight overhang over your tomato plants. By taking some rigid clear plastic and installing over your plants you can reduce the amount of rain that falls directly on your plants while not inhibiting light getting to your plants.
8. Fertilize. Providing the right nutrients to the plants as they need them can help encourage their growth and provide vigorous plants in the shorter period of time. The problem with tomatoes is if you over fertilize your plants will simply grow larger and fail to produce fruit as can be seen from this tomato plant I had growing out of my compost bin.

I provide a weak balanced fertilizer such as alfalfa pellet applied every couple weeks to the top of the soil allowing them to break down and provide nutrients on each watering.

Once the plant begins to set flowers I switch to applying about a 1/4 cup of bone meal to each of the plants about every 3 weeks to allow the plants to get the phosphorous they need during for reproductive function at this this time.
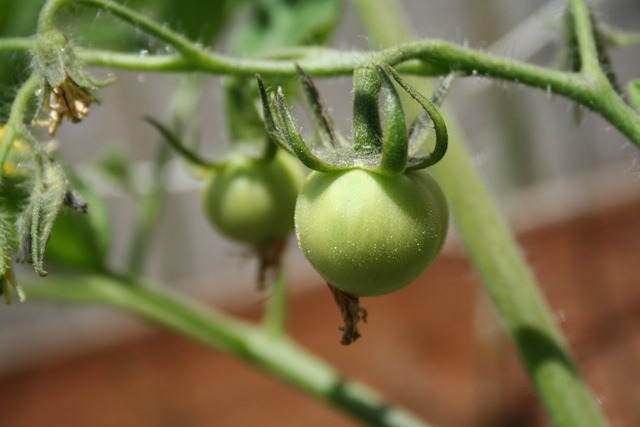
9. Many plants with less tomatoes. The less tomatoes your plants has ripening on its vines the more energy it has to get them to that nice delicious red color for picking. By pinching off all the suckers not on the main vine you will get your tomatoes to ripen more quickly while taking less space. By doing this I can plant my tomatoes 18-24” apart allowing me to get a few extra plants in to make up for some of this lost yield ending up with less green tomatoes at the end of the season.
10. Get supermarket quality tomatoes from your garden. Of course tomatoes ripened on the vine will have the better taste but when your season runs out and your tomatoes are still green what can you do? One option is to take any flawless tomatoes (no bruises, no cracks) place them very gently in a cardboard box padded on bottom with newspaper and place in a cool humid location. You may also add a ripe banana to speed up the process by adding a little extra ethylene. If you are luck in a couple/few weeks you should have some red tomatoes.
John & Bob’s Grow Green Review and Giveaway
13.2 years ago fertilizer, giveaway, product review

If you have been growing organically for several years your garden is probably beaming with beneficial bacteria and various microorganisms. Though if you are just starting a garden using bags of sterilized soil/compost or are starting with soil that has undergone many decades of chemical fertilizers, John and Bob’s Grown Green might be just what you need.
The product comes in four parts: Optimize, Maximize, Penetrate, and Nourish.
 |
Optimize adds humus to neutralize the pH of the soil and also adds nutrients such as calcium and iron which is benefits cellular wall plant growth but important for feeding beneficial micro-organisms (fungi and protozoa) to encourage activity to break up hard soil and fight plant disease. |
 |
Maximize also includes some minerals to feed fungi and protozoa but also brings in the microscopic plant helps as well. This is where you can quickly start adding abundant life to your previously sterile soil. Below are microbial contents:Aerobic Soil Bacteria: 150 micrograms per milliliter.Soil Protozoa: 4,000 per gram.
Soil Fungi: 230 micrograms per milliliter. Beneficial Fungal Mycorrhizae: – Glomus aggregatum: 154 propagules/lb* |
 |
Penetrate is a liquid bio-tiller that contains powerful ingredients that work together to break up hard, clay soils. This comes in two parts, the first is a highly concentrated compost tea with dormant beneficial bacteria (150 million per ml) that are awakened when you combine with the food from the second bottle which provides food to get that bacteria awake and start rapidly reproducing. |
 |
Nourish is an organic fertilizer made from 100% vegetable sources. Specifically the vegetables this is derived from is Soybean meal and cottonseed meal. This organic fertilizer provides the normal NPK nutrients your plants needs but also includes organic matter to support all these microorganisms you have been working hard to get established in your garden. This is a fast acting organic fertilizer which your plants can benefit from immediately but unlike chemical fertilizers will not burn your plants and can be used anytime during the growing process. |
Typically when I do a review I will include some of my own experiments to prove or disprove the products I am reviewing. Provided this is a product which can at least a few months to prove its effectiveness I will be doing the following experiment this spring/summer. My lawn contains very bad clay soil (thank you home developers) and is a challenge to keep life growing on it. This seems like a great challenge for the Grow Green products and will do a this half treated, this half treated with my normal alfalfa pellets and we will see which side thrives the most. Though my vegetable garden plots should have good number of microorganisms already established I will also use the product on half of one of these plots where I will be growing tomatoes and identify the benefits for a more established garden.
The great people at John and Bob’s Grown Green have also agreed to giveaway the same sample of the products I have pictured above with include all four Optimize, Maximize, Penetrate, and Nourish products.
There are multiple ways to enter:
- 1. Add a comment to this post
- 2. Like CheapVegetableGardener on Facebook (add an additional comment to the post)
- 3. Like this contest in facebook (add an additional comment to the post)
- 4. Mention this giveaway on your site/Twitter (add an additional comment to the post)
A winner will randomly be picked on 02/21/11.
How to fertilize/side dress tomatoes/peppers in your garden
14.8 years ago alfalfa pellets, compost, fertilizer, peppers, tomato
When your fruiting plants are flowering and bearing fruit this is a good time to give them a little extra boost. Though you don’t want to throw any old fertilizer at them at this point. You want them to get the nutrients they need to produce high yields of produce, though you don’t want to shock them with an abundance of nitrogen to stimulate new vegetative growth when you would rather the plant expend its energy making you food.
The solution to this problem is to provide your plants with a low dose of balanced fertilizer. I couple of my favorites are compost and alfalfa pellets applied every couple weeks while the plants are blooming/fruiting. This ensures the plants have all the nutrients they be lacking without throwing the plant into a growth spurt.
If you have a little extra time take the compost and add some water and let it sit in the sun for several hours and water or spray onto the foliage for a great dose of compost tea.
If you forgot to apply a little bone meal when you planted your peppers/tomatoes this is also a good time to sprinkle a handful under your plants and work into the couple inches of soil to provide your plants with a boost of phosphorous and also a little calcium to help prevent blossom end rot.
Hopefully with these tips you can help your green tomatoes turn into bright delicious red tomatoes.
If you want to learn more about the chemistry of organic fertilizers I have a whole post on that subject
Tags: alfalfa pellets, cheap, compost, organic vegetables, outdoor plants, pepper plants, tomato plants, vegetables
Chemistry of Gardening: What nutrients do plants need?
15.2 years ago alfalfa pellets, fertilizer, outdoor seed starting
 If I ask my four year old what it takes for a plant to grow she can quickly respond with response, “Sun, water, air, and soil” This is a great answer for photosynthesis since plants need energy from the sun. They leverage the carbon dioxide (CO2) from the air and water (H2O) to create starches and sugar. Now the soil part of this answer is where things get a little more complicated. Soil gives plants the ability for roots to expand and grow but also provides many nutrients to help them as well.
Similar to humans, plants need various minerals to live healthy lives. The primary macronutrients Nitrogen (N), Phosphorus (P), Potassium (K) are required to sustain life. These are the nutrients that plants consume significant amounts which is why these are advertised in big letters on the outside of packages of fertilizer.
MACRONUTRIENTS – PRIMARY
| Nutrients | Benefits | Signs of Deficiency | Sources (N-P-K) |
| Nitrogen (N) | Provides energy to allow vegetative growth. Leafy plants can’t get enough, root plants need very little, fruiting plants need plenty in beginning but too much later in growth cycle will result in big/tall fruitless plants. | Light green to yellow leaves; growth stunted | Bloodmeal (14-0-0) Alfalfa meal (7-3-4) Soybean meal (6-1-2) Cottonseed meal (6-2-2) Fish emulsion (5-2-2) Chicken Manure (3-4-3) Compost (1-1-1) Cow Manure (.2-.2-.2) |
| Phosphorus (P) | Makes plants more stress resistant, allows for fast growth, encourages bloom and root growth. | Red or Purple leaves; cell division slowed | Bonemeal (4-12-0) Chicken Manure (3-4-3) Alfalfa meal (7-3-4) Compost (1-1-1) |
| Potassium (K) | Helps with photosynthesis process, immunities to disease, and increased quality of fruit. | Vigor reduced; susceptible to disease; thin skin; small fruits | Alfalfa meal (7-3-4) Greensand (0-0-3) Wood ash (0-1-3) Chicken Manure (3-4-3) Compost (1-1-1) |
We could live off a simple food like gummy bears for quite a while, but our quality life will decrease once we picked up scurvy and exhibit significant bone and muscle loss. The same idea goes for plants, they can live simply on the primary macronutrients but they will live poor and possibly fruitless (literally) lives. This is where the secondary nutrients come in. With the exception of Calcium, these are not consumed in nearly the volumes as the primary macronutrients though supplementation may be required.
MACRONUTRIENTS – SECONDARY
| Nutrients | Benefits | Signs of Deficiency | Sources |
| Calcium (Ca) |
Helps with cell wall structure imperative for strength of plants |
Growing points of plants damaged | Dolomitic limestone, gypsum, egg shells, antacids |
| Magnesium (Mg) | Required as part of the chlorophyll required for photosynthesis | Yield down; old leaves white or yellow | Epsom salt, Dolomitic limestone, organic material |
| Sulfur (S) | Required for to allow plants to create protein, enzymes, and vitamins. Helps with seed, root growth, and resistance to cold. | Light green to yellow leaves; growth stunted | Rainwater, gypsum |
Finally are the macronutrients, these are the nutrients that most of the time, as long as you are not growing with hydroponics. should exist in your soil and rarely need to be supplemented due to the small amounts that are consumed by plants, nevertheless are still very important for plant growth.
MICRONUTRIENTS
| Nutrients | Benefits | Signs of Deficiency | Sources |
| Boron (B) | Helps in production of sugar and carbohydrate s. Essential for seed and fruit development. |
Small leaves; heart rot (corkiness); multiple buds | Organic Matter and borax |
| Copper (Cu) | Helps in plant reproduction | Multiple buds; gum pockets | Copper sulfate, neutral copper |
| Chloride (Cl) | Helps with plant metabolism | None known | Tap water |
| Iron (Fe) | Helps in formation of chlorophyll | Yellow leaves; veins remain green | Iron sulfate, iron chelate |
| Manganese (Mn) | Helps in breakdown of carbohydrates and nitrogen | Leaves mottled with yellow and white; growth stunted | Manganese sulfate, compost |
| Molybdenum (Mo) | Helps in breakdown of nitrogen | Varied symptoms | Sodium molybdate, compost |
| Zinc (Zn) | Regulates growth and consumption of sugars by the plant | Small, thin, and yellow leaves, low yield | zinc oxide, zinc sulfate, zinc chelate |
Nutrient Deficiency Information from “The Vegetable Gardener’s Bible”
Now you are armed with plenty of information, though unfortunately you can not act on any of this without knowing the chemical composition of your soil. If you simply went by the signs of deficiency (for example yellow leaves) could be caused by one or many nutrient deficiencies. Fortunately you can get this information to act on by running a soil test on your soil. There are a couple options for this if you are simply concerned about primary macronutrients there are cheap DIY home tests, electronic testers, or you can send a sample to a soil lab to give primary/secondary macronutrient and micronutrient levels and recommendations to get your soil back on track. You may also want to check with your local municipal office they may have a cheaper/free option available to you.
Just remember, your perceived lack of a green thumb my have nothing to do with your ability but the chemistry of soil you are working with.
Tags: alfalfa pellets, cheap, compost, garden seeds, led, organic vegetables, outdoor plants, vegetables


