Saving Thanksgiving rosemary and sage cuttings by cloning
5 months ago Uncategorized
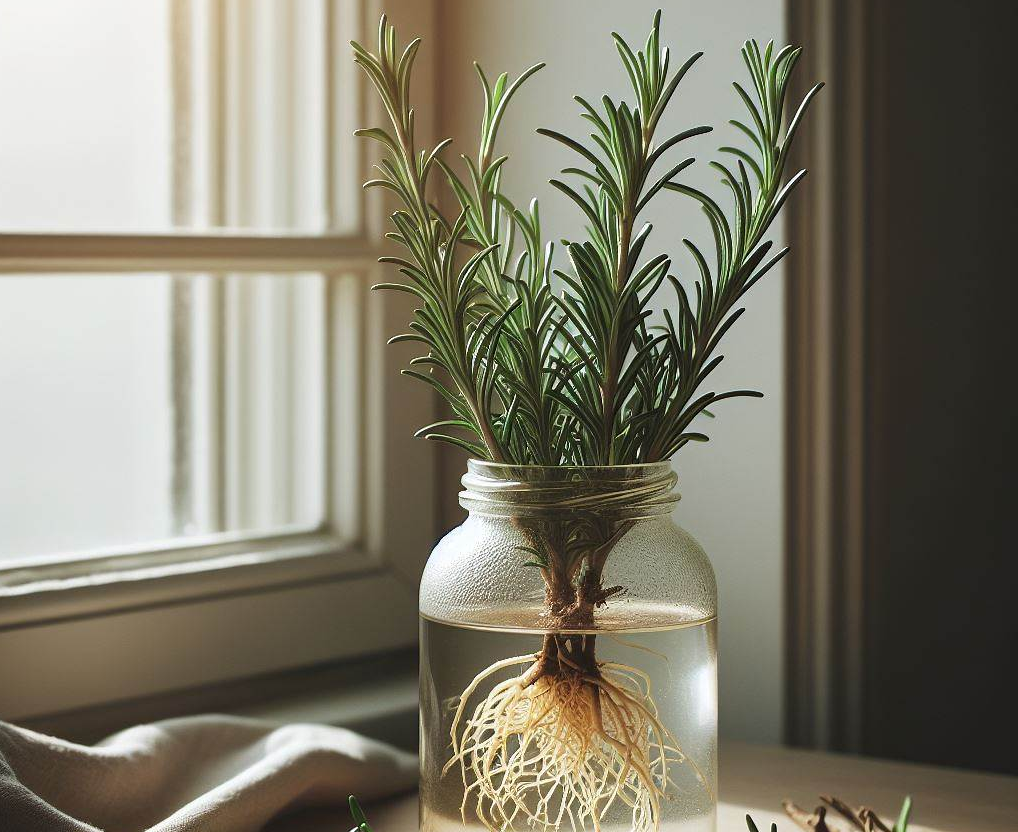
Hey, everyone! I hope you had a wonderful Thanksgiving with your loved ones. Sage and Rosemary are two repeating ingredients in which I typically would get from my herb garden but appears I was a bit lapsed on my watering this summer and plants didn’t make it, so I was forced to buy some fresh herbs from the grocery store. To avoid having to this next year I am repeating what I have done in previous years and cloning them to use next year. Here’s how.
First, you need to trim the cuttings to remove any leaves or flowers. You want to have a clean stem with a few nodes (the bumps where leaves grow). Then, you need to dip the cut ends in some rooting hormone, which you can buy at any garden center or online. This will help the cuttings develop roots faster and stronger.
Next, you need to prepare some pots with moist potting soil. Make a hole in the soil with your finger or a pencil and insert the cutting. Gently press the soil around the stem to secure it. You can put several cuttings in one pot, but make sure they have enough space between them.
Another option here if you are lapsed in remember to keep up in watering and you have an aerogarden you simple put these stripped stems in the water and then once they are more established with some solid roots then transplant to a small pot filled with some quality dirt.
Finally, you need to place the pots in a bright spot, but not in direct sunlight. You also need to keep the soil moist, but not soggy. You can mist the cuttings with water every day or cover them with a plastic bag to create a humid environment. In a few weeks, you should see new leaves sprouting from the nodes. That means your cuttings have rooted and are ready to be transplanted into bigger pots or into your garden.
And that’s it! You have successfully saved your rosemary and sage cuttings from Thanksgiving and cloned them to use next year. You can do this with other herbs as well, such as thyme, mint, basil, oregano, etc. It’s a great way to save money and enjoy fresh herbs all year round. Happy gardening!
Tags: cloning, herbs, rosemary, sage, thanksgiving
Countdown for chicken coop
9 years ago Uncategorized

This weekend we picked up our chicks at Keep It Simple Farm. Our three kids, my two nieces, and one of my daughter’s friends each picked out a chick and we ended up with one Silkie and five Ffrizzles. They are currently two weeks old so I now have four weeks to finish building a chicken coop. Fortunately the first weekend was very productive.

My design is to have a chicken run that is six feet by ten feet with the coop being four feet by six feet giving a decent amount of space to explore. Given we have raccoons hanging around in out backyard having the so plan is to have a solid wood floor and wrap the entire chicken wire in 1/2 inch hardware cloth to help protect those soon to be grown up chickens.

Mantis 4-cycle tiller/cultivator review – Day 1
9 years ago Uncategorized

A week before I was about to move to my new house with a much larger yard I got an email from the nice people at Mantis asking if I would like to review their 4 cycle tiller/cultivator. Given I needed to start from scratch of a new garden and had a decent amount of land to use it on it sounded like a great idea.
The tiller came in the box requiring some basic installation requiring some basic tools. This was pretty easy though guessing it was from some of the long days moving/unpacking but I had some trouble handles put on the right way. Brain kept forgetting I had the thing upside down :) Though after probably about 30 minutes I had the tiller assembled ready for its first mission…expanding the garden.

I previously pulled this ivy-like ground cover away with a rake and some gentle massaging by yanking on it pretty hard and was hoping to have the tiller do some of this heavy work for me. The tiller had some serious power though the ivy just wanted to hang onto the tines and eventually had to remove them to get the mess I created cleared.

Though it had the power to clear this ground cover out this is probably not exactly its designed use so results probably should have been expected.
After clearing some ivy I decided to try digging into the ground a bit by pulling the throttle and walking backwards with it. This caused the tiller to dig deep into the ground where I remembered that my new yard has rocks 3-4 inches down which one ended up getting stuck in the tines where I again had to remove them. In the future I should reverse the tines to use as a cultivator unless I have cleared the rocks deeper ahead of time.

Though I was not too successful with my first use I admittedly was pushing the intended use of this tiller but I was very impressed with the ease of starting (after reading directions) and the power this tiller/cultivator has while still being light enough to pack around with minimal effort.
What is also pretty cool about this tiller is there are optional attachments such as aerator and dethatcher which gives some options to extend it’s functionality without having to take up much extra space in your shed.
My next mission for this tiller is to clear an area of grass under my youngest daughters playset before laying down some wood chips which I expect will go much smoother than this mission…
The Cheap Vegetable Gardener has moved
9.1 years ago new start, Uncategorized

So after decades of living in home in suburbia with a minimal amount of land this month I have moved to a new location where we have 1 acre of land to work with.
Great news is there is awesome potential for gardening here, it also means I have to start over from scratch leaving my previous more mature plants behind…
Though this definitely provides me with some additional space for a garden there are a good portion of our land has some mature trees so still a good portion of space that is devoid of good light for vegetable gardening.

I started by planting a couple apple trees and as a last minute decision I also picked up a pear tree…

Now for the apple trees I did my research and made sure the varieties I got were compatible (Honeycrisp and Ginger Gold) to use as pollinators for each other by ensuring there was not a dreaded black dot when looking at the compatibility chart below I took a picture of at the Grey Barn Nursery where I also bought my trees.

The pear tree (Bartlett) on the other hand I was not as careful by just buying the one so looks like another tree purchase may be in my future.

I also planted a blueberry bush this time spending a bit more money for a mare mature plant given the little stick version I bought at my local home improvement store probably took 4 years to get this size and was just starting to produce. Hopefully this way I might even get some berries to snack on this year (if the birds/squirrels/raccoons don’t beat me to them)

Also found a good fence line to plant some raspberries knowing moving was in the future last summer instead of throwing the sprouts that would pop up in my yard or sneak into my southern facing area for summer veggies into the compost I carefully removed them and put them up into pots which I transplanted into my new location…guess this is a bit of bringing my old garden with me in a way.

So for my actual vegetable garden I am sticking with cinder blocks since they are cheap and I can easily expand the garden as I have more time and plants to fill it (not no soil on blocks on the right going to expand there soon. I also continued my habit of filling the cinderblock holes with strawberry starts.
One great thing about having a bit more space I can now buy screened compost by the yard and let it sit in a pile for a while, much cheaper than my previous buying bunch of bags of mystery compost opening them up and wonder if they mislabeled bark as compost….
For my planting I am going with the tried and true Mel’s Mix (1/3 compost, 1/3 peat moss (or coconut coir), 1/3 vermiculite) which I load up into my garden cart (another new purchase) and add to my planting areas.

So a pond is also an addition to our new property, though I like the look/sound of this reality of maintenance has me a bit nervous so guess you may be hearing a bit about this in the future.

One other potential addition in the future to our property will be chickens we haven’t pulled the trigger on this yet though I have bought the wood for the chicken coop…the building of said coop has not made it as the next priority of projects since we moved in…not sure how chickens and cheap vegetable gardening may go together exactly but sure they will come up 🙂

Handy Tips for a Great Garden
9.3 years ago Uncategorized

Put an end to the mini-gardens you have been planting along the windowsills and rooftops. They are well kept and easy to look after but are in no comparison to the garden you can plant around your house. Let this be the time when you decide to go with the urge of planting a proper garden and experience its beauty and charm.
Garden lovers do plan to plant their own garden every year, but without proper information they expect that it may soon turn into a disaster.
A well-planned garden may save you from many problems. Once saved from these problems, your garden will be your admiration and the best part of your territory.
Here are just a few handy tips for a great garden. Keep these in mind before you pick up a trowel or open a seed packet.
1. Plan Your Garden
A complete plan should be made to plant a healthy garden, which may save you a lot of time and energy later. Everything is important, from selecting the right place for a garden to choosing what you can grow according to the season. Seeds are usually sown in spring, while Fall is favorable for planting trees, shrubs, bulbs and some other perennials.
You should keep in mind what kind of garden you want to grow, a fruit garden, a vegetable garden or a flower garden. Know when to sow and when to reap. And the area should also be selected according to your plants’ need of sunshine.
It is your garden and it is up to you to plant whatever you wish to. As in the beginning, we suggest that start on a small level and once you understand the nature of your plants then go expand the boundaries of your garden.
2. Clean up the Area
You need to clean up the area where you are planning to start growing a garden. You can get rid of the sod covering by smothering it with newspaper. Place a layer of five sheets of newspaper with a 3-inch layer of compost (or combination of potting soil and topsoil) on it and then wait for about four months to let the compost and paper to decompose.
3. Your Soil Matters A Lot
If you know your soil type, then you can easily manage it and get the best out of it. The three basic types are – sand, silt and clay. And if you can’t recognize which one is yours, then take help from a nearby nursery on garden center.
Soil needs a boost as well, which can be done by adding some simple organic matter to it. Such organic material includes the addition of a 2- to 3-inch wide layer of compost, decayed leaves, dry grass clippings, or old manure. It enhances the nutrient level and encourage life-giving soil microbes and worms.
Know when to dig the soil. Though, digging loosens the soil so roots can penetrate more easily, but digging when the soil is too wet or too dry can ruin its structure. You should dig only when the soil is moist enough to form a loose ball in your fist, but dry enough to fall apart when you drop it.
4. Mulch, the best friend of your garden
Sun, rain and mulch are known as the best friends of a garden. A couple of inches of mulch will help in keeping weeds out and water in. The different sorts of mulch which are available are pine needles to cocoa hulls to bark chips. As for a vegetable garden or bed of annuals, you may choose a mulch that decomposes in a few months. Longer-lasting mulch is used for perennials, such as bark chips.
5. Bring seedlings home
Bring all the seedlings outdoors (whether home grown or store bought) and expose them to a steadily increasing amount of sun, wind, and temperatures lower or higher than what they were used to indoors. This process of hardening off gradually introduces seedlings to the conditions in your garden. It may take about 2 weeks.
6. When to Plant
The ideal time to plant is when there is rain in the forecast and no frosts or heat waves expected. Incase forecasts are not that helpful, then try to plant in the late afternoon or early evening to minimize the time the seedlings bake in the sun. And before planting anything, water the soil a day before to keep it moist.
7. Planting
You should know which species to plant together depending on their similar requirements of soil, light and nutrients. You can either plant a single type or multiple types. Planting different species together may eliminate the risk of facing attacks from plant-specific pests.
Keep some space between your plants. Spacing is good for their growth and the bare patches can be filled with flowering plants.
8. Water Wise
The most important element in a plant’s life is water. Seedlings should never dry out; they should be watered daily while they are small. New transplants also need frequent watering, every other day or so, until their roots become firm. The rest of the water requirements depend on your soil and climate.
Watering should be done slowly and deeply. The way you water a plant determines its health.
9. Pests and Diseases
Once you have decided to plant certain species, then make sure you know what kind of pests and diseases attack them. Find organic ways to keep your plants healthy enough to avoid any pest problem. And be prepared to tackle their arrival. It is better to know your problem beforehand.
10. And the hard work continues…
A healthy garden is not a single-day story. You have to keep watering your plants properly and keep maintaining your garden. Fertilizers may change according to the season and you shall need to fertilize the soil halfway through the season. Keep up with your plants’ needs and take care of them.
Get ready to have a garden of your own and rejoice its pleasure. You just need to keep investing time and effort. It will all pay off when the plants will grow up and you will be sitting back enjoying the blessing of having your very own garden. A little hard work today will bring in plenty of joys later.
Author Bio:
Christine Rudolph is a content writer at B&C Pest Control, a Lake Mary Pest Control Provider. Serving homeowners and business owners with its effective pest management and extermination solution.
Cheap desktop aquaponics system
10 years ago Uncategorized

I wanted to create a fun project with my daughter and a proof of concept for an aquaponics setup to have running in my grow box. For those of you new to this concept this is growing plants in a soilless environment (much like hydroponics) but instead of paying for expensive nutrients you use naturally occurring bacteria and fish poop to grow plants.
Now there are fish farm kits out there but given most of the parts for this build I had sitting idle in my garage I decided to construct my own.
First after a trip to IKEA I found some plastic tubs just the right size for my grow box. I got two of the bins and one lid.

This is the basic idea of how this goes together, fish in the bottom plants on top.

Next I took a 1/4 inch drill and made several holes on both the bottom of the top tub and also through the lid. I also added a few extra hole in the lid to ensure water can drain faster from the lid than the water coming in from above. I also drilled a big enough to fit some 1/2 in plastic tubing from an old fountain pump I had lying around.

It is a bit hard to see from this picture but I cut the top of a 2 liter bottle off and drilled a hole in the cap just big enough to fit the top of the plastic tubing through. I then drilled six 1/4 holes and pushed a 6 small pieces of irragaction tubing (pieces of straws could probably work here as well) and positioned them right under the plants roots.

I then filled the top tub 1/3 with aquarium gravel (washed pea gravel would work as well) that I had sitting the the garage and topped the rest with some clay pellets.

Next add some plants and pour water from the top until the tub below is full, start the pump and add a few goldfish and the process begins.

As the fish breath, poop, and pee they will produce ammonia (NH4) this is pretty worthless to the plants but after a few weeks Nitrosomas bacteria will begin converting the ammonia (NH4) to Nitrates (NO2) which plants can absorb some of the nitrogen from but not very efficiently. Finally Nitrospira bacteria will convert the Nitrates (NO2) to Nitrates (NO3) which is easily converted by the plants producing some nice vibrant greens with fish poop.

You can even do this whole process without even having fish by simply adding pure ammonia to you water which will create the same natural bacterial processes without having to remember to feed your fish and a small bottle of the stuff only costs a couple dollars on Amazon.


