Making your own potting soil
10.3 years ago cheap, compost, fertilizer, soil sifter

The last few years have bought a bag or two of potting soil for my spring planting though each year I am disappointed when I open the bag containing a bunch of bark , twigs, gravel, and even several pretty large rocks.
This year I have decided to make my own potting soil with very little effort and much less cost. Given I just recently harvested my compost bin and got about 15 gallons of screened compost as my starting point to make my own mix.
CVG Potting Soil Recipe
Ingredients:
- 15 gallons of screened compost
- 1 brick coconut coir (hydrated)
- 4 cups of vermiculite or perlite
- 1 cup organic fertilizer
Directions:
Add all ingredients to 20 gallon trash container. Mix thoroughly with large shovel until everything is well incorporated. Cover with lid with several holes drilled in the top (otherwise moisture+no light = mold growth)

You can use a smaller container than 20 gallons but would not recommend one smaller or it can be a decent reach to get the last of the soil out of the bottom…
How to harvest your compost from your portable compost bin
10.3 years ago compost
![WP_20140104_002[2]](http://www.cheapvegetablegardener.com/wp-content/uploads/2014/01/WP_20140104_0022.jpg "WP_20140104_002[2]")
When it comes to making compost I am pretty lazy approach to this process, no turning, no tumblers, just stack up material in the compost bin and let natural decomposition process and worms do their job.
Given I use a portable SoilSaver Classic Composter with just a bit muscle I can lift this off my pile of compost. As you can see with the composter removed you can view the various layers of composted and completely raw materials with various levels in between.
I then take the empty composter and move to a new location where not much is growing. What is great about having the ability to move your composter location is it will rejuvenate the soil under it so once you compost there for a year or so and move it it would be difficult for something to not grow there.
![WP_20140104_016[2]](http://www.cheapvegetablegardener.com/wp-content/uploads/2014/01/WP_20140104_0162.jpg "WP_20140104_016[2]")
Taking a shovel keep removing the material that still needs some time in the composter and place back into compost bin in its new location.

Keep taking a layer off at a time until you reach this stuff, nice finished compost. You may still have some uncomposted material mixed in there so I like to run this through my homemade soil sieve to filter out the larger material. When I am running the material through I am not too careful to get every bit of finished compost out to leave some in the compost bin as a starter for the next batch.
![WP_20140104_019[2]](http://www.cheapvegetablegardener.com/wp-content/uploads/2014/01/WP_20140104_0192.jpg "WP_20140104_019[2]")
Add aeration to compost bin with irrigation pipes

Here is a quick and easy way to add additional aeration and also provide a convenient way to deeply water your compost during dry months.
Simply cut to length of corrugated irrigation pipe with a utility knife and run them through your compost bin.

Fill with uncomposted material being careful to not add material in the exposed tube(s). This should allow better airflow to your compost bin without the extra effort of turning your material as often.
5 Easy Money-saving Gardening Tips
11 years ago cheap, compost, guest post

Starting and keeping a garden is a great way to spend your time for those of you with a green thumb. I just recently took up the hobby, and was shocked at just how expensive it was to start a relatively large garden in my back yard. Undeterred by the cost, I opened my wallet, pulled out the no fee credit cards and began buying seeds, mulch, and the tools I needed to keep my garden looking great.
Make you own compost. There are two big benefits to composting. First, those scraps from the vegetables and other foods you spent your hard-earned money on don’t go to waste, allowing you to make the most of your purchases. More importantly, however, compost is free nutrient rich soil for your garden. It’s easy, too.
A very simple way to create a compost area is to choose an area of your yard that’s away from everything else and section it off with chicken wire. Once you’ve built your bin, simply toss your scraps, veggie peelings, egg shells, and more into the bin and let it decompose. Compost soil takes about a year to be ready for gardening, but once it’s ready, you’ll have some of the freshest free soil around.
Cut back on mulch. Have you laid mulch and then had pesky weeds pop up anyway? If you answered “yes,” there’s a good chance that you also purchased more mulch to lay over the invading weeds. There’s a simpler solution, however.
Next time you go to lay mulch, take some of those old newspapers out of your recycling bin and lay them flat over the area where you’re going to lay the mulch. With this biodegradable layer between the weeds and the mulch, you’ll see fewer of their little heads popping through the wood chips, and you’ll save money since you’ll have to reapply your mulch less often.
Buy self-seeding plants. Another really great way to save money on your garden going forwards is by not having to by new plants every year. Many plants – like Foxgloves, Oriental Poppies, etc. – are self-seeders. This means that as they deteriorate in the colder months, they will release seeds that will germinate when the weather gets warm again.
This is a great way to save money on your garden because it removes some of the monetary burden of purchasing all-new flowers at the start of each warm season.
Start small. One way to facilitate the lushness of your garden is to buy larger, adult plants instead of growing from seeds. Many gardening stores sell larger plants because they are more expensive to the buyer, however. To save some money this year, but smaller, starter plants or grow your garden from seeds. Seeds and smaller plants cost less because they’ve cost the growers and distributors less to grow and maintain.
For some, growing a garden can be challenging, but if you’re willing to try, going this route will save you money upfront and could very well produce just as beautiful a garden as larger plants.
Become a plant food chef. Another expense that can be very important to your garden (and its health) is purchasing plant food. Plants, like all other organisms, need certain things to thrive—water, light, nutrients, and more. And one of the ways we give plants nutrients is with expensive plant foods.
You can, however, save money on plant food by making your own. Here’s how: take compost and place it into a large container of water for a week. When the week’s up, the water should be murky and brown. That means it’s ready. Now, use this mixture to water your plants—it will work as well as store-bought foods, but will lack the chemicals found in them.
The biggest tip I can give you is to keep it small and simple until you get the hang of it. Gardening is supposed to be relaxing, not complicated. If you want complicated, try understanding section 529 college savings plans. That’s complicated. Gardening should be the opposite of that, and once you get the hang of it, it is.
How to fertilize/side dress tomatoes/peppers in your garden
14.8 years ago alfalfa pellets, compost, fertilizer, peppers, tomato
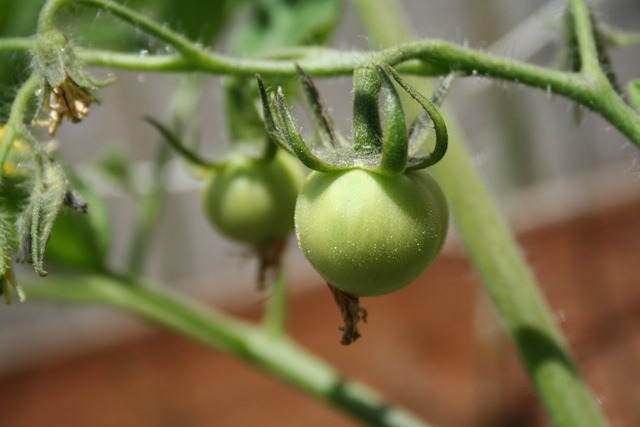
When your fruiting plants are flowering and bearing fruit this is a good time to give them a little extra boost. Though you don’t want to throw any old fertilizer at them at this point. You want them to get the nutrients they need to produce high yields of produce, though you don’t want to shock them with an abundance of nitrogen to stimulate new vegetative growth when you would rather the plant expend its energy making you food.
The solution to this problem is to provide your plants with a low dose of balanced fertilizer. I couple of my favorites are compost and alfalfa pellets applied every couple weeks while the plants are blooming/fruiting. This ensures the plants have all the nutrients they be lacking without throwing the plant into a growth spurt.
If you have a little extra time take the compost and add some water and let it sit in the sun for several hours and water or spray onto the foliage for a great dose of compost tea.
If you forgot to apply a little bone meal when you planted your peppers/tomatoes this is also a good time to sprinkle a handful under your plants and work into the couple inches of soil to provide your plants with a boost of phosphorous and also a little calcium to help prevent blossom end rot.
Hopefully with these tips you can help your green tomatoes turn into bright delicious red tomatoes.
If you want to learn more about the chemistry of organic fertilizers I have a whole post on that subject
Tags: alfalfa pellets, cheap, compost, organic vegetables, outdoor plants, pepper plants, tomato plants, vegetables
Growing seedlings with compostable coffee cups
15.2 years ago cheap, compost, indoor seed starting, tomato
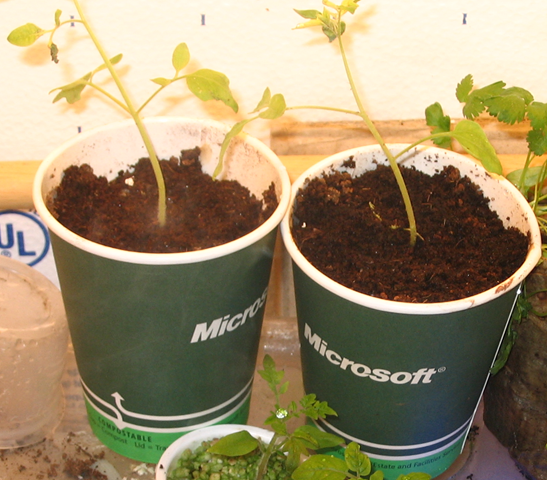
Occasionally at work I get a craving for some hot chocolate. When I do, I reach for a company provided compostable coffee cup (I know I should bring in my own cup, but I did say “occasionally”). When I am done with my delicious beverage, I simply dispose of them in the proper “compostable” reciprocal. Last week was different, with my recent frustration with the durability of some of my newspaper pots, I got the idea to extend the life of these cups a little longer and grow some seedlings in them.
This particular type of cup breaks down in 47 days, unless you happen to leave one half filled with liquid overnight on your desk, in that case they magically breaks down a few minutes after you walk out the door. I am planning on growing my tomatoes and peppers in these cups and plant them directly into the soil. To help with more freedom in root growth I will cut out the bottom of the cup. I will let you know how it works.
Now if your work does not use these cups, never fear many coffee shops are featuring these same type of cups with the purchase of an overpriced hot beverage.
Tags: cheap, coffee grounds, compost, garden seeds, led, outdoor plants, pepper plants, tomato plants, vegetables


