Make a worm bin out of a bath tub
15.3 years ago vermicomposting, worms

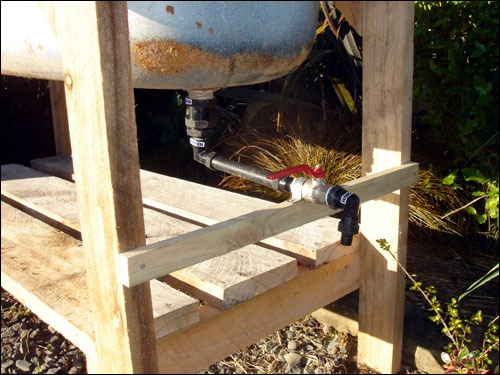
Over at LifeBoat Farm they have created this great DIY Worm Farm out of an old bathtub. What I like about this build is they could have easily taken the bathtub propped it up on some cinder blocks and have been done with it. They took the extra effort with the wood enclosure (with bonus storage shelf) and proper drainage making use of the actual drain it almost appears that this is the true use for this bath tub.

Tags: worms
Make your Garden/Lawn into a gigantic worm bin
16 years ago alfalfa pellets, vermicomposting, worms
My soil is consisted of a high percentage of clay, as a result I am required to aerate my lawn twice a year to avoid my soil getting too compacted. I am cheap so I purchased a $10 aerator from Home Depot which I walk around the lawn giving it a nice look of a goose bathroom until the next good rain or mowing. Of course nature has an answer which is the garden earthworm. As a finished limping behind my aerator I thought how can I get more earthworms to do some of this work for me, which brought me to the conclusion to turn my lawn and garden to a gigantic worm bin.
As worms wiggle through the ground they break up the soil and provide pathways for water and air to flow and while they are at it drop their nutrient castings along their way. Now looking at my tips on how to care for a worm bin, the same principles apply to doing the same on a larger scale. Our course my wife and HOA would appreciate me just throwing our kitchen waste out in our front yard so I have to be a little more creative. For organic matter to feed the worms (and the lawn) I will be using alfalfa pellets and grass clippings (mulch) As for moisture, given I live in the Seattle, WA area our frequent rains take care of this until mid summer where short frequent watering will keep the grass and the worms happy. I will avoid chemical fertilizers, herbicides, and pesticides using organic options to control weeds and pests and occasional application of alfalfa pellets to fertilize the lawn.
At this time the results look good the lawn looks great and I have definitely seen an increased number of worms in my garden and yard. The birds have also noticed and are taking advantage of my increased population and taking care of some of the excess in my lawn (guess it is better than them eating my seeds planted in the garden)
Just as a warning like everything in life too much of anything is normally not a good idea which can apply to worms as well. Worms can move enough soil and leave piles of castings on the surface which can create a lumpy lawn, which as long as you don’t have a putting green for a lawn this will probably not be unsightly and on the next rain will give some extra nutrients to your soil/lawn. Given the current state of my soil I have quite a while until I am burdened with having too loamy soil and need to be concerned on how to drive the worms away.
Tags: alfalfa pellets, birds, cheap, compost, garden seeds, organic vegetables, outdoor plants, vegetables, worms
Vermicomposting – How to harvest your worm poop (castings)
16.1 years ago harvest, vermicomposting, worms
Now your worms have been working hard eating, pooping, and reproducing so now it is time to harvest the fruits of their labor (worm castings) There are a few methods to harvest worm castings so I will briefly describe a few:
Dump and Sort Much like it sounds you simply dump out your worms and castings onto a plastic sheet. Sort through and catch as many worms as you can and set them aside.
Divide and Harvest Move you compost and worms to one side of your worm bin and fill the other half with new bedding. For the next couple weeks only bury food on the side with the fresh bedding. During these two weeks a majority of the worms will move over to the other side where you can harvest the castings minus the worms.
Moving on Up Create a second bin which you place on top of your existing one (Rubbermaid containers and 5 gallon bucket worm bins work great for this) and fill it with clean bedding and food and after a couple weeks the worms will migrate into to the new bin. Now you simply harvest the lower bin.
Using any of these methods I would suggest using a soil sieve like I showed how to create previously to better separate food/bedding from the castings and either use the remains in your next bin or put them right into your compost bin.
Tags: cheap, compost, vegetables, worms
Vermicomposting – How to take care of your worms
16.1 years ago vermicomposting, worms
Your worms need 6 things to stay healthy: temperature, food, moisture, airflow, bedding, and darkness.
Temperature: Your worms need to be stored between 55 and 77 degree. During the hot days of summer you should keep your worm bin in the shade and during winter you should keep it indoors or in your garage.
Food: Worms are vegetarians so any garden waste you normally would add to your compost (expired fruits and vegetables, bread, egg shells, cereal, etc) you can give to your worms. There are some tricks to make the fruits/vegetables easier for the worms to eat by putting the food in your freezer for a few days and/or putting it in a blender and make a worm food smoothie.
Moisture: Lack of moisture is the easiest way to kill off your worm population. Like us worms contain a high percentage of water without moisture they will dry out and die. Most of the time the food you add will give your worms enough moisture to be happy but on hot/dry summer days you might need to add a little extra water to your bin.
Airflow: Worms need air to live, make sure your worm bin has air holes. You must also ensure that your bin does not get too soggy which can suffocate your worms. If you find your bin begins to get too wet add some shredded paper and mix in with the existing bedding. If you bin frequently gets waterlogged you may want to add some extra air holes to your bin.
Bedding: Bedding gives worms space to live and also allows area to bury food scraps. This also adds material to store some extra moisture.
Darkness: As long as your bin is created out of a opaque material and you keep a lid on it this one should take care of itself.
Tags: compost, vegetables, worms
Vermicomposting – How get your worm bin ready
16.1 years ago vermicomposting, worms

Now you have created your own worm bin now you need to get it ready for your worms. The worms need some bedding, which you can buy some coir worm bedding online or you can make some yourself by taking confidential documents from your shredder and soaking in water until it has the consistency of a wrung out sponge. Now not only shredding your documents but having worms eat them and then spreading their castings in your garden, talk about organic security. Simply add this wet paper with a handful of compost for grit (worm fiber) to your worm bin and you are ready for the worms.
The best worms you can get for vermicomposting are red wriggler (Eisenia Fetida) because they digest nearly their weight per day, creating lots of precious castings. They also enjoy eating close to the surface so they will happily eat food you place at or just under the surface. You can purchase these red wiggler worms online or at your local worm farm. I could not get myself to pay $20 for worms, so I went the cheap route and with my daughters took some worms from our garden. They do not have as big an appetite, if I get a population more than my bin can support (yes they multiply quickly) I can simply add them to my garden without worries of effecting the native worm ecosystem.
Now you should have a happy worm habitat which can provide rich nutrients to your garden.

Tags: cheap, compost, organic vegetables, vegetables, worms
Vermicomposting – How to make a cheap worm bin
16.1 years ago vermicomposting, worms
Why would I want a worm bin? Well my initial reason was my daughter wanted a pet worm and I decided making a worm bin would be a much better option than having worms escaping in our house. After researching into the world of vermicomposting, harvesting worm poop or castings for the nicer which is basically the best thing you can add to your garden. It is also a great way to compost your garden/kitchen waste if you have limited outdoor space such as a condo or apartment. There are actually many books on the subject but the most well known is Worms Eat My Garbage most likely for the catchy title.
There are many options for creating a worm bin for Vermicomposting. You can take a 5 gallon bucket drill a few holes (1/2 inch) in the bottom and stack multiple or use a single one and put a lid on top also with some hole drilled (1/4 in) in it. If you are really serious and want to make harvesting your castings easier, you can purchase a worm factory or Worm Chalet online.
I obviously like to go the cheap route and I didn’t have any extra 5 gallon buckets I wanted to sacrifice, so I opted for another method of using a 14 gallon Rubbermaid container. Using the same premise as the bucket I drilled 3 holes (1/2 in) in the bottom for drainage and about 30-40 around the top 3 inches of the container to allow for sufficeint airflow. As any project my daughter insists she needs to “decorate” which included coloring and labeling our finished product with a permanent marker.

Tags: cheap, compost, led, vegetables, worms


