How to make pickles
10.7 years ago cucumbers, pickles, recipe
 When my first cucumber started to rot in the vine when I was waiting for it to mature, I realized that I grew the smaller variety of which grows 6-8 inch cucumbers which are perfect for pickling to enjoy a nice nutritional snack. Having a few nice specimens on the vine this afternoon I decided to make myself a few pickles. Step 1: Clean the pickles. One of the surprises when I picked my first cucumber a few years back was the little spikes they have on them…you don’t see any of those by the time they make it to you in the grocery store. I quick bit of brushing of your hand should get these off. Finish this off with a quick wash in the sink and you should have a few clean almost pickles.
  Step 2: Cut the Pickles. If you have a small variety like mine you can get away with simply quartering (or cutting in sixths if you have an extra girthy one). For full size cucumbers you will probably need to cut it into two pieces and cut each half into sixths or eighths depending on how large of spears you desire.
  Step 3: Brine the Pickles. There are many good recipes for brines out there. Here is my favorite that provides a good balance of sweet/salty/spicy as well as some extra components to have a nice balanced flavor profile. Simply add the ingredients to a 1 quart mason jar, give it a little shake, then add your cucumbers. Secure the lid of the jar and give the jar another shake and place in your refrigerator.
My Pickle Brine
- 1 clove garlic
- 1/2 cup apple cider vinegar
- 1 cup water (or enough to cover the pickles)
- 3 T sugar (artificial sweetener works here)
- 1/2 tsp salt
- 1/2 tsp dill
- 1/4 tsp pepper flakes
- 1/4 tsp cloves
- 1/8 tsp cinnamon
- 1/4 tsp coriander
- 1/4 tsp mustard seed
- 1/4 tsp black pepper
Step 4: Wait. This can be the hardest part, you need to wait at least 3 days for your pickles to brine, possible a couple of days more if you needed to add much more than 1 cup of water to cover your cucumbers. As more cucumbers come in you can simply add them to the jar and have a non-stop supply of incoming snacks…at least until the end of summer. For something a little more traditional you can also try the following:
Alton Brown’s Dill Pickle Brine
- 5 1/2 ounces pickling salt, approximately 1/2 cup
- 1 gallon filtered water
- 3 pounds pickling cucumbers, 4 to 6-inches long
- 1 tablespoon black peppercorns
- 1 tablespoon red pepper flakes
- 2 cloves garlic, crushed
- 1 teaspoon dill seed
- 1 large bunch dill
Directions: Same process as above though probably going to have to wait 6-7 days before your pickles are ready and are good for about 2 months.
How to make a tomato/cucumber cage
10.8 years ago cheap, cucumbers, DIY, tomato, trellis

In my area, the tomatoes and cucumbers plants are starting to take off and are in desperate need of some additional support. After walking the aisles of my local home improvement store I couldn’t make myself pay the $15-30 for a single support. Sure they look real pretty but at that price it could take a few seasons to even break even for an inexpensive vegetable like cucumbers.
For this build I wanted something that was inexpensive and would be strong and hold up for years to come. My first thought was cattle panels they are made of 1/4 inch steel. You can find them even thicker if you want, but this size was perfect for my needs and is much easier to work with.
Note: For those observant people out there you may see some similarities between the cucumber/tomato cage and my pea tower…well they are the same thing and in my case I even reused my pea trellis tower to use with my cucumbers when my peas stopped producing. So this is a great multi-tasker in the garden.
Construction
First I started with a 4 foot by 8 foot cattle panel which ran me about $6 at Home Depot.

Given the panel had sharp edges and my largest vehicle is a pretty new minivan with leather seats I planned ahead and started the construction in the Home Depot parking lot (yeah got a couple funny looks) Taking a piece of scrap lumber I brought with me, I placed it on the 5th cross section on one side and bent it up until it was perpendicular to the ground then repeated with the other side.

The I carefully placed the bent panel into my minivan and brought it home for the remaining construction which pretty much was adding a zip tie in the middle to make a isosceles triangle and then tucked both ends to interweave with the other open side of the tower.

Next I used some pliers to not have as many sharp pointy parts for my kids…probably more likely me to poke myself with and also filed down any ends that seemed overly sharp. If you happen to have an angle grinder this would be a great way to quickly take care of these

Now you have everything constructed all you need to do is carefully place this over your tomato or cucumber plants and they shouldn’t have any problems climbing up this structure. I also just used my foot to push the pointy ends on the bottom into the ground to provide some additional support.
You might also see in this case I am also using a self watering 5 gallon bucket for my planter for this cucumber plant which has been working awesome. Just top off the water every few days and every two weeks include a little fish fertilizer in with the water to keep the growth vigorous.

Due to the size and shape of this design it should remain very stable the entire season and many more to come and at just $5-6 a piece and about 5 minutes of work a great value as well.
Making the Most Out of a Small Space
12.2 years ago cucumbers, peas, trellis

There is a common misconception that you need to have a huge sprawling garden to be able to grow vegetables, but that is simply not true. Even the smallest of gardens can grow sumptuous vegetables. By utilizing the space you have available you can grow a wide variety of climbing vegetables. Whether you have a gazebo, a trellis or just an outside wall you can plant some truly succulent vegetables, which will produce not only food, but also some amazing flowers too.
Runner beans are a great plant to start with; all they need is sunshine and fertile soil. They also produce flowers, which are certainly a welcome addition to any garden. For runner beans you need to either make a wigwam, lashed together with string at the top, or create a parallel row of canes, which are firmly secured to a horizontal cane running along the top. The best time to plant Runner Beans is a week before the last frost; these plants are originally from South America so die out every year after the frost. Runner beans need to be watered particularly heavily, but twice a week in dry weather.
Japanese cucumbers, which will reach several feet, are a more demanding vegetable, and require different types of fertilizer at different times of the development, although all the hard work is certainly worth it, especially when you get to taste your produce. Although not widely known, several of the smaller pumpkin species, including trailing pumpkins, can be grown vertically. These are easy to grow and even easier to cook and enjoy! Marrows will also clamber over fences, or up trellises. All you need to do is prepare the soil well, with lots of fertilizer.
There are hundreds of things that you can grow up a trellis over a wall and even up a gazebo, so this spring make the most out of the space you have!
Late summer harvest
12.6 years ago cucumbers, jalapeno, peppers, summer, tomato

One of the good things about a cold summer is still getting harvests of summer vegetables now into October. Got another cucumber for summer fall pickles and some tomatoes I have ripening inside which this weekend I used to make some low carb pizzas.

One thing I was especially excited about was my jalapenos finally getting ready to be picked which I will dry and make jalapeno pepper powder which is an excellent addition to eggs in the morning and burgers in the evening providing the taste and kick of jalapenos without the texture and moisture.

I have also picked some green peppers which I will be drying out for my own variation of not so sweet paprika.

Hardening off plants in the grow box
15.1 years ago computer, computer power control, cucumbers, electronics, indoor growbox, tomato
When you have seedlings growing indoors or a greenhouse during their life they have had the opportunity spending it in a near perfect environment with controlled temperatures, consistent lighting, no wind, etc. If you take this happy plant and move it directly into the wild (your garden) it can, and probably will, go into shock leading to its sudden death. The solution to this problem is to hardening off the plant. This is a process of slowly getting the plant accustomed to the real world environment a couple hours at a time.
You start by bringing the plant outside for two hours in the late evening or early morning hours. If the plant begins to wilt let it recover indoors until it appears healthy again. Each day increasing the amount of time it is exposed to the outdoors over 1-2 weeks period, or until the plant can survive a full day/night outside. At this time it is ready to get its permanent home in your garden.
This process takes a lot of patience, which as they say is a virtue. Unfortunately I believe I am missing this virtue. My history of hardening off plants follows a similar pattern; bring out a plant in the evening with the full intentions of bringing it back in after a few hours, unfortunately I forget and it spends its first day out in the cold all night which normally the demise of my summer plants.
![image[18]](http://www.cheapvegetablegardener.com/wp-content/uploads/2009/03/image18.png)
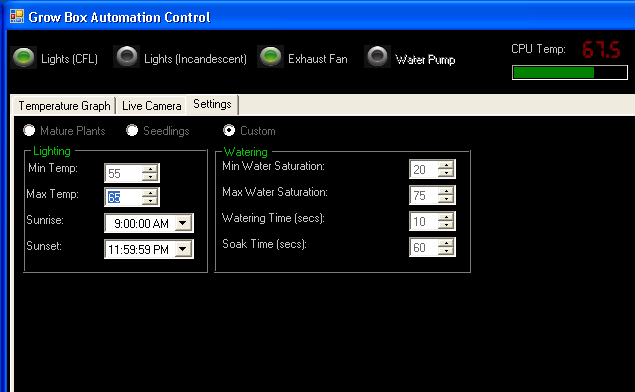
This year I am using my grow box to harden off my plants. Normally the grow box runs at about 68-72 degrees which is a great environment for my seedlings. By allowing some hot air to vent and lowering the maximum temperature setting in the software I am able to bump the temperature down to a range of 57-65 degrees. After a few days I will drop the temperature a few degrees until it has similar low temperature to the outdoors, while still staying at a safe temperature for the plants.
Given today using an unknown neighbor’s weather station we had a high of 48.2F and low of 35.1F I still have some time before I can safely bring my tomatoes/cucumbers outside but they should be toughened (hardening) up and ready to go when it is.
Tags: cheap, garden seeds, growbox, led, outdoor plants, tomato plants, vegetables
Time lapse video of cucumbers, tomatoes, and peppers in grow box
15.1 years ago cucumbers, indoor growbox, peppers, tomato
As you can see they are starting to take over the even larger box and the camera.
Tags: growbox, pepper plants, tomato plants


