Freezing Raspberries
12.8 years ago cheap, freezing, raspberries

Last weekend my daughters and I went to a berry farm in my home town to pick some raspberries. Of course a few were eaten while picking but we left with 5 lbs. of berries by the time we left. After making 6 pints of raspberry jam and eating a few cups at snacks we still had some extra left, unfortunately ripe berries will go bad and begin to mold quickly…scary how the berries I buy in the store that traveled hundreds of miles do not have this problem…the also do not taste anywhere near as delicious either.
Long story short…I ended up with some extra berries I know would go to waste if I didn’t do something with them quickly so I decided to freeze them.
1. Wash and Dry. Give the raspberries a quick wash and let the water drain for the strainer for a couple minutes to allow the water to drain off.
2. Pour berries into a container. I chose a cake pan because it was the right size to fit all my berries. Do your best to spread the berries out into as single layer but if a few are touching that is not a problem (will explain later)

3. Freeze berries. Allow 6-8 hours for berries to completely freeze. As you can see in the picture below I was lacking freezer space so opted to use the ice tray for this short freeze (remembering to turn off the ice maker to avoid an incident)

4. Separate and store the berries. If you were not careful like me and the berries seem to be frozen in a single blob, never fear. Simply take the cake pan and move inside a gallon Ziploc container and flip upside down and smack the back of the cake pan. Now you should have a circle of frozen berries. Remove the pan and use your hands (outside the bag) to break apart the berries. With just a few seconds of effort you should have nearly no big chunks of raspberries. Finish off with the poor mans vacuum sealer (stick a straw into the Ziploc bag and suck and you should have some berries good for at least 6 months.
Growing peppers during a cold Pacific Northwest summer
12.8 years ago cayenne, indoor growbox, jalapeno, peppers

Nearly August and I decided it is finally time to bring the peppers out from the garage, though in some ways they are doing so well in the heated grow box with a killer 120 watt Extreme Flower LED lighting not sure if I should chance it but looking at the upcoming forecast this might be as good as it gets.

So far my peppers in the Topsy Turvy strawberry planter appears to be a success. Even with the cold wet summer we have been having plants have survived and even has at least one baby cayenne pepper growing on it.

Though they are just now starting to see their first rays of sunshine have a good looking Rossi Italian Pepper growing here.

Here I have a couple of banana peppers I can pick anytime.

I am also excited to see these jalapeno peppers provided I ran out of jalapeno pepper powder a few months ago and have been missing it in my omelets in the mornings.

Finally I have my cayenne plants which was a survivor from last year, I pulled it into the garage to let some of the last few peppers ripen up as the temperatures got cool and forgot about it. After a few months I assumed it was dead until I saw some new growth on the plant and quickly put it under the LEDs where it fully recovered and started flowering and producing fruit. Currently drying some of the pods and also saving some of the extra mature ones to save for seeds might have a hearty specimen here.

Easy Ways to Eat Local
12.8 years ago cheap, farmers market, organic
Whether you want to eat local just to know where your food comes from, to support your local farmers, or possibly an environmental perspective of promoting organic farming or going for a challenge of a 100 mile diet, here is a guest post to help you out.
Eating local has tons of benefits. Fresh food, less environmental damage, preserving farm land, supporting local economy, the list goes on and on. So how can you go local in your meal planning? Here are some easy ways that you can give your environment (and your stomach) a little boost.
Join a CSA
Community Supported Agriculture (CSA) is a program which allows individuals to support a farming operation by giving money to farmers upfront in exchange for a weekly box of food. Find CSA farmers on the Local Harvest website. The website also provides information on how to find a CSA program that will best suit you and your families needs. If you live by yourself, split the food with a neighbor or friend.
Preserve Local Food for the Winter
Make a jelly or jam, pickle vegetables, make some applesauce. These are just a few ways that you can preserve your local food for the winter. Go to the National Center for Food Preservation website to learn how to preserve food.
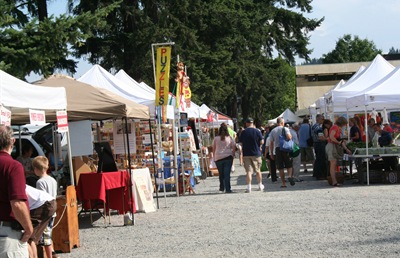
Go to a Farmers’ Market
Rather than going through a “middle man,” like a supermarket, go straight to the source. Farmers’ markets allow you to buy directly from the person who has grown your food. This is also a great way to get involved in your community. Find a farmers’ market near you on the USDA website.
Build a Backyard Garden
Do you have a green thumb? If you haven’t already, you should consider building a fruit and/or vegetable garden in your backyard. Do some research to find some plants that thrive in your region. If you’re less than confidant about your gardening skills, start small with a windowsill herb garden.
So there you have it — several ways to integrate some local eats into your diet. Once you start eating local, you will feel not only closer to your food, but to your community too.
James Kim is a writer for foodonthetable.com. Food on the Table is a company that provides online budget meal planning services. Their goal is to help families eat better and save money.
Making your own toilet paper planting strips
12.8 years ago outdoor seed starting, seed planting sheets, seed planting strips

My previous attempt at making planting strips worked ok, lapsed a bit on the watering, but had a few surviving carrots. This time around I decided to go with the classic technique at making planting strips with simple toilet paper.
1. Start with single ply. If you buy the fancy double-triple ply toilet paper you will want to pull them apart to start with a single layer. This will make it even easier for your seeds to push their roots through the paper.
2. Cut to appropriate widths. You should be able to get four lengths of planting strip (eight lengths for double ply) by cutting the paper lengthwise 4 times. In my case I only needed 3 so I simply cut mine into thirds.

3. Apply some glue using a glue stick. Hold one end of the paper and use a little dap of glue for the appropriate spacing for my carrots I did just a little under 2 inches (just eye balling no measuring required.

4. Attach the seeds. Simple drop a few seeds in the area and press gently with your finger to ensure they are in place. I then pick up the paper and lightly shake off any seeds that did not stick and reapply seeds as needed.

5. Plant the strips. There is no reason to wait for these to dry, you can plant them immediately or wait a few days/weeks until you are ready. Lay in the desired location, cover will a bit of soil and give a light watering. In a few weeks you should have perfectly straight and spaced rows the seeds of your choice.
At least something is growing in my garden
12.8 years ago Uncategorized

After many weeks of overcast and low evening temperatures, hoping to see some real summer weather soon…not sure if the peppers will even make it out of the garage this summer.
Garden walkthrough
12.8 years ago Uncategorized

This bed holds all of my cold season crops, I also chose varieties that do not really need to be watered too often given it is a pain to drag a hose out to this location so it normally gets neglected. Here I have onions (bunching and bulbs), leeks, carrots (still small), cilantro (coriander at this point), garlic, romaine lettuce, and surrounded by strawberry plants in the holes of the cinder blocks. I was also smart this year to save some open space to plant some fall crops (I always seem to be ambitious and forget to do that.

The slug deterrent strategies have been successful and have not had much problems with them this year…though I was not as diligent on a second bed…
My raspberries that snuck in from my neighbors fence are also coming in nicely, I don’t think any of these have made it indoors eaten by myself of my oldest daughter.

Still a couple more weeks for blueberries but should have enough to actually make something more than a smoothie this year.

It has been a rough year for the tomatoes but they are still surviving with even a few tomatoes going from yellow to red.

I got lazy with the pea trellis this year and simply leaned an old chain linked gate against my fence and called it good. Actually worked pretty well and considering using the same for my cucumbers whenever summer stays around long enough.

Finally the peppers are doing great in the grow box. Considering if I should even bother bringing them outside. Been giving them a few hours of sunshine when we get some so hopefully when the good weather hits they will not get shocked too bad when I bring them outside.

Already got a couple of red cayenne peppers harvested with a nice banana pepper below not too far off:


