3rd Annual Ladybug release
15 years ago aphids, kids, ladybugs

In case you missed the first and second annual lady bug release, you can follow those posts. We have never had a serious aphid or spider mite problem and I like to feel our annual release of lady bugs is the reason why. Either way, great entertainment for the girls for a couple hours for a $6.00 bag of lady bugs.

Lady bugs sometimes naturally choose to wander from the location where you release them and may just take residence in your neighbors yard, so I have thought about releasing them in my neighbors yard so they will end up in mine. Fortunately there are a few tricks to help entice your lady bugs from leaving your garden.
Give them a nap. Before you release them put them in your refrigerator for at least a couple hours. This will make them go asleep (dormant) until you are ready to release them. This way when you bring them outside in their sleepy stupor they may be more inclined to check out your garden before heading over your neighbors.
Feed them. After watering your garden before releasing them spray the ground with some sugar water. This will entice them to feast on that while waiting for a the aphids and spider mites to show up.
Choose the right time. Put your lady bugs out as the sun is falling and ensure that they are shaded from sun when releasing. This will prevent them from hiding from the hot sun and possibly finding a new place to make home.
Encourage your neighbors to have their own lady bug releases. One of our friends and neighbors had a great time with their girls releasing lady bugs last year and fortunately they are close enough that we may be sharing some bugs from both of our releases.
In the past I have had good results with the releases maybe seeing 30-40 lady bugs still crawling around on my plants the next day. This year had great results with hundreds of lady bugs in my aphid killing army.
Tags: cheap, outdoor plants, vegetables
Make your own upside down tomato planter
15 years ago cheap, peppers, tomato

Every time my daughter sees the upside down tomato planter (Topsy Turvy) commercial on TV she asks when we can grow tomatoes upside down. I am definitely not one to pay $15 to $20 to buy one of these things in the store when I could have the fun of making my own for much less money.
Though this has been commercialized recently, the concept growing plants upside down is not a new one. Many people have been growing plants like tomatoes in 5 gallon buckets or hanging baskets for decades. Not having any spare bucket or hanging basket to sacrifice I went with my daughters suggestion and used a 2 liter bottle.
Materials required for you upside down tomato planter
- Empty 2-liter bottle
- Eye bolt with washer
- Duct tape, contact paper, or spray paint
- Drill or hot nail

Step 1 — Create access hole
Make a hole on the side of bottle, this has two purposes: it allows adding soil much easier and also provides an convenient way to water your plant. I used a 2-inch hole cutter, though you may also carefully cut a hole with a knife.

Step 2 — Add the hanger
By design 2-liter bottles are extra thick in on the bottom immediate center which will make a perfect place to hang it. I used a drill of the same diameter as the eye bolt. This allowed me to thread the bolt right into the bottle, which was pretty strong it itself. Though expecting a great harvest, I also added a bolt to prevent the discovery of my plant on the ground after having a hard fall.

Step 3 — Covering your planter
Roots can be damaged if exposed to light for long periods of time so you need to cover your planter. You should consider color depending on where you live. In colder regions a darker color will help keep the soil warm on cool mornings, though in hotter climates a dark color could fry the plant. I would recommend a medium to light green color for moderate heat absorption and little more aesthetically pleasing in the garden. Not having any paint I used good ole duct tape. Wrapping around the entire bottle (even covering the access hole.

I then cut an X through the access hole and bent the corners in to soften the rough edges caused by cutting the hole.

Step 4 — Decorate (optional unless you have kids)
We used permanent markers to personalize both of my daughters upside down tomato planters.

This completes the construction of your upside down tomato planter. I will admit the first design flaw of this planter is its size. It will be fine for root growth but it can dry out very quickly. In response to this water retention was my primary concern when deciding on medium to fill the planters with.
I chose 2 parts (peat moss or coconut coir okay substitutes) , 1 part perlite, and 1 part Groden granulates. WonderSoil it contains coconut coir which retains water well but also contains water retaining polymers. The perlite and Groden granulates both provide water retaining properties an allow for proper aeration for easy unrestricted root growth.
To give the plants a good head start I also mixed in a couple of tablespoons of bone meal and tablespoon of balanced organic fertilizer. Add some water until the mix has the consistency of a wrung out sponge .
Lastly I used my tomato plants from my hydroponic experiment and carefully fed the roots into the now bottom opening of the bottle. We then added our soil mix until it reached the bottom of the access hole. Given the plants had a well established root system just the friction and weight of the soil is enough to keep the plant from falling out

Even though the medium retains water well the plants should be watered every day to the point until some water comes out the bottom. Within 24 hours we can already see the leaves turning over to face the sun.
You can also try other heat loving plants such as peppers, cucumbers, and zucchini. So if you every wanted to try growing plants upside down with the directions above you can have your own for less than $0.50.
If you want something a little more aesthetically pleasing there is always the commercial option, this one from Gardener’s Supply seems much more sturdy than the ones I have seen on TV:

UPDATE: 05/24/09

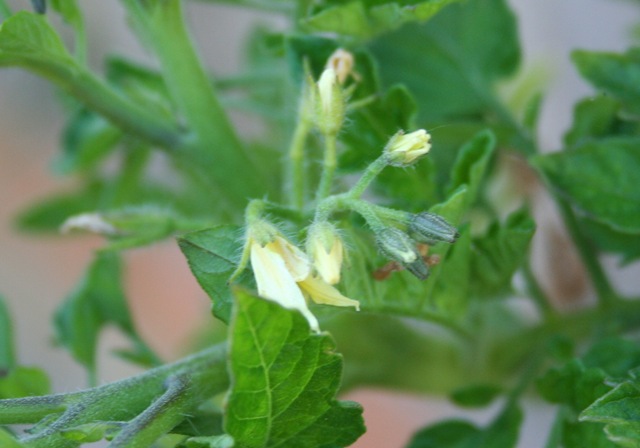
It has finally started to get a little warmer at night in my garden so seems like a good time for a little update on the upside down tomato planter. I wish I could give a direct comparison of the growth of these plants with plants a planted at the same time in the ground though unfortunately we had a light freeze that killed them off. Interesting enough both plants in the upside down tomato planter survived and even are showing some small blossoms.
Now as part of my pepper planting experiment, I also put a pepper plant in an upside down tomato planter with much less exciting success. Just to test if my super paranoid water retention worries had any backing I simply filled this one with regular potting mix. And the plant dried out very quickly which shows in the following results.

Given these results I am going to stick with my 2 parts WonderSoil (peat moss or coconut coir okay substitutes) , 1 part perlite, and 1 part Groden granulates recipe in the future.
Tags: cheap, led, organic vegetables, outdoor plants, pepper plants, tomato plants, upside down tomato planter, vegetables
Growing peppers at high latitudes
15 years ago hydroponics, indoor growbox, peppers

Here in the Seattle area we are, as you say, latitudelly challenged. We are fortunately to have the Pacific Ocean to give us mild winters and summers though our distance from the equator provides our plants with less intense light and a relatively short growing season for summer crops. One in particular difficult summer crop are peppers.
This is important because one of the major exports of my garden are the ingredients to allow me to make homemade garden salsa (tomatoes, garlic, onions, cilantro, jalapeño peppers) Al ingredients come from my garden (except for jalapeño peppers) This year I am determined to fix this.
I have a couple strategies for doing this, the first is to “start early” pepper plants require 80-110 days from seedling to harvest, timing is everything. Given our late winters here over the past couple years, I don’t really have much of a cushion here and would also be nice if the peppers were ripe when the tomatoes are getting red as well. To get a head start many weeks ago I planted several jalapeño pepper seeds and they currently are turning into some great looking pepper plants in my grow box. As they have grown I have potted them up to encourage them to continue to grow vigorously.
Not wanting to put my eggs peppers in one basket, I have decided to try a few different techniques in case one completely fails I hopefully have a couple backups:
- Grow pepper plant in grow box in WonderSoil
- Grow pepper plant hydroponically using a Grodan Gro-Blocks
- Grow pepper plant in the ground beside my tomatoes
- Grow pepper plant in large pot in sunniest location
I honestly can not really predict the outcome of this experiment. The grow box as the advantage of accurate temperature control but the CFLs though work great can’t compare to full sun. On the other hand outdoors has the great light intensity of the actual sun though given the pepper plants can stop growing lacking 60 degree nights and at least 70 degrees during day. Given we don’t have too many nights greater than 60 degrees the grow box might have a chance.
UPDATE — 05/25/2009
Plant grown in WonderSoil in grow box at temperature controlled to remain above 60 degrees at night and a high of 80 during the day. This is amazing results compared to the 2.5 inch plants I started with less than a month ago.

Plant grown hydroponically using a Grodan Gro-Blocks also in temperature controlled grow box.

Plant grow in actual dirt outside in good light

Plant grown in pot outside…well this one is already out after some high winds and cold mornings this one was looking pretty bad to I brought to the infirmary (the grow box) to bring it back to life, which seems to have done wonders.

The obvious winner at this point is the pepper plant in WonderSoil in the grow box, though I have noticed some recent growth in the outdoor plant now the weather has started warming up, so might be some time for Mother Nature to redeem itself. Overall I have been very impressed with the results of the grow box but still need to see if I can get flowers and fruit…until the next update…
UPDATE — 06/20/2009
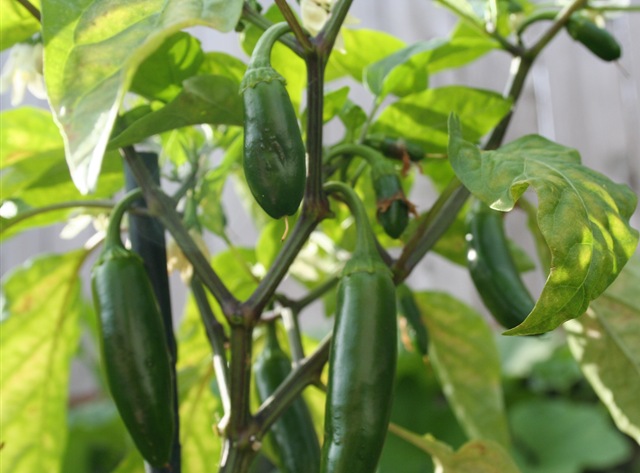
We were blessed with some warm weather so the outdoor potted plant has been doing great blossoming and almost a dozen of good sized peppers growing.
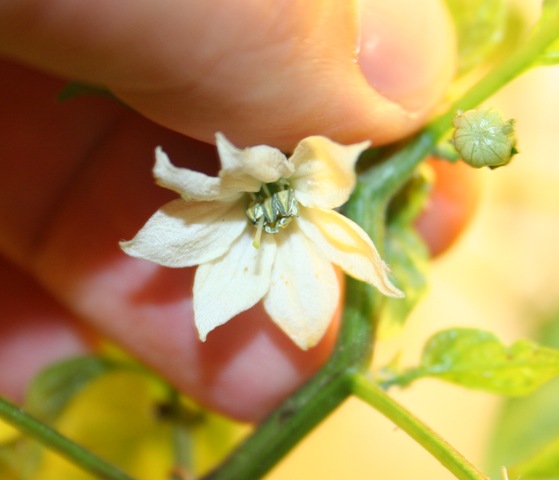
I have seen plenty of blossoms on the pepper plants in the grow box though I have not have and fruit set. I have two theories what is causing this, first is we have hat some hot weather with the garage getting over 85 degrees even with best exhaust and airflow it was hard to keep the temperature from exceeding 90 degrees which causes the blossoms to drop. The second reason is I have been attempting to hand pollinate the flowers with the absence of some nice bees to do the work for me. I have been using a fine paintbrush without much luck. Switching to having better airflow and using a Q-Tip to simulate a bees bottom.
The plant I had in the ground eventually got overtaken by a pumpkin plant which I removed and moved to the grow box given it had not shown any significant signs of growth since I transplanted it there.
Right now seems the best method is grow the pepper plant to about 18 inches and just let mother nature take care of things at that point.
Tags: cheap, cilantro, garden seeds, garlic bulbs, growbox, led, outdoor plants, pepper plants, salsa garden, tomato plants, vegetables
Always have a Plan B in gardening
15 years ago garden planning, indoor seed starting

In college I had a business class, it definitely wasn’t the most memorable since all I remember it had something to do with working with small businesses. There was an important takeaway, which was always have a “Plan B”. The teacher used this term in particular when we were preparing to give presentations to the class, it was fine to use a PowerPoint presentation, though better have some overhead slides “just in case,” which many times became a necessity in the end due to “technical issues”.
This advice definitely applies to gardening as well. In my case, especially if you want to push your planting date for your summer vegetables due to your short growing season. It is great to be ambitious and plan on getting your tomatoes out weeks before your last frost date, though when the inevitable frost comes and kills your plants you need a “Plan B” Last year, I really didn’t have one so I was forced to go to my nursery and blowing my gardening budget on the limited selection of summer vegetable seedlings.
This year I was a little smarter and planted my seeds still ambitiously but also planted a few more a couple week later. This way, if Mother Nature is cruel to my optimism I still have a backup. If she is kind I always have some extra tomato/pepper seedlings to offer to friends and neighbors or create a couple more upside down tomato/pepper planters.
Tags: cheap, garden seeds, outdoor plants, pepper plants, tomato plants, vegetables
Cheap fogger hydroponics final results
15.1 years ago aeroponics, cheap, hydroponics, peppers, tomato

In case you missed them here is the original post on the creation of this fogger hydroponic system, and the latest update (before this one).
The plants still are still looking pretty healthy with the exception of a little phosphorus deficiency, but the blame goes on me for that one. Been a little busy at work and have been neglecting the plants.
I decided to end this experiment since their roots were starting to get tangled and I want to use these plants for another project.

These roots are healthier than they look, some soil leached in when I put some of my pepper plants on top of the hydroponic box.

This pepper plant look really good, haven’t decided what to do with it yet. Maybe the victim volunteer for the next hydroponic experiment.
Tags: cheap, led, outdoor plants, pepper plants, vegetables


