How to Freeze pumpkin puree
12.5 years ago freezing, halloween, pumpkin

After making my own pumpkin puree last year, I can’t go back to the old stuff in the cans. Last year I put the pumpkin puree into individual 1/2 cup plastic containers. This worked ok but given our full freezer it was pretty common for these hockey pucks to fall out from where they were wedge breaking on the floor (if I was luck enough to get my foot out of the way)
This year I am using a different technique to freeze these to use in pumpkin pie, pumpkin cheesecake (low carb version), pumpkin ice cream, or pumpkin bread this holiday season. Before you can freeze the pumpkin puree you need to get it from the pumpkin.

Step 1: Clean the pumpkin. Use a little water and scouring pad to remove loose dirt

Step 2: Remove stem and cut pumpkin in half. This will take a little muscle to get through but using a serrated blade should make quick work of this little pumpkin.

Step 3: Scoop out seeds and innards. Using an ice cream scoop scrape out the seeds and the stringy innards, you don’t have to get this completely clean as you can see below. I also decided to save a few seeds with hopes to grow my own sugar pumpkins next year using the seed saving techniques I have wrote about last year.

Step 4: Cut the pumpkin into smaller equally sized pieces. Once you have all the seeds and gunk out slice up the pumpkin halves into several equally sized pieces.

Step 5: Cook the pumpkin. Places pieces in a casserole dish and cover with top or if yours are overflowing your largest casserole dish like mine you can simply cover the dish with a piece of aluminum foil. Place in a preheated oven at 350F and cook the pumpkin for 45-90 minutes. The pumpkin is done cooking when you can slice through the pumpkin flesh with an edge of a fork with almost no effort.

Step 6: Blend. Use a large metal spoon to scape the pumpkin away from the skin and place into a blender and blend until smooth. If you have a very dry pumpkin like mine you might need to add a little water to get a good cortex going like above.
Step 7: Freeze. Scoop your pumpkin puree into a couple of cupcake pans and freeze for 24 hours. Then using both your thumbs apply a little pressure on the bottom of each frozen pumpkin puck to dislodge. My wife had a great idea of using those silicon cupcake liners to make getting them out easier….though we just purchased those a day too late so I had to deal with the muscle and cold finger technique. Place your dislodged pumpkin pucks into a freezer bag removing extra air with a straw and should be good to use for about 12 months…which is perfect when more pumpkins arrive and the process repeats.

Each puck is approximately 1/2 cup so just pull out and defrost as many as you need for your recipe. Given there are no additives or sugar involved I have also used this same puree as baby food, which our daughter seemed to enjoy, but I opted for some fresh banana bread for myself.

How to start a winter vegetable garden
12.6 years ago broccoli, cold season crops, fall crops, freezing, leeks, lettuce, onions, spinach, winter garden

Why let your gardening season end, with a little creativity there are many vegetables that can continue growing right through winter. I find this fun as wells of a rewarding challenge bringing in some great produce from my garden all year round.
Choosing your winter vegetables
First we need to determine what vegetables to grow, given temperature and lack of light will be a reality we will have to go with the colder tolerate spring/fall options. below are some of my favorites and their typical hardy temperatures.
Arugula: Hardy up to 15F (-9C). Not only is this the most profitable vegetable to grow per square foot it is a tasty and nutritious addition to your garden salads a very good source of vitamin A/C/K, folate, calcium, iron, magnesium, phosphorus, potassium and manganese.
Beets: Hardy up to 20F (-7C). With beets you have a couple of options, eat the roots which are an excellent source of folate, potassium and manganese. The other option is to eats the beet greens which are an excellent source of vitamin A/C/E/K/B6, thiamin, riboflavin, calcium, iron, magnesium, potassium, copper and manganese
Bok choy: Hardy up to 24F (-4C). Bok choy is a great source of vitamin A/C/K/B6, riboflavin, folate, calcium, iron, magnesium, potassium and manganese.
Broccoli: Hardy up to 10F (-12C). So many options here and great eat fresh and if you get too much at once it is easy to freeze your excess crops while being a great source of Vitamin A/C/K/B6, folate, potassium and manganese.
Brussels Sprouts: Hardy up to 0F (-16C). If the thought of Brussels sprouts sicken you, don’t give up on these until you try some fresh from your garden. As an added bonus this is a great source of vitamin A/C/K/B6, thiamin, folate, potassium and manganese.
Cabbage (Winter): Hardy up to 5F (-14C). Use for raw for coleslaws or cooked in stews or soups to add some vitamin C, folate, potassium and manganese to your next meal.
Carrots: Hardy up to 15F (-9C). Great in salads, stir-fry, or raw as a quick snack and is also a great source of Vitamin A/C/K and potassium
Collards: Hardy up to 24F (-4C). Great sautéed with a little oil with salt and pepper and a great source of vitamin A/C/E/K/B6, riboflavin, folate, calcium and manganese.
Endive: Hardy up to 5F (-15C). Great addition to salads as well as making or a great addition to sounds. Endive is high in vitamin A/C/K, thiamin, riboflavin, folate, pantothenic acid, calcium, iron, potassium, zinc, copper and manganese.
Kale: Hardy up to 8F (-13C). Sauté as a great side or even bake to make some delicious Kale chips and is high in vitamin A/C/K/B6, calcium, potassium, copper and manganese.
Kohlrabi: Hardy up to 15F (-9C). The taste and texture of kohlrabi are similar to those of a broccoli stem or cabbage heart, but milder and sweeter, with a higher ratio of flesh to skin. The young stem in particular can be as crisp and juicy as an apple, although much less sweet1. Kohlrabi is a great source of vitamin C/B6, potassium, copper and manganese
Garlic: Hardy up to 8F (-13C). One of the most useful aromatics to use in your kitchen and high in vitamin C/B6 and Manganese.
Leeks: Hardy up to 8F (-13C). Great additions/bases for many soups and stocks. Has flavor of onion though not quite as overpowering. It is also a great source of vitamin A/C/K, folate and manganese.
Lettuce: Hardy up to 24F (-4C). Staple for a quick winter salad. Choose varieties with darker leaves for more nutritious goodness of vitamin A/C/K, thiamin, folate, iron, potassium and manganese.
Onions (Bulb): Hardy up to 0F (-18C). Plant these out this fall/winter for some nice large bulbs next spring summer. These provide a great deal of versatility and vitamin B6, folate, potassium and manganese, and a very good source of Vitamin C.
Onions (Bunching): Hardy up to 10F (-12C). Plant a bunch of these and your garden and they will continue to spread and provide additional produce to your kitchen. With just a little bit of protection you can have onions all winter.
Peas: Hardy up to 35F (2C). Can be shelled and cooked and eaten as is or added to some nice soups in the wintertime or kept in the shells and eat raw or a great addition to a nice stir-fry. Peas also provide vitamin A/C/K, thiamin, folate, iron and manganese.
Spinach: Hardy up to 8F (-13C). Just recently got turned back to eating spinach, previously just used in an occasional salad but now I add to omelets every morning for some great taste but are also packed with nutritional potency being a very good source of protein, vitamin A/C/E/K/B6, thiamin, riboflavin, folate, calcium, iron, magnesium, phosphorus, potassium, copper and manganese.
Swiss Chard: Hardy up to 20F (-7C). Vitamin A, Vitamin C, Vitamin E (Alpha Tocopherol), Vitamin K, Riboflavin, Vitamin B6, Calcium, Iron, Magnesium, Phosphorus, Potassium, Copper and Manganese.
When can you actually grow these vegetables
Now that found the vegetables you want to grow now is a good time to check those hardy temperatures of the vegetables you have chosen compared to your average winter temperatures. If your average low for the day is going to fall at or below that limit you may want to consider skipping that one or invest in a little protection.

Using a site like WeatherSpark, you can determine what your average low is for your area and then determine what vegetables you can grow during the winter. As you can see above on average in my area the average low is 36F which allows me to grow most of the cold season vegetables mentioned above. Though it is possible to get an occasional cold streak which cold mean death to my vegetables over the winter.
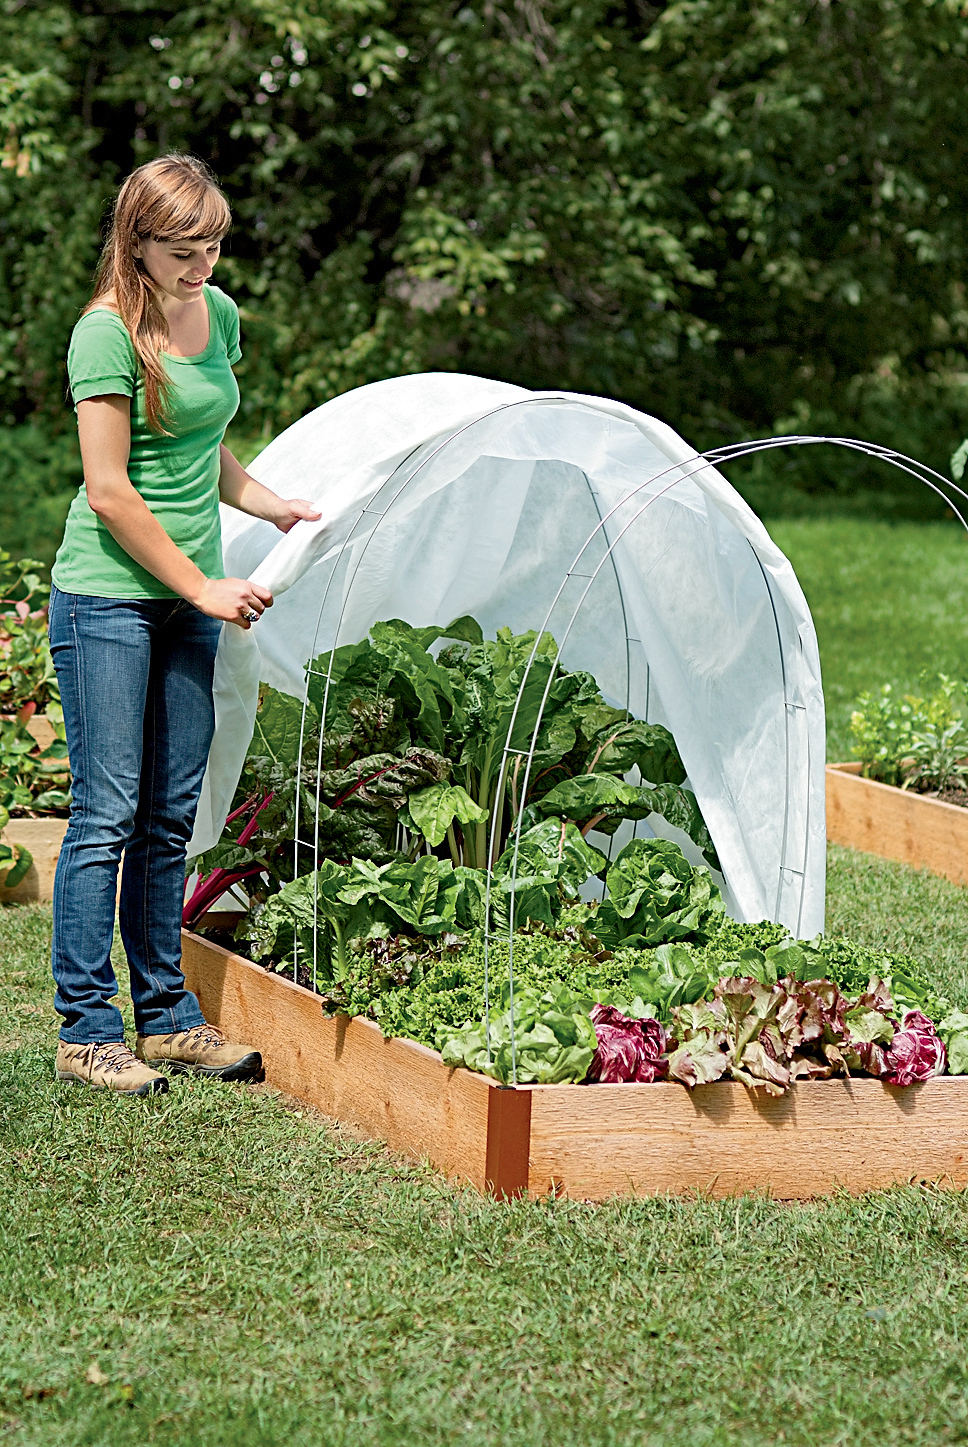
By using some row covers you can provide a little extra temperature (5-10F) depending on the thickness of the plastic and the volume of air you are attempting to keep warm. The thicker the plastic the better the temperature retention though allows less light to get through. For my area I am going with 2.5mm which should provide some decent protection while still allowing needed light in. When things really go bad you can also supplement with a light blanket at night and/or a couple strings of regular old Christmas lights (no LEDs for this application) to provide a few more degrees.
How to start your vegetables
Though your plants may grow well in the low temperatures germination can be incredibly slow at lower temperatures even for cold weather plants. For this reason you should start your vegetables indoors and bring them outdoors with some minimal hardening off.
As a general rule here are the plants you should be able to start as seeds in the ground now (September):
- Carrots
- Garlic
- Lettuce
- Onions (sets for green onions, seeds for spring onions)
- Radishes
- Spinach
Other plants should be started indoors and planted out as starts. These can be brought out right now so check you local grocery store…this time of year I have found 4-packs of winter vegetable starts as low as $0.25 as the stores are making room for the Halloween pumpkins coming in. Since you will want a continuous harvest you can also start seeds now and every few weeks for a constant supply of winter vegetables all winter long.
Summing things up
By taking maturing and harvest time into account and creating continual planting you should supply yourself with delicious and nutritious selection of vegetables all winter long. I was going to go into what I am growing this year…but this post is already getting long so will write about that later…
How to freeze spinach
12.6 years ago freezing, spinach

I made the same mistake I did with the broccoli, by purchasing more spinach (2.5 lbs) than I could eat within a week or two at most before it goes bad. To not be wasteful I decided to to freeze some of the extra.
Start bringing a large pot of water to a hard rolling boil, add as much spinach as you can fit and cover with lid and cook for 2 minutes. Strain into colander and spray with cold water for one minute to stop cooking process.

Allow water to draining out for a few minutes then squeeze out excess with your hands and lay out on some paper towels. Place another paper towel on top and press firmly to remove all additional liquid.

Separate spinach into easily consumable portions (I went with two 5 oz servings) and place into a Ziploc sandwich bag and place these bags into a one gallon Ziploc freezer bag and place into your freezer

As far as cost savings go I can buy chopped or leaf spinach for $1.49 for a 10 oz. package (same amount I made myself) This works out to $2.39 per pound, I can buy a 2.5 lb. bag for $3.00 ($1.20 per pound) or roughly half the price for a pretty simple process.

How to freeze broccoli
12.6 years ago broccoli, freezing

I love broccoli, the problem is no one else in my family likes it with me. I am also cheap and don’t like paying $2.49 per pound at the produce section of my grocery store nor $3.69 per pound in the frozen section. I had a simple solution to this problem buy 3 pounds 3 lbs. ($1 a pound) of broccoli from Costco. Though like I mentioned I love broccoli I do not love it enough to put away before it goes bad in about a week.

The solution to this problem was quite simple, I would simply freeze 2 lbs. of broccoli to eat later.
Step 1: Cut and wash the broccoli. Make sure the broccoli is in roughly uniform size pieces. I simple cut these to the size I would want to eat the so I can save myself some time when it comes time to cook these later. Given a quick rinse, I wouldn’t worry too much about getting them dry since you will be putting them in water in a few moments anyway.

Step 2: Blanch the broccoli. You need to blanch the broccoli to kill and of the bad bacteria, etc. before you freeze them. You have 2 options here, you can steam them for 5 minutes or boil them for 3 minutes. I opted for steaming so I could easily add and remove my broccoli using a metal colander.

Just fill up your “basket” drop it into already boiling water…

and throw a lid on and wait 5 minutes.

Step 3: Stop cooking the broccoli. You do not want to keep cooking the broccoli so take your now blanched broccoli and….

dump it into a waiting ice cold water bath.

After cooling for 2-3 minutes move into portion size Ziloc bag to enjoy later.

Though this water appears much greener than the picture shows there is are plenty of vitamins and minerals leached into this water and would be a great start for some vegetable stock…but I was tired and dumped it down the sink…

Freezing Raspberries
12.8 years ago cheap, freezing, raspberries

Last weekend my daughters and I went to a berry farm in my home town to pick some raspberries. Of course a few were eaten while picking but we left with 5 lbs. of berries by the time we left. After making 6 pints of raspberry jam and eating a few cups at snacks we still had some extra left, unfortunately ripe berries will go bad and begin to mold quickly…scary how the berries I buy in the store that traveled hundreds of miles do not have this problem…the also do not taste anywhere near as delicious either.
Long story short…I ended up with some extra berries I know would go to waste if I didn’t do something with them quickly so I decided to freeze them.
1. Wash and Dry. Give the raspberries a quick wash and let the water drain for the strainer for a couple minutes to allow the water to drain off.
2. Pour berries into a container. I chose a cake pan because it was the right size to fit all my berries. Do your best to spread the berries out into as single layer but if a few are touching that is not a problem (will explain later)

3. Freeze berries. Allow 6-8 hours for berries to completely freeze. As you can see in the picture below I was lacking freezer space so opted to use the ice tray for this short freeze (remembering to turn off the ice maker to avoid an incident)

4. Separate and store the berries. If you were not careful like me and the berries seem to be frozen in a single blob, never fear. Simply take the cake pan and move inside a gallon Ziploc container and flip upside down and smack the back of the cake pan. Now you should have a circle of frozen berries. Remove the pan and use your hands (outside the bag) to break apart the berries. With just a few seconds of effort you should have nearly no big chunks of raspberries. Finish off with the poor mans vacuum sealer (stick a straw into the Ziploc bag and suck and you should have some berries good for at least 6 months.
How to make your own cheap weather station
13.5 years ago cheap, freezing, last frost date, thermometer, weather station

Though the prices for personal weather station have dramatically dropped (around $100) over the past few years, I decided to work on making my own. The primary measurement I wanted was temperature given this is the specific one that could be dramatically different from my neighbors (or neighborhood weather station) given the many unique microclimates your yard can have.
Step 1: Create an account and weather station at Weather Underground. This will allow you a place to view your weather station results as well as a permanent storage location for your data. After you have created your account it is really easy to create a weather station after clicking this link you just need to enter some basic information such as address and time zone click “Submit” and you have yourself a weather station. Now this is not very exciting unless data is being updated so we will look at this next.
 Step 2: Get some data. Hear is a point where you can go all out with every weather measurement sensor imaginable, though if this was your intent I would recommend saving some money and getting a personal weather station
, but in my case all I really wanted to track was the outdoor temperature. To get this temperature I used a DirectTemp USB waterproof temperature probe from Quality Thermistor, Inc. All you need to do is plug this into an open USB port and with some simple serial communication you can start getting temperature results. This can easily be done using a language like C# with just a few lines of code:
SerialPort serialPort = new SerialPort(“COM5”, 9600); serialPort.Open(); serialPort.WriteLine(“2”); double responseValue = Convert.ToDouble(serialPort.ReadLine()); serialPort.Close();
You could also use something similar to my homemade waterproof digital thermometer and an arduino to get your outside temperature.
Step 3: Log your results. WeatherUnderground makes submitting data to them very easy. All that is required is a specially formatted query string request which you could do in any internet browser…though updating this manually every 5 minutes would be very tedious this is how can do this also using C#. All that is required is to replace the “ID” with your weather station created in Step 1 and your password used when you created your account.
string submitUrl = “http://weatherstation.wunderground.com/weatherstation/updateweatherstation.php?action=updateraw&ID=KWAREDMO38&PASSWORD=[password]&”; submitUrl += “dateutc=” + DateTime.UtcNow.ToString(“yyyy-MM-dd hh:mm:ss”) + “&”; submitUrl += “tempf=” + GetOutdoorTemp(); // Using code above WebClient webClient = new WebCLient(); webClient.DownloadString(submitUrl);
Now by calling the above code every 5 minutes using an infinite loop with some delay you can now log your temperature results and have current and historical data to have some better info to better guess your first/last frost dates or when it is safe to bring out your tender seedlings you are growing indoors.
Step 4 (optional): Leverage external weather data. As you may have noticed my weather station has more weather data than just temperature. I did this by leveraging (nicer word than stealing) some data from a weather station at a school in my neighborhood. Now this is not quite as accurate as if I was getting this information from my backyard…it is pretty safe to assume that the humidity, rain, and wind velocity and direction should be pretty much in the same ballpark. The process is pretty simple here where I extract this from a request to the external weather station and include these into my submission, which you can see in the code sample below.
1: using System;
2: using System.IO.Ports;
3: using System.Xml;
4: using System.Net;
5:
6: namespace WeatherStation
7: {
8: class Program
9: {
10: private static WebClient webClient = new WebClient();
11:
12: static void Main(string[] args)
13: {
14: while (true)
15: {
16: SubmitWeatherInfo();
17:
18: System.Threading.Thread.Sleep(300000);
19: }
20: }
21:
22: public static void SubmitWeatherInfo()
23: {
24: string submitUrl = "http://weatherstation.wunderground.com/weatherstation/updateweatherstation.php?action=updateraw&ID=KWAREDMO38&PASSWORD=[password]&";
25: submitUrl += "dateutc=" + DateTime.UtcNow.ToString("yyyy-MM-dd hh:mm:ss") + "&";
26: submitUrl += "tempf=" + GetOutdoorTemp() + "&";
27: submitUrl += GetExternalWeatherData();
28:
29: webClient.DownloadString(submitUrl);
30: }
31:
32: private static double GetOutdoorTemp()
33: {
34: SerialPort serialPort = new SerialPort("COM5", 9600);
35: serialPort.Open();
36: serialPort.WriteLine("2");
37: double responseValue = Convert.ToDouble(serialPort.ReadLine());
38:
39: serialPort.Close();
40:
41: return CelsiusToFahrenheit(responseValue);
42: }
43:
44: public static double CelsiusToFahrenheit(double temperatureCelsius)
45: {
46: return (temperatureCelsius * 9 / 5) + 32;
47: }
48:
49:
50: private static string GetExternalWeatherData()
51: {
52: string externalWeatherStation = "http://api.wunderground.com/weatherstation/WXCurrentObXML.asp?";
53: externalWeatherStation += "ID=[ExternalWeatherStationId]";
54:
55: XmlDocument xmlDoc = new XmlDocument();
56: xmlDoc.LoadXml(webClient.DownloadString(externalWeatherStation));
57:
58: string externalData = "&winddir=" + xmlDoc.SelectSingleNode("//wind_degrees").InnerText;
59: externalData += "&windspeedmph=" + xmlDoc.SelectSingleNode("//wind_mph").InnerText;
60: externalData += "&windgustmph=" + xmlDoc.SelectSingleNode("//wind_gust_mph").InnerText;
61: externalData += "&baromin=" + xmlDoc.SelectSingleNode("//pressure_in").InnerText;
62: externalData += "&humidity=" + xmlDoc.SelectSingleNode("//relative_humidity").InnerText;
63: externalData += "&dewptf=" + xmlDoc.SelectSingleNode("//dewpoint_f").InnerText;
64: externalData += "&rainin=" + xmlDoc.SelectSingleNode("//precip_1hr_in").InnerText;
65: externalData += "&dailyrainin=" + xmlDoc.SelectSingleNode("//precip_today_in").InnerText;
66:
67: return externalData;
68: }
69: }
70: }


