Fuji Heavy Industries autonomous farming robot
14.5 years ago garden maintenance, robot
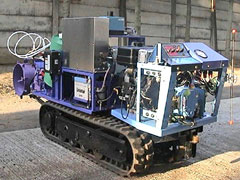
We have seen MIT students making robots to tend on their plants. Now Fuji Heavy Industries has created a robot that can completely take care of your fruits and vegetables in your fields (or greenhouse) for a modest fee of only $100,000. You can pick up your own by the next fiscal year.
It uses lasers with reflective panels to orient itself and is 6.5 feet long, unfortunately there are not too many additional geeky details which probably would be helpful before putting down the $100K for this bad boy.
Given this is the cheap vegetable gardener, I will be sticking with my hands and trowel next fiscal year though can’t wait to see a video if this in action.
Tags: cheap, outdoor plants, vegetables
Twittering computer grow box
14.5 years ago indoor growbox, twitter

Well this is pretty much clichéd nerdiness but given it only required a couple of lines of C# I couldn’t resist. I have updated my grow box software to “tweet” some sort of semi-humorous and not really witty comment appropriate to its current state and share its current temperature and moisture content every 2.5 hours.
For those who want to do something similar, this is how I did it. I one of the many twitter C# libraries and for no specific reason I chose tweetsharp and after adding a reference to their DLL and just the few lines of code (below) you can be programmatically making updates via twitter.
private void UpdateStatus(string message)
{
IFluentTwitter twitter = FluentTwitter.CreateRequest();
twitter.AuthenticateAs("user_name", "password");
twitter.Statuses().Update(message);
twitter.AsUrl();
string response = twitter.Request();
}
If you want to see it in action go to http://twitter.com/computergrowbox.
Right now I only have a handful of not so witty comments, so if you have some good zingers add them to the comments and if I like them I will add them to the list.
UPDATE: Grow box shares its own pictures
I get busy these days and sometimes can’t make it out to keep a close eye on my plants in the grow box. Given I have everything automated the box basically takes care of them, though I thought it would be nice if I could see how they are doing so added photo sharing to the grow box’s twittering software.
I already have the software taking pictures every so often so all I really needed to do what send out the most recent file to twitter. After a little looking I found that tweetsharp already supported this so yet again this was just a few lines of code to implement.
First I needed the logic to determine the last photo I have taken, fortunately I was carefully about my naming using a timestamp based name similar to “Photo_2008_10_01_090130.jpg”, so alphabetical sorting would work just fine. I removed the error handling to keep things brief but here is the code to complete this logic:
string[] files = Directory.GetFiles(photoDirectory, "*.jpg");
Array.Sort<string>(files);
string fileToUpload = files[files.Length - 1];
Now you have your photo to upload just signup for one of the photo TwitPic using your twitter account and run the following code using your credentials.
IFluentTwitter twitter = FluentTwitter.CreateRequest();
twitter.AuthenticateAs("user_name", "password");
twitter.Photos().PostPhoto(fileToUpload,
                      SendPhotoServiceProvider.TwitPic);
twitter.Statuses().Update("My Picture").AsJson().Request();
Hopefully this, you too can make you own grow box (or other inanimate object) share its feelings on twitter.
Tags: growbox, outdoor plants
Growing blueberries
14.5 years ago blueberry, cheap
If it were up to me every part of my landscaping would be edible. Though my homeowners association may disagree with me but blueberry bushes looks just as nice as any ornamental plant/bush when you visit the nursery with the obvious bonus of free food.
When selecting a blueberry bush, unless you are very patient spend about $10 a plant and get some more established ones (about 1/2 inch stem) You can get the two for $10 plants from your local Home Depot but you won’t be eating blueberries for a couple years. With the larger plants you should pinch off the blossoms to get better growth for the first couple years but I opt to getting my reward now instead of later and enjoy the handful of berries the young plants can produce.
When it comes to plant selection there are a large number of species to choose from with varying fruit size and harvest timing. I would recommend getting varieties that have varying maturity dates so you can enjoy those blueberries for a longer period of time. When I got my first two plants I went with Toro and Berkeley. The Berkeley is a very popular bush given it produces average size berries great for muffins/pancakes/cereal or the occasional snack with a mid-late harvest. The Toro on the other hand produces large (almost grape size) berries which are great for jams and snacks though bit of a mouthful for muffins. If you are curious of other varieties here is a great resource.

I have heard differing opinions on whether you need to have different species to successfully produce fruit after a little research I found this article which explains that blueberries are capable of pollinating with a single species, though studies have shown that having more varieties can produce larger and earlier fruits. So if you have a favorite variety you can go crazy with the single plant though a little diversity seems to always be a good thing.
When it comes to pest control the biggest pest is birds. You can control them by laying some netting on the plants, though in my personal opinion that just gets in the way of me getting my snacks so I opt for the lazy approach and just plant more plants and share with “neighbors”. Worse case I end up with a backyard with some bushes that look much nicer than my current evergreens, and I always can take up bird watching.
One of the most important parts to being successful with your little blueberry plants is soil preparation. The plants need to have an acidic soil and their roots like to remain moist, but not drowning in water. Given my area has an abundance of clay in my backyard, I naturally do not have either of these requirements. To give the plants a head start I dug a 1 foot wide/deep hole and filled it with peat moss and mixed with a few handfuls of compost. Not only will this retain water well, but the peat moss is also naturally acidic and will be a nice haven for a large family of worms in the next few years to add some awesome natural fertilizer (worm castings) Last I purchased I box of organic blueberry fertilizer which provides the primary and trace minerals as well as help keep the acidity of the soil up. I simply followed the directions on the box and watered the plants when there was a couple of days without rain.
Now some of you might be thinking, “hey it is fall why are you talking about growing blueberries” Well this is the “Cheap Vegetable Gardener, right now is a great time to visit your local nursery to pick up some of their “old overgrown” blueberry plants at bargain prices which you can plant now and enjoy some delicious berries next spring/summer.
Tags: birds, cheap, compost, led, organic vegetables, outdoor plants, vegetables, worms
Pickled jalapeno peppers
14.6 years ago jalapeno, peppers, recipe

My jalapeno peppers did great this year. So good I didn’t really know what to do with all of them. After making some salsa and having several mature red ones as snacks in the garden, I still have about two pounds that I didn’t want to go to waste. After a little thought I decided to make some pickled jalapeno peppers.

CVG Picked jalapeno pepper recipe

Directions: Mix ingredients and bring brine to boil. Either slice or leave the pepper whole. If you choose to do whole peppers, be sure to poke them with a toothpick so they won’t collapse. Fill jars with jalapeno peppers and then fill with hot brine up to 1/2 in from the top of jar. Boil for 10 minutes and feel free to pick some pickled peppers as fast and as many times as you want this summer.
Tags: garden seeds, led, pepper plants, salsa garden


