How to save tomato seeds
9.7 years ago seed saving, seed storing, seeds, tomato

It is really easy to save tomato seeds is a little more difficult that other vegetables seeds, but with a little patience and the right technique you can save your seeds with very little effort.
Step 1: Get the seeds. The easiest way to get to your seeds it do cut the tomato across the hemisphere as shown below.

This will give you easy access to the seeds, though if you are slicing your tomatoes at a different angle you can easily pull out some seeds with a prong of a fork or spoon. The cutting board will normally hold more than enough seeds than I will need for the following year.

Step 2: Get the junk off the seeds. The seeds have a gel-like substance that surrounds the seeds along with some pieces of flesh that you did not take the time to pick out. There are a couple of techniques to do this:
- Add some water to the seed mixture, cover with plastic and let them ferment for a few days.
- Mix tomato seed mix with equal amount of powdered disinfectant cleanser and let sit for 30 minutes
Given the fermentation methods can stink up your kitchen and the powdered disinfectant methods doesn’t exactly sounds organic I went with my own method I call the soak and rinse technique.
Drop the seeds in a small bowl with some water and let soak for a couple hours. Pour off anything floating to the top (seeds too they won’t germinate) into your sink

Pour what remains into a strainer and give a quick rinse with water.

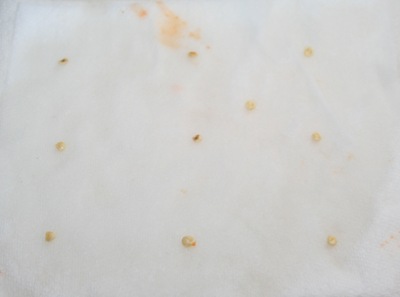
Repeat the soak and rinse process twice a day and notice the amount of gel decreasing.

Once the seeds look like the ones below (about 2-2.5 days) they are ready to be dried.

Step 3: Drying the seeds. I do this by spreading the seeds on a labeled coffee filter trying best to keep seeds from touching. Once they dry (couple days to a week) store them with your other seeds.

With very little effort and a few days of waiting you can collect seeds to use/share/trade for next season.
Organizing seeds using bead containers
13.7 years ago cheap, seed saving, seed storing

I first saw this idea on a garden mailing list at work but given most of you are not on that, I figured I should share with the rest of you. My problem was I had a big bag of seeds and it was always a pain to dif through and find the right seeds for the time of year I was planting.
My solution was to use Darice Bead Container and some Avery Shipping Labels
(printed lengthwise) and was able to get 7-8 seed labels out of a singe shipping label.

One printed I added the seeds and labels and grouped by planting time. After I was done I did have some thoughts about getting even more organized with a little color coding of specific dates…but guess I should take small steps

As you can see from a glance you can find your seeds and do a quick inventory of your available seeds. With this you can make easy incites like, “I really shouldn’t plant on collecting onion seeds this year” or “I almost forgot to plant fall spinach/lettuce”
Well off knock off a onion flower and plant some spinach and lettuce for this fall/winter.
Tags: seed
Hometown seed giveaway #2 (Survival Seeds)
14.2 years ago free, giveaway, seed storing, seeds

Hometown Seeds has again graciously offered up a selection of their non-GMO non hybrid survival seeds. These are advertised to keep in storage for 5-10 years but also are open pollinated so you can grow them this year, collect the seeds and create your own stockpile in preparation of any future catastrophic food shortage.
They include a selection of the following varieties:
- Lincoln Peas
- Detroit Dark Red Beets
- Kentucky Wonder Brown Pole Bean
- Yolo Wonder Pepper
- Champion Radish
- Lucullus Swiss Chard
- Black Beauty Zucchini
- Waltham Butternut Winter Squash
- Bloomsdale Longstanding Spinach
- Scarlet Nantes Carrots
- Long Green Improved Cucumber
- Rutgers Tomato
- Golden Acre Cabbage
- Romaine Paris Island Cos Lettuce
- Golden Bantem Sweet Corn
- Yellow Sweet Spanish Onion
They will be sending me the seeds to no restrictions on where these can be mailed to, so simply add a comment by 2/16/2010 2/19/2010 and I will randomly select a winner in one week.
Update — 2/16/2010
I got the seeds in the mail from Hometown Seeds and I was very surprised in the weight of these seeds. Well over a lb of seeds in this package. They come in a sealed lightproof wrapper as you can see below:

Though the seeds would last longer if I kept them in this packaging, though I just had to rip it open to see what was inside (winner’s package will not be opened):

As you can see there are quite a few seeds in this package so you may want to think about who you may want to share these with if you win.
Tags: cheap, garden seeds, led, pepper plants, tomato plants, vegetables
How to determine your seed germination rate
14.6 years ago germination, seed saving, seed storing, seeds
Whether you are trying to determine if those seeds you have been stored for 3-4 years are still good or questioning your ability to harvest seeds on your own testing germination is a great way to take away from of the guesswork and avoid disappointment next spring.
The process is very simple, I believe I did the same thing in second grade during our plant section. Though that was to observe how a seed sprouts/roots the concept is exactly the same.
Take a wet paper towel and place 10 seeds on it and place the wet paper towel in a Ziploc bag. After a few days (or weeks depending on the normal germination rate) check back on your seeds and count how many sprouted.

In my case six out of ten of the jalapeno seeds sprouted. So just do the simple math using the following formula:
Germination rate = (# seeds sprouted/# total seeds sprouted) X 100
So in my case:
(6 seeds sprouted/10 seeds total) X 100 = 60% germination rate
Of course the more seeds you use in your “trial” the more accurate the results will be for my purposes the error rate is good enough for me.
If I was a seed seller this would be disastrous since most distributors have germination limits (90-95%), but given these are for my own use and I have about 300 more seeds that I will use no major loss. Though I will need to remember when I plant these out I will want to plant 2 seeds per cell to have good odds one of the seeds will germinate.
Another option is to give your 4 year old a handful of seeds and a pot full of dirt and see if most of them sprout. Much less scientific but my daughter didn’t seem to notice.
Tags: garden seeds, outdoor plants
Alternative seed saving containers
14.6 years ago cheap, seed saving, seed storing
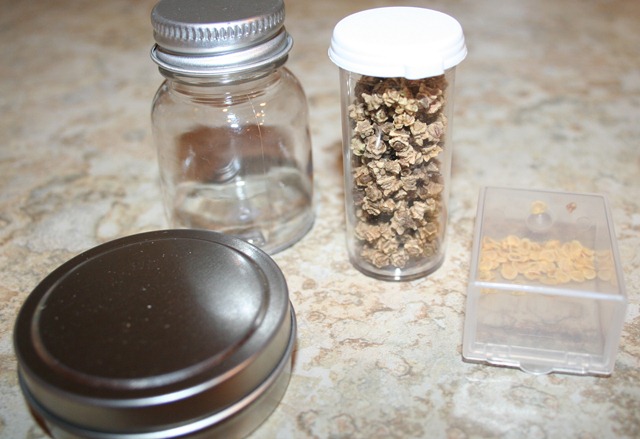
When I am storing seeds for months at a time my homemade paper seed packets work great, but for seeds I seem to use many times throughout the year I was looking for a new option.
My solution was small plastic/metal resealable containers. They are small and do not take up too much extra space and securely close so now worries of reaching into my pocket do find it full of seeds (had this happen more than once) They are also water resistant (if not waterproof) so now worries about setting these down on some moist soil soaking the seeds.
You probably have many of these containers lying around your house from other products (prescription, OTC drugs, food containers, etc)
Unfortunately (I guess fortunately) I do not need prescription drugs too often and wasn’t smart enough to save any of my past containers so I opted to get some from an online supplier. This particular one many options for specifically for seed saving containers at very reasonable prices. I am also considering using these when I share seeds with others as gifts.
What sort of creative options have you used to store your saved seeds?
Tags: cheap, garden seeds, vegetables
Make your own seed packets (packet templates)
14.7 years ago seed saving, seed storing

Last year I did origami seed packets last year which worked out pretty good though I only got two per sheet of paper and didn’t hold too many seeds (especially large seeds like peas) with the many types of seeds I am collecting this year I decided to try another option.
I looked online and found many templates, though I couldn’t find any with standard seed package sizes. Eventually I gave up and created my own and thought I would share.
| Small Seed Packet (2.75” X 3.00”) | 4 packets per sheet | pdf doc docx |
| Typical Seed Packet (3.00” X 3.75”) | 2 packets per sheet | pdf doc docx |
| XLarge Seed Packet (4.50” X 5.25”) | 1 packets per sheet | pdf doc docx |
Basic idea is pretty simple, just print them out and glue the flaps on the inside. I used a plain old grade school glue stick which worked out great. Not only does this work great for new seeds collected, but I also used them to reduce much of the space my large seed packets were taking for a small number of very small seeds.
Tags: cheap, garden seeds, vegetables


