Enjoying Spring at the Skagit Valley Tulip Festival

Growing up in the area I have had a lifetime of the Skagit Valley Tulip Festival, but now being the father of three little girls I have a feeling I will be seeing more of these millions of flowers blooming. With the not so spring like weather we have been having this month it seemed like a nice day to remember what spring is supposed to look like.

My middle daughter found some flowers that matched her shirt.

Now off to catch up on the work in the garden I should have been doing today…
Catching garden pests in the darkness with OutbackCam night camera
13 years ago infrared, night cam, pests, product review

In the past I have had a few critters scale or crawl under my fence to snack on my tomatoes. Without knowing what is going after my crops it is difficult to figure out how to attempt to prevent these attacks. When Swann approached me to review their OutbackCam I decided this would be the perfect tool to answer this question.

The OutbackCam is a small device that holds a digital camera which with the help of motion sensor and an array of infrared LED lights can take quality pictures/videos of anything that moves within its range during the day or night.
Installation of the devices is very simple, you use the provided strap to attach the device to a fence post, tree, etc. and pull snuggly to keep it in place. This is fine for catching animals in the act, but if humans are your target you may want to provide your own cable and lock or protected enclosure to prevent someone with a pocket knife walking away with your camera and evidence it may have captured.
The camera provided numerous settings to allow you to choose between taking photos and videos and also the amount of time you want to delay between photos to prevent using up the whole card while lets say you are mowing the lawn. This configuration I would not call intuitive (meaning I actually had to look at the instructions) but I would consider no more difficult than setting a new digital watch. Once you understand the settings and the flow it is very easy.

Though it is a few months before I will be able to catch any animals going after my tomatoes I did turn it on and captured some less threatening creatures to confirm the image quality and the number of false positives.
Overall the device was very accurate there were very few false triggers and after I was unable to catch any critters in my garden I decided to simulate a zebra attacking a seedling in my kitchen which was pitch black when the picture was taken.

One things I did notice when taking the picture above the camera does make a mechanical noise when it takes the picture. Which could scare away the trespasser (which in my case could be a good thing) but if you are looking to catch many pictures of Bigfoot in your back woods this may not be the camera for you.
The camera uses an SD memory card (same used for many digital cameras) which you can plug into the media slot of your computer to view as needed.
Overall I think this is a great gadget for capturing wildlife (wanted or unwanted) and is easy to setup is pretty effective at capturing photos based on movement in its range. It is rugged we have had some pretty intense weather here over the past few months (hard rain, hail, snow) and the enclosure has stayed completely dry. As for using for “human pests” I would recommend using this due to the internal storage of photos and the ease it is for the “pests” to walk off with your photos and your camera. Though if you are able to install this in a location that is not easily reachable or visible it could work as a standard security camera.
Disclosure: I was given a free sample to review this product but not compensated or affiliated with Swann Communications Inc for this review.
Many uses for witch hazel in your garden
13 years ago deer, guest post

Witch hazel is a small tree or deciduous shrub that usually stands between 3 and 8 meters high and can sometimes reach 12 meters. The witch hazel’s oval leaves are arranged alternately and have a wavy or smooth margin. The leaves are 3 to 11 cm wide and 4 to 16 cm long. The scientific name for witch hazel translates to “together with fruit,” due to the fact that its flowers, leaf buds, and fruit can all be found on the branches simultaneously, something which is rare among tree species.
Hamamelis virginiana flowers during the fall season. Some species of witch hazel produce flowers during winter on leafless stems, hence an alternative name of the plant, “Winterbloom.” The flowers are comprised of four strap-shaped, slender petals measuring 1 to 2 cm in length that appear in red, orange, dark yellow, and pale. The 1 cm fruit capsule is split into two parts, each housing a single 5 mm black, glossy seed. When maturity is reached in the autumn after flowering for eight months, the capsule splits, ejecting the seeds so forcefully that they fly as far as 10 meters. This is the origin of another name for witch hazel: “Snapping Hazel.”
Landscaping Use
Witch hazel plants can reach heights of 12 feet, but can be kept much shorter by pruning. Its fall foliage is yellow and the flowers have a warm, spicy fragrance that bloom in late winter or early spring. It’s ideal to plant witch hazel in full-sun to partial shade areas with acidic soil amended with humus.
These plants are unique because their flowers bloom in March, which add color to normally dull yards and gardens during this time.
Witch hazel is known as a deer repellent though organic deer repellent sprays are much more effective at preventing deer damage to landscapes and gardens.
Preventing Deer Damage
For areas with a concentrated deer population, witch hazel is ideal for landscaping because of its natural resistance to deer. However, it is not a fool-proof method of deterring deer. Some deer will eat witch hazel, even though the taste isn’t appealing. As with other deer-resistant plants, a hungry deer will eat anything.
A more effective way to prevent deer from damaging your landscape or garden is by using deer repellent. These easy-to-apply sprays are available at most lawn and garden stores.
The most effective deer repellents work by targeting both the scent and taste senses, which are highly sensitive in deer. The ingredients of these dual-targeting deer repellents include a capsaicin and putrescent egg combination. The capsaicin provides an immediate irritation to the deer when tasted. The putrescent egg mimics the smell of decaying animals, which alerts the deer into thinking a predator is nearby. Once dried, the solution is not detectable by the human nose.
There is an organic deer repellent spray available. With the OMRI logo on the label, consumers know they are using a truly organic product. This spray is highly effective at keeping deer away from treated areas, and it also protects against rabbit damage. Unlike other deer repellents, this type of spray is long-lasting, requiring reapplication as little as every 3 months.
Medicinal Use
Witch hazel’s astringent properties are due to the high level of tannins in the twigs, leaves, and bark of the plant. Astringents can harden, tighten, and dry tissues, which
is why they’re frequently used on the skin to remove oil and tighten pores.
Astringents are also useful for stopping discharges when using a styptic pencil. The tannins found in witch hazel soothe and tighten painful varicose veins temporarily, or decrease discomfort associated with phlebitis, the inflammation of one or more veins. Also contained in witch hazel are flavonoids, resin, and procyanadins which increase its anti-inflammatory, soothing properties. Applying a cloth soaked in witch hazel tea can help reduce swelling and relieve pain associated with bruises or hemorrhoids.
Various witch hazel forms, such as suppositories, hemorrhoidal pads, or lotions, can be found in almost any pharmacy. Besides topically treating veins and hemorrhoids, witch hazel lotions can also be useful on swollen, rough carpenter’s or gardener’s hands. When taken internally, witch hazel can be used to treat a prolapsed uterus, hemorrhoids, or varicose veins, although this treatment differs from what is commonly found in pharmacies.
Those suffering from laryngitis can find relief with witch hazel as well, given its effectiveness in shrinking swollen tissue. Gargling with cloves, myrrh, and witch hazel reduces the uncomfortable pain of a sore throat. Using tincture or fresh tea is preferable to store-bought witch hazel, which often contains isopropyl alcohol. For case of infected or swollen gums, rinse with myrrh and witch hazel, placing a dropper’s worth of each herb into a quarter cup of water to rinse the mouth. When combined with a drop of both clove oil and myrrh, a teaspoon of witch hazel tea makes for an inflammation and pain relieving rub for teething gums.
For treating swimmer’s ear, use a calendula, goldenseal, and witch hazel tea applied to a cotton swab on the outer ear. Moisture and pus typically accompany swimmer’s ear, usually in the outer canal of the ear. Calendula and goldenseal fight infection while witch hazel dries the secretions.
Combined with arnica, witch hazel makes for an effective topical remedy in treating traumatic sprains, bruises, and bumps by promoting a quick recovery and relieving pain. In most store-bought witch hazel, isopropyl alcohol has been added to treat external lesions.
If you’re experiencing a stomach flu or intestinal illness that causes diarrhea, a tea composed of thyme, mint, chamomile, and witch hazel can be highly effective.
Bleeding ulcers or gums can be treated with witch hazel, either topically on a wound or when taken internally. Witch hazel is very important for controlling bleeding. Medical attention is still required for serious wounds, but in the interim, witch hazel can help stop bleeding. (Jennifer Brett)
Works Cited
Jennifer Brett, N.D. Witch Hazel: Herbal Remedies. 29 March 2010
witch hazel. 20 March 2010. 29 March 2010
Guest Post Provided By Havahart®
Building of an indoor computerized grow box
13 years ago indoor growbox
Before going into my latest version of the grow box, I think it would be good to go through the brief history of my computerized grow boxes.
Version 1: PC Grow Box
It all started with my daughter’s question for her science project “Why don’t strawberries grow during the wintertime?” After some discussion she decided because it was too dark and too cold (pretty smart for a kindergartener) To prove her hypothesis we created the original computer grow box.

Now the only thing computerized about this one was the fact that it was made from an old PC case using a simple lamp timer hooked up to control the CFL lights and a incandescent to provide a little extra heat. This system worked great the strawberry plant thrived and produced about a dozen berries and we had proven that yes you can grow strawberries during the wintertime.

As with any iterative development process I did look at some of the shortcomings of this design and made some improvements. Though this was the perfect size for this experiment when I started consider using this for starting some of my seedlings the plants quickly overgrew this small space. The other problem was the ability to maintain ideal temperatures for growing. As the ambient temperature rose in my garage so did the grow box (by plus 15F normally) so this became a maintenance issue trying to keep this in check. This led to the next version.
Version 2: The True Computerized Growbox

This is where things started to get a little technical, my primary concern was temperature control. This would allow me to create the perfect growing environment for my seedlings and plants by using a pretty simple software program, an arduino prototyping board for the electronics, and a few solid state relays I was able to achieve pretty consistent temperature in the grow box.
This design led to a couple of issues; first it worked great for seedlings but as the plants matured I ran out of room fast. Second was temperature control, the CFL/incandescent combo was good at adding 10-15 degrees to the ambient temperature but when weather got very cold or hot there was not much that could be done to get the box out of these extremes. These we the inspirations for the most recent build.
Version #3: The deluxe computerized grow box

Space: First off the new box is over 3 times bigger than its predecessor. This allows ample space for plants to grow up and out as needed. Specially the dimensions are 4 feet wide and tall with a depth of 2 feet. It is constructed underneath my workbench which is supported from studs in the wall and 2”X2” posts as legs supporting the actual workbench. The walls of the grow box is made from a single sheet of quarter inch plywood…I probably should have spend a couple extra dollars for half inch for a little more insulation but hey this is the Cheap Vegetable Gardener. Speaking of insulation…there is none, I might rethinking this while growing peppers over the summer to save a little on heating costs but for now I don’t need it.

Lighting and Heating: Here are a couple more major improvements in this build. I have installed a 120 watt LED system from Advanced LED Lights and picked up a pair of 150 watt ceramic reptile heaters for $17 each on Amazon. Now for me this was a pretty big purchase but they were a steal provided they normally sell for $40 each at my local pet store. Between the very cool LEDs putting almost no heat and the heaters pumping out as much as I can need, this grow box is ready for any adverse weather that comes my way no matter what season.

Ventilation: I went simple with this high performance CPU fan dangling from a couple of wires…this is on my list to create a better install of this but hey I have a newborn at home give me a break =)

Watering: I really liked the bottom feeding system that I had in the old grow box but provided that now I have four separate trays to fill this makes things a little more complicated. For the watering system material I chose to go with PVC pipe because it is easy to work with and is fairly inexpensive. Another benefit is because I am using a low pressure system to pump the water in (low end pond pump) just making them hand tight is good enough to prevent leaks and allows me to make quick and easy modifications as needed.

This was good when I made the misfortune of making the intake (see picture above) a little two low and accidentally created a syphon and if I wouldn’t happened to have been in the garage when it kicked on I would have had nearly my entire 5 gallon bucket of water on the floor of my garage.

The next problem was that water will simply flow out the first free flowing outlet, so to create a small amount of water pressure to ensure the trays were getting filled evenly I used a threaded 1/2” cap with an 1/8” hole in the middle to restrict the flow enough for even distribution. The rest of the piping included a couple of elbows, 4 T-joints for each tray and an end cap to stop the flow of water at the end of the pipe.
Hardware: The PC I scraped together from spare parts and was showing an end in life was near, so I upgraded the 12 year old desktop with my 7 year old laptop. Which added a little performance but also cleaned up the need for LCD display, keyboard, mouse. As an added bonus this made the brains of grow box much more portable which allowed more evenings of troubleshooting in my living room versus cold garage.
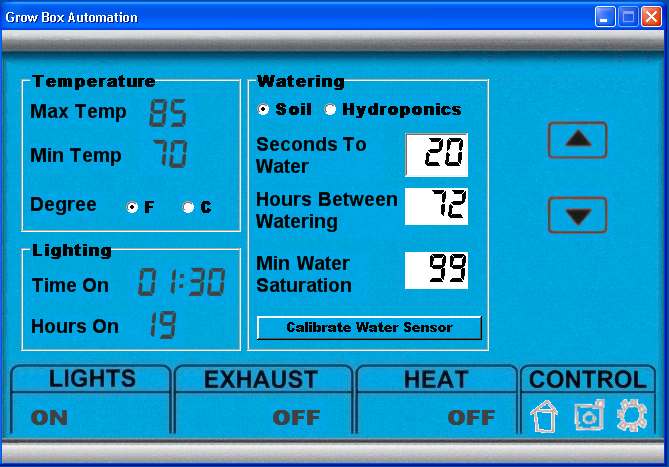
Software: This is an area where I will be the first to admit I went overboard on, but when you find something you are passionate about it is very easy to do. Building upon the previous version of my software for the old grow box I made some cosmetic changes to give the UI a design that is similar to a thermostat. I also included some temperature trending (up/down arrows next to the temperature) along with some basic (Min/Max/Avg) information for quick analysis for the climate of the grow box on that day.

To have easy access to see how the plants have been doing while I have been away I have the ability to view the current conditions inside the box but also to check on images taken in the past.

Finally we have the “Settings” screen which allows the ability to change optimum temperature range, lighting conditions, and watering configurations. I also added an hydroponics mode which works on timed on/off cycles versus being based on moisture content in the soil.
Lastly as I mentioned previously I have implemented Windows Phone 7 mobile support, which I am still limited to using on an emulator given Verizon taking their sweet time bring a model for to market for me to purchase…this provides a view into the grow box and also allows me to remotely turn on/off the controls watering, lighting, heating, and the fans within the grow box.


Overall I couldn’t be more pleased with my current configuration and the plants are thriving in their closely monitored and controlled climate…now I just have to hope that the temperatures outside will fall into some reasonable ranges to they can thrive outside of this box.
Many uses for egg shells in your garden
13 years ago easter, egg shells

This time of year you probably have a larger number of egg shells heading to your trash. Between dying Easter eggs and our new tradition of making Ukrainian Easter bread (uses over a dozen eggs) I end up with quite a pile of egg shells.

The good news is there are many uses for these to use in your planting and in your garden.
Use #1 Soil amendment: Egg shells consist of calcium carbonate which many of your plants desperately need; apples, broccoli, brussel sprouts, cabbage, carrots, cauliflower, celery, cherries, citrus, conifers, cotton, curcurbits, melons, grapes, legumes, lettuce, peaches, peanuts, pears, peppers, potatoes, tobacco, and tomatoes (just name a few) What I like to do is collect the egg shells and throw them in a freezer bag and keep them in the freezer. Once I have a dozen or so saved up I put them into the oven (when I am warming it up to bake something else) and give them a good toasting. I quick spin in the coffee grinder and I have some great calcium powder to apply to plants when planting, or seep in some water overnight to give your tomatoes a quick boost if they are appearing sufficient.

Use #2 Compost nutrient additive: If you start getting too much lying around you can also add some to your compost pile to give that black gold a little extra boost. Just be sure you crush them finely (or powder as mentioned in Use #1) or you will just find a bunch of whole eggshells in your finished compost.
Use #3 Seed pots: If you are even just a little bit careful when cracking these eggs you can add a little soil to these egg shells add a seed and use them to start seeds. Provided that the seeds are round you will want to also save the egg carton to keep them upright.

Use #4 Pest deterrent: Using the same method of creating a powder in Use #1 this granule form can be sprinkled around the base of your plants to deter cutworms and slugs who will find these abrasive surface undesirable.

Winner of the WetCircuits power strip is…
13 years ago Uncategorized

The winner of the WetCircuits powerstrip giveaway is Journey11. For the rest of you stay tuned this growing season since I am always on the lookup for products to giveaway.


