Growing vegetables from kitchen scraps
10.9 years ago guest post, indoor seed starting, vegetables
If you’re fond of gardening and you want to do something fun you can always use kitchen scraps to grow new vegetables. It’s not a difficult job, and you can ask your kids to help you. The activity can be extremely engaging, not to mention that you’ll have the chance to improve your kitchen’s overall décor.

Grow your own spring onions, fennel, leeks, and scallions
To plant the vegetables mentioned, you need the white roots. Your next step is to put the white roots in a pot and add some water, but pay attention because they shouldn’t be totally immersed in water. Put the pot on a window sill so that the sun can have access to it. In the next 3 to 5 days, you’ll see them grow. Take as much as you need and let the roots in the pot. Don’t forget to change the water once a week.
Lemongrass
The same applies to lemongrass, which means that all you have to do is put the roots in a pot, add water and place it near a sunny window. Note that lemongrass might need a little more sun than the vegetables mentioned above. After approximately seven days, you should see new growth. As soon as this happens, you have to move the plant into another pot, and add soil. Then, place it again near a sunny window.
Celery, Cabbage, Romaine Lettuce, and Bok Choy
You have to do the same as with the scallions. Remove the leaves, but not completely. Leave about one inch and face the white roots down; put them into a container and add water. Just like before, pay attention not to immerse the whole plant in water. These roots also need sun and constant fresh water. After a few days, you will notice that your plant will start sprouting, and in no more than 10 days, you will have to put it into soil. Obviously, the leaves must remain over the soil. In just a few weeks, you will have the possibility to harvest your produce. Lettuce, cabbage and celery will certainly compliment your kitchen’s décor, not to mention that they’re delicious.

Ginger
First of all, you have to know that growing Ginger is a really easy job. All you need is a chunk of Ginger that you will put in soil. Unlike the vegetables mentioned above, this one prefers filtered light. What is more, apart from using it in the kitchen, you can also utilize Ginger as a nice ornamental plant.
Potatoes
Everyone likes eating potatoes, especially children. So now you have the possibility to grow your own potatoes, whatever variety you prefer. The essential thing is for the scrap to feature those “eyes” growing on its surface. Every piece that you intend to use should have one or two eyes. Cut the vegetable into pieces, and let them in room temperature during the following days. Then, you have to plant them in a nutrient-rich soil. Hence, you need to add some compost into it prior to putting the potato cubs with their eyes up in the pot.
Garlic
To grow garlic you need just one clove. Put it in soil with the root facing down, and let the pot in a place that features warmth and sunlight. Then, the plant will grow and you will see how new shoots pop up. Once the plant is fixed into the soil, remove the shoots. After this, a new tasty garlic bulb will come out.

Mushrooms
If you want to grow mushrooms, make sure you do it in a pot and not in your garden, because otherwise, you will have a hard time trying to protect your mushrooms from other fungi. If you plant them in a pot, you will have the possibility to move them from one place to another in order to offer them the conditions they need. For example, you can try putting the mushrooms in a place that features warm filtered light throughout sunlight hours, and keep them in a place that features cool temperatures during nighttime. In order to grow mushrooms, you have to remove the head, and then put the stalk into a pot filled with soil. Note that the top of the stalk must remain at the surface.
Author Bio: Peter Smith wrote the awesome article. He is a part of site http://www.kitstone.co.uk/ where you can get a wide range of furniture collections. He is also a freelance writer who writes about everything fashion, health, home décor etc.
Latticework that Works!
10.9 years ago guest post, pests, rabbits, vegetables, vertical gardening

Lattice fencing has been a go-to tool for gardeners forever. Its classic crisscross or grid structure has remained unaltered since its inception for one reason: it works! And as we all know, if it ain’t broke, don’t fix it.
Indeed, the lattice is the one "fixing" things – it provides privacy fencing for yards, serves as a blank canvas for clinging vines and ivy, helps climbing vegetables to reach new heights, keeps out unwanted critters, and functions as the main building material for decorative arbors, trellises, screens, pergolas and more!
Let’s learn a bit more about lattice by delving into two of its main purposes: vertical gardening and natural pest control.
Vertical Vegetables

One of the wonderful things about the overlapping strips in latticework is the structural support they provide for climbing vines and vertically-growing plants and vegetables.
In the world of trellis climbers, you can’t go wrong with selections such as tomatoes, cucumbers, melons, peas and pole beans.
Once the frost threat passes for your region, lay out your garden in front of your lattice incorporating each plant’s specific spatial needs – this info can be found on the transplant’s nursery container.
After placing each transplant in its specified hole, cover with soil (mixed with compost for nourishment) and water liberally. From here, attach each of the climbers to the lattice by looping a soft piece of twine around the main stem of each plant and tie the loose ends to the lattice.
As the plant grows, the twine will guide the stems to grow vertically against the lattice. As soon as the vegetables ripen, harvest them and enjoy a homegrown bite of your hard work!
Natural Pest Control
Another fantastic use for lattice is as a tool for border control for those annoying animals that threaten to move into your home, completely uninvited. Just take a look around at all of the crawl-space homes surrounded with lattice under-fencing and you will understand the widespread infestation issues that lattice solves in such a lovely manner!
But more to the point is how to keep hungry critters like rabbits and deer from feasting on the fruits (and vegetables!) of your labor: installing lattice fencing is a great way to keep their grubby little paws off your peas and carrots and little hooves away from your rose bushes.
Although a picket fence works well as an exterior border surrounding your entire yard, if it is not at least 6 feet tall it may not thwart all deer, as some can clear that height in a single leap. Rather than installing a completely new fence, consider adding a level of lattice at the top of your existing fence.
Attaching a length of lattice to the upper railing of your fence not only provides the additional height to keep the deer at bay but it also adds texture and interest to your fence and can soften the entire look of your yard if you allow vines or ivy to grow on the lattice. Plus, you are repurposing what you already have which is a great way to save some green for the planet and your wallet!
When it comes to rabbits, here’s a quick tutorial on installing a lattice border around your garden:

You’ll need:
- Wire rabbit fencing, with openings no larger than an inch: Ensure you have enough wire for the length of your entire garden area that is at least four feet wide
- Decorative lattice, in the same length as the wire fencing and at least three and a half feet wide
- Garden trowel
To build your border:
- Use the garden trowel to dig a narrow channel around the perimeter of your garden, approximately 12 inches deep
- Bury the wire rabbit fencing in the trench – there should be 12 inches below the surface and three feet above ground
- Fill in the trench halfway, leaving six inches of space from the surface
- Enclose the wire rabbit fencing with the lattice, burying the lattice approximately six inches deep
- Replace the remaining soil and firmly pack the ground around the new fencing
With this type of border, you have form and function. The decorative lattice masks the presence of the wire rabbit fencing, at least partially, and cursory garden admirers may not even notice it, depending on the style of lattice you choose. By burying the fence in the ground, you discourage burrowing and digging and at three feet tall, even Bugs Bunny will have difficulty breaching your barrier!
What other garden projects do you plan to complete with lattice?
Chris Long, a long-time store associate at a Home Depot in Illinois, writes for the Home Depot website. He enjoys writing on outdoor projects ranging from lattice to lumber and fencing.
How to make a grow box controller
11 years ago cheap, LEDs, Uncategorized, vegetables

While my existing system was working I decided to make an upgrade to the electronics on my old grow box controller specifically to have a much more industrial strength version that will run without problems for decades to come. This version also is much safer…still probably not quite to a building code but much less worries to burning my garage down in the middle of the night. Finally it is modular if there are problems in the future I can easily switch out electronics or sensors.
Well now I have attempted to justify my reasons this is what I used to put the whole thing together:
Parts List
- Enclosure big enough to fit four Solid State Relays (SSR)
- Breadboard or custom PCB
- soldering iron and solder (optional if using breadboard)
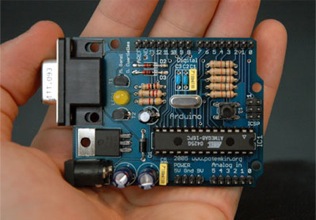
- Arduino
- 4 – solid state relays
- 4 — 1K resistor
- 4 — 2N2222 transistor
- 4 — 1N4004 diode
- DS18S20 (1Wire temperature sensor)
- 4.7K resistor
- 10K resistor and homemade soil sensor
- 18 gauge triple stranded solid copper wire (5 feet)
- Industrial grade sockets (1 male/4 female)
- Old Ethernet cable
If we had lawyers, they probably would want us to say this:
WARNING: I am not an electrician and do not pretend to be one. I do not know the specific building electrical codes of your area, so please be sure your wiring is completed under the proper safety code for your area. As always, using high voltage electricity can result in self-electrocution or burn down your house if not done safely so if you are not comfortable doing this wiring please contact a qualified professional.
Putting it all together
On the electronics side overall the circuits are actually pretty simple and if using a breadboard definitely something that could be tackled by a beginner. Though on the other side since this project is dealing with AC current I definitely would recommend caution (no hands unless power is unplugged) or have someone a little more comfortable with 120/220V help you out.
The Brains
I will be the first to admit that using an Arduino for this application is complete overkill for this application but it gives plenty of room for additions in the future. For all intents and purpose you could have your grow box completely controlled from the Arduino own processing power though on my case the software and UI is more interesting part to me. For this reason the Arduino code is actually very “dumb” basically just taking commands via the build in serial through USB and setting digital outputs to HIGH/LOW or reading analog inputs.
Here is the code for your grow box controller:
1: /*
2: * GrowBox Arduino Interface
3: *
4: * Descriptions: Simple interface to digital and analog controls by passing serial inputs
5: * For example:
6: * "A1" to read analog value on pin 1
7: * "D1H" to set digital pin 1 to HIGH
8: */
9: #include <OneWire.h>
10:
11: //1-wire
12: OneWire ds(8); // on pin 8
13: #define BADTEMP -1000
14:
15: //define unique sensor serial code
16: byte temperature[8];
17:
19: #define PIN_VALUE 1 // numeric pin value (0 through 9) for digital output or analog input
18: #define ACTION_TYPE 0 // 'D' for digtal write, 'A' for analog read
20: #define DIGITAL_SET_VALUE 2 // Value to write (only used for digital, ignored for analog)
21:
22: int NUM_OF_ANALOG_READS = 2;
23: char commandString[20];
24:
25: void setup()
26: {
27: Serial.begin(9600);
28:
29: setOneWireHex();
30:
31: // Power control
32: for(int i=0; i<=7; i++)
33: {
34: pinMode(i, OUTPUT); // sets the digital pins as output
35: digitalWrite(i, LOW); // turn everything off
36: }
37: }
38:
39: void loop()
40: {
41: readStringFromSerial();
42:
43: if (commandString[ACTION_TYPE] != 0) {
44: int pinValue = commandString[PIN_VALUE] - '0'; // Convert char to int
45:
46: if(commandString[ACTION_TYPE] == 'A')
47: Serial.println(analogRead(pinValue));
48: else if(commandString[ACTION_TYPE] == 'D') {
49: if(commandString[DIGITAL_SET_VALUE] == 'H')
50: digitalWrite(pinValue, HIGH);
51: else if(commandString[DIGITAL_SET_VALUE] == 'L')
52: digitalWrite(pinValue, LOW);
53:
54: Serial.println("OK");
55: }
56: else if(commandString[ACTION_TYPE] == 'T') {
57: float temp = get_temp(temperature);
58:
59: Serial.print(temp);
60: Serial.println("C");
61: }
62: else if(commandString[ACTION_TYPE] == '1') {
63: printOneWireHex();
64: }
65: else if(commandString[ACTION_TYPE] == 'V') {
66: Serial.println("VERSION_1_0_0_0");
67: }
68: else if(commandString[ACTION_TYPE] == 'P') {
69: Serial.println("PONG");
70: }
71:
72: // Clean Array
73: for (int i=0; i <= 20; i++)
74: commandString[i]=0;
75: }
76:
77: delay(100); // wait a little time
78: }
79:
80:
81: void readStringFromSerial() {
82: int i = 0;
83: if(Serial.available()) {
84: while (Serial.available()) {
85: commandString[i] = Serial.read();
86: i++;
87: }
88: }
89: }
90:
91: void setOneWireHex() {
92: ds.reset_search();
93: ds.search(temperature);
94: }
95:
96: void printOneWireHex() {
97: ds.reset_search();
98: if ( !ds.search(temperature)) {
99: Serial.print("NONE\n");
100: }
101: else {
102: ds.reset_search();
103:
104: int sensor = 0;
105: while(ds.search(temperature))
106: {
107: Serial.print("S");
108: Serial.print(sensor);
109: Serial.print("=");
110: for(int i = 0; i < 8; i++) {
111: Serial.print(temperature[i], HEX);
112: Serial.print(".");
113: }
114: Serial.println();
115: }
116: }
117:
118: ds.reset_search();
119: }
120:
121: float get_temp(byte* addr)
122: {
123: byte present = 0;
124: byte i;
125: byte data[12];
126:
127: ds.reset();
128: ds.select(addr);
129: ds.write(0x44,1); // start conversion, with parasite power on at the end
130:
131: delay(1000); // maybe 750ms is enough, maybe not
132: // we might do a ds.depower() here, but the reset will take care of it.
133:
134: present = ds.reset();
135: ds.select(addr);
136: ds.write(0xBE); // Read Scratchpad
137:
138: for ( i = 0; i < 9; i++) { // we need 9 bytes
139: data[i] = ds.read();
140: }
141:
142: int temp;
143: float ftemp;
144: temp = data[0]; // load all 8 bits of the LSB
145:
146: if (data[1] > 0x80){ // sign bit set, temp is negative
147: temp = !temp + 1; //two's complement adjustment
148: temp = temp * -1; //flip value negative.
149: }
150:
151: //get hi-rez data
152: int cpc;
153: int cr = data[6];
154: cpc = data[7];
155:
156: if (cpc == 0)
157: return BADTEMP;
158:
159: temp = temp >> 1; // Truncate by dropping bit zero for hi-rez forumua
160: ftemp = temp - (float)0.25 + (cpc - cr)/(float)cpc;
161: //end hi-rez data
162: // ftemp = ((ftemp * 9) / 5.0) + 32; //C -> F
163:
164: return ftemp;
165: }
Copy and paste the above code into your Arduino software. For the code above I used the OneHire.h library which is free to use and can be downloaded from here. To be able to use this library simply copy the contents to C:\arduino\hardware\libraries\OneWire. Now you should be able to Compile (CTRL+R) and upload the code to the board (CTRL+U)
Now with the software uploaded you can send some simple serial commands via its built in USB to serial adapter to interact with it. The interface is are broken up into 1 to 4 character commands, which I will detail below
| Command | Description |
| T | Returns temperature from One Wire component |
| D4H | Sets digital pin 4 to HIGH (ON) (replace 4 for alternate pin) |
| D4L | Sets digital pin 4 to LOW (OFF) (replace 4 for alternate pin) |
| A1 | Reads analog value from pin 1 (replace 1 for alternate pin) |
| PING | Returns PONG which is used to confirmed controller is online |
| V | Returns version which is some forethought into the PC application being able to support different versions of controller software |
Using the build in serial monitor tool in Arduino.exe, my application, or you should be able to control your Arduino with this very simple command based interface
Now you can hook up some LEDs and watch them blink which is fun for a little while but if you want to add some grow box components read on….
Temperature Sensor
As you can see I have fully embraced the circuit schema on the back of a napkin idea. These are the actual diagrams I crumpled up and stuffed in my pocket with several trips to the garage for some final soldering of various joints until everything was solid.
Below is the simple circuit required to get your 1Wire temperature sensor working. I would recommend checking your documentation (if not labels on the chip) for the orientation to have 1 and 3 correct, if you have it wrong you should get some complete unrealistic number. Hook ground up to pin1 on the DS18S20 and pin 2 hooked up to the digital input pin 8 on the Arduino with 5V with a 4.7K resister in between to step down the voltage.
If everything is hooked up correctly you should get the current room temperature in Celsius by sending command “T” to your Arduino. If you prefer Fahrenheit uncomment line 162 and recompile and upload your changes, though if using my software I support both degree types and do the conversion in the the software. To make sure everything working (or just to play with your new toy) put your fingers on the chip for a couple seconds and take another measurement unless you keep your house very warm the temperature should go up a couple of degrees

Turning things on and off (Relays)
If you were smart enough to check the current requirements of your Solid State Relays (SSR) before you bought them you may be able to skip this whole circuit and simply hook the digital outputs to the 5V positive side and ground to the negative side of the SSR.
Unfortunately if you are like me and bought some SSRs that require more current draw than the Arduino (or any other IC chip) of 40mA then you will need to create the simple circuit below.

Basic idea is pretty simple, you are using the output from the digital pins to switch of the transistor which then allows the ground to complete the circuit with the thus turning on the relay. As you can see there is a 1K resistor between the base (middle pin) of the transistor. If you are not using a SSR relay (though recommend you do) you should add a 1N4004 diode between the positive/negative which protects the transistor from being damaged in case of a high voltage spike which can occur for a fraction of a second when the transistor switched off, this is also known as a back-EMF diode or fly back diode.
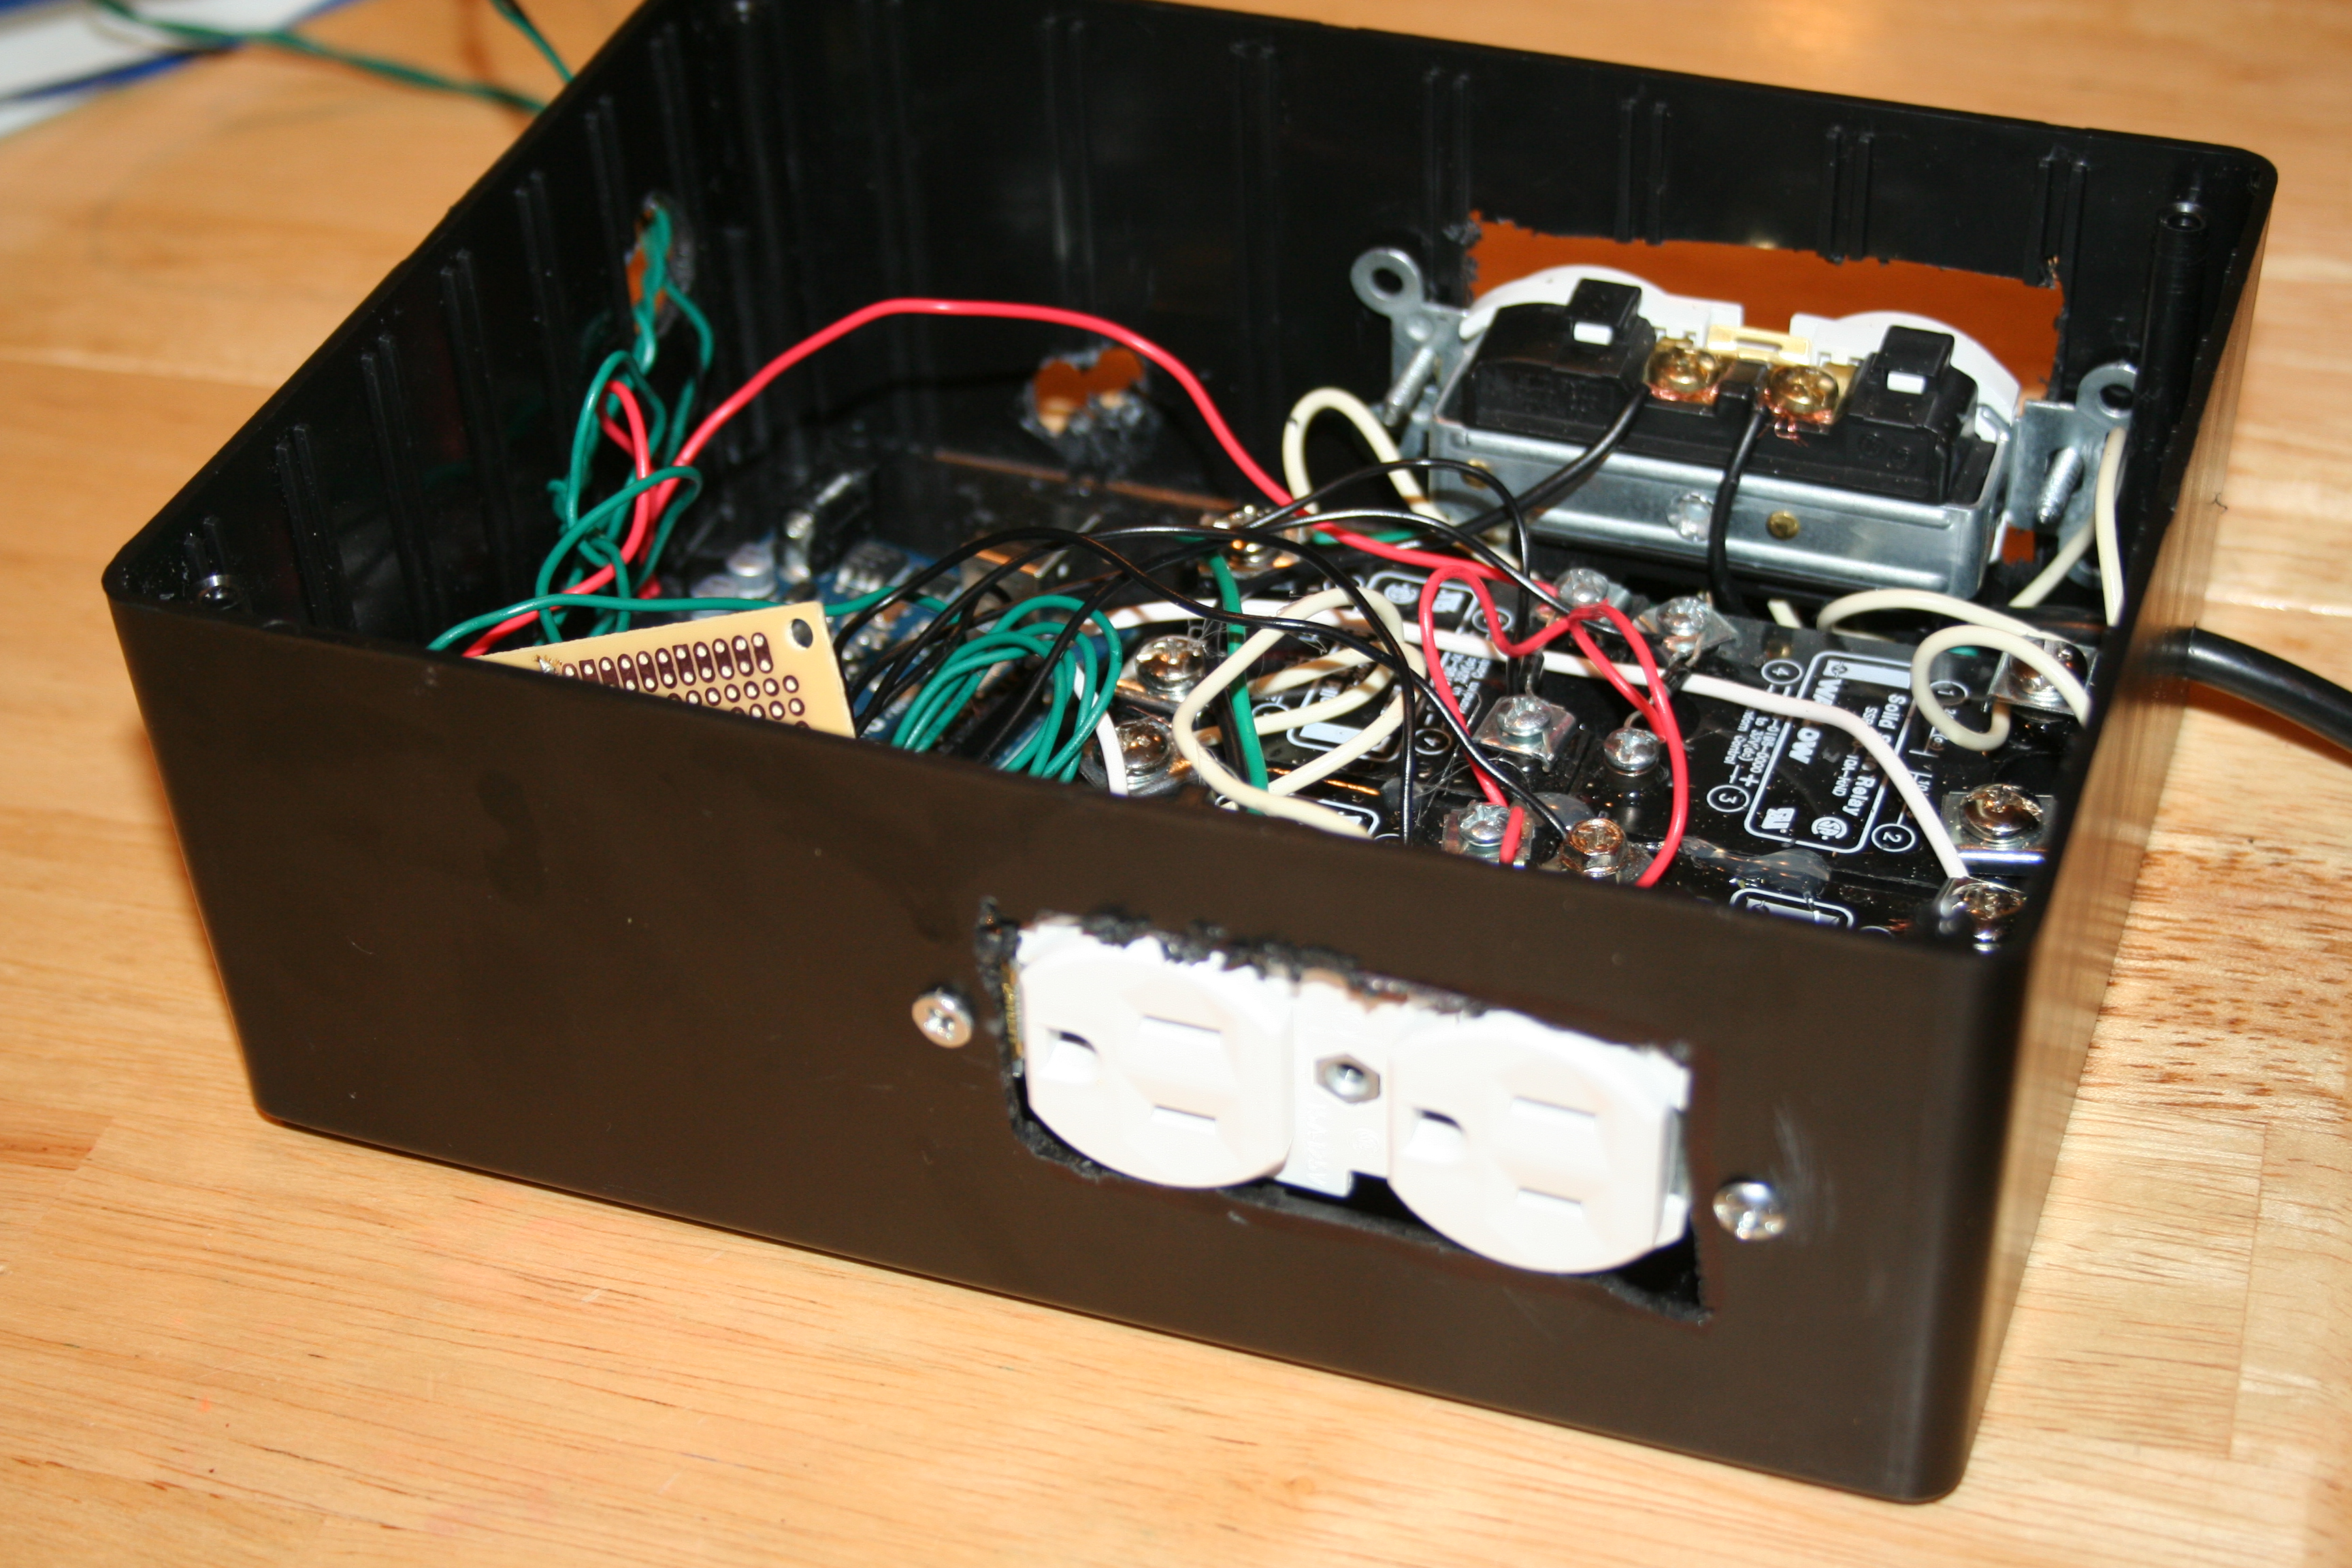
Now here you have a couple options. If you are confident of our wiring skills you can do like I did and take a couple of sockets and hook up the neutral and ground in parallel. Two save space and since I really didn’t need two separate plug-ins (nor its own plug) for each relay I removed the little metal bar between the two sockets so they could be switched on independently. Now simply hook up hot to the left side of all your relays in parallel and then connect a wire from the right side of the relay to its own plug on the two sockets.
Now a less wiring intensive method is to simply take a 6 foot (small if you can find them) and cut the hot wire (usually the one with non-smooth wire) and attach each end of the wire to both sides of the relay.
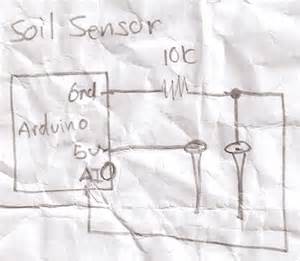
Moisture Sensor
When it comes to a moisture sensor there are a few options. First is the classic two galvanized nails, second is the cheap gypsum soil moisture sensor which I have written up in the provided link.
If you are using the other options you will need the simple circuit below. Technically it is a voltage divider, but that doesn’t really matter. Just hook up one end of your sensor to 5V and other sensor to ground with 10K resistor and also connected to analog pin 0.
My custom PCB solution

I actually started the work to create my own PCB at least a few years back. Played with if it off and on and finally pulled the trigger to get some boards printed up which I must say was very rewarding and pretty fun experience for just $20-30 of out of pocket cost. This provides all the circuits I mention above with a bonus circuit to let me know when my water reservoir is running low. I also installed a Ethernet socket not
I designed this to be an Ardunio which plugs directly on top of the Arduino. In theory I could stack more functionality on top of if but haven’t though of anything cool to do here yet.
Don’t want to spend 10-20 hours creating your own PCB and then wait 2-3 weeks for it to arrive from Hong Kong? Well you can do the same thing with a bread board which I show below.
Virtual breadboard layout
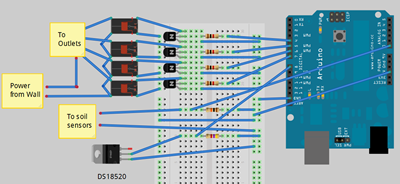
If you are new to soldering or have no interest in learning I would definitely recommend this option. Simply place the components in the holes and make connections with 18 gauge solid copper wire. You should be able to pick a small breadboard for less than $7.
Various applications
Of course for my application, I am using this to integrate with my custom software solution to control my grow box. Specifically soil sensor, temperature measurement, heater, lights, exhaust fan, and water pump. So using the circuit mentioned above I ran the hot wire through each SSR with the remaining wires connected to the plug and eventually gets plugged into the wall. Then simply hooked up the wire from the Ethernet cables to the low voltage side to turn the switches on/off. So I would say this is a bit of an improvement over my last attempt…
Before
After

Last I hooked the arduino up to my PC and used my custom software to control the temperature, water, and provide cool graphs as you can see below.
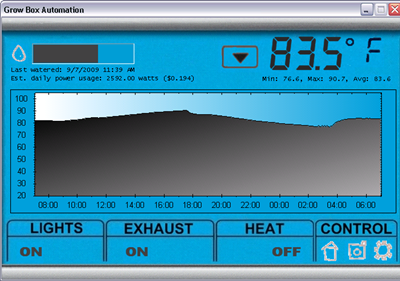
Sometimes life can get busy and you have limited time to keep an eye on your plants, for these times I also integrated with a custom Windows Phone 8 application which allows me to check the current state of the grow box using life tiles, water remotely (turn on/off lights/heater/fan as well), or even check out a current feed inside the grow box.


Looks at the actual actual grow box…


Tags: arduino, cheap, coffee grounds, grow lights, growbox, led, vegetables
Go Green in the Veggie Patch
11.3 years ago garden planning, guest post, vegetables

Vegetable gardeners inherently have a leg up on the casual nature lover: they’re already doing their part for the environment by growing their own vegetables in the first place. Mass-produced horticulture can be a pretty massive strain on the environment when you factor in the nasty effects of pesticides and the sometimes wasteful techniques employed by factory farmers. The agribusiness is a sticky one; while it provides much of our nation with balanced nutrition and a range of job opportunities, it’s tough to deny the toll it takes on Mother Nature.
Vegetable gardens, while often small and discreet, are a common way for homeowners to allay their environmental impact. Here are a few tips to keep in mind in order to get the most out of your veggie plot while wounding the least of the environment:
1. Compost. Of course, that means a little extra effort on your end, but it’s well worth it. We all know what an ecological perk homegrown compost can be, so don’t skip out. Use what you have on hand – eggshells, grass cuttings, newspaper, manure, whatever it may be. Just make sure you’ve got something you can throw together to make your own organic fertilizer.
2. Accessorize. Eco-friendly garden maintenance is a lot easier when you have a little help. Make things easier on yourself by equipping your vegetable patch with the right supplies. Make your own plant markers or purchase recycled materials that will help you separate your squash from your spinach. Put out a rain barrel and make use of precipitation to water your plants at a later date. Look around for trowels and spades made with bamboo or other organic materials – there are plenty of brands out there that are selling earth friendly gardening tools.
3. Simplify. Certain vegetables offer up low maintenance, low effort endeavors that can produce surprisingly high yield. Potatoes, green beans and carrots are all pretty easy to grow, and don’t require much attention. Make some room and plant a few of your favorites; there won’t be much more you have to do other than some routine upkeep. The environmental benefit comes in what you don’t end up spending on potentially harmful garden care products
That’s it! Well, of course, that’s not all of it – but those are some great places to start. Follow these Eco-friendly tips in your vegetable garden and spread the word! What are you and your friends doing to stay green in the veggie patch?
Author: Kristina Ross is a writer by trade and gardener by habit. She’s currently a freelancer and blogger for Save On Energy.
Free Gardening Books
11.3 years ago book, free, vegetables

The great thing about home gardening is that people have been doing it for thousands of years and even better writing about for at least the last few hundred. Fortunately this provides us with a great amount of knowledge of from many generations back.
What’s even better many of these get gems are under the public domain so they are completely free gardening books to have as a resource to read online and is even available in EBOOK format to take with on your favorite. To check out these great books yourself check out Google Books with the public domain filter enabled.
Currently I am checking out “The home vegetable garden” by W. R. Beattie in printed in 1906. Sure it doesn’t have a real catching marketing title but provides some great tips and makes use of low cost solutions to the same problems we come across today. One of my favorite finds was this handy Planting table:

Click on image to enlarge
Update: Max mentioned in the comments of another great resource your local Cooperative Extension Service just go to Bing.com and type “Cooperative Extension Service” and then your zip code to find your local office and get some great local info.

So check these out and let me know what treasures you find in the comments.
Create your own organic kitchen garden in 2013
11.3 years ago garden planning, guest post, kitchen, organic, vegetables
With a continued focus on healthy eating this year and the recommendation to eat healthy, organic foods where possible, what better way to incorporate the two by creating your very own organic kitchen garden in 2013. With a little planning and imagination you’ll soon experience the joys of planting and growing your own food that will see you kitchen stocked with fresh produce all year round. Celebrate the seasons and get in touch with the foods that should be cooked with and consumed throughout the different cycles of the year and you’ll be sure to be taking in maximum vitamins with every bite without any of the pesticides.
So how do you get started? The first thing you need to consider is the available space you have within your garden to dedicate to growing food. You’ll need a bright sunny spot that is relatively sheltered from the winds and ideally as flat as possible to allow for even water distribution across your plot. Make sure you have easy access to the plot, ideally locating it as close to your kitchen door as possible to ensure you can reap the benefits of popping out into the garden whilst cooking to pick your herbs and vegetables for your meal.

To achieve the best results, start off simple and choose vegetables that are known to be easy growers such as lettuces, Swiss chard and chives. Add to this some tasty beetroots and radishes and you’ll soon see just how much fun growing your own food can be. To achieve success with your vegetable growing you need to ensure that your plants have access to as much sun as possible – ideally at least 6 hours each and every day.
If your garden tends to fall into the shade halfway through the day you might want to consider planting directly into containers rather than the ground to allow you to move your plants into the sunny areas with relative ease. As the seasons change and the position of the sun moves around your garden you might find this one of the most valuable tips to consider.
Container growing also opens up the opportunity for those people without gardens to participate in growing their own food and can do very well on even the smallest sunny balcony or patio. All you need to do is ensure that your pots are large enough to take the full growth of the plant, add plenty of drainage holes and water on a daily basis. For best results add a liquid fertilizer once every fortnight and you’ll soon start to see results.

If you have a sunny window in your kitchen this is a great place to grow your favorite herbs from and fills the space with an incredible aroma. It’s also the ideal place to start off tomato plants, bell peppers and squash that benefit from that extra bit of nurturing and protection in the early days. What’s more, bringing your organic garden directly into your kitchen in this way is incredibly inspiring when meal planning.

Like these planters? I found them here
Before planting your seeds you need to ensure that your soil is as fertile as possible. Add essential nutrients by working the soil through with rich compost manure and high quality fertilizers before you get started to guarantee your end result of delicious, healthy produce. On top of this you will need to maintain a regular watering routine, depending on the weather and soil you have planted into and the types of vegetables you are growing. As a general rule, leafy vegetables need to be watered more frequently than root vegetables. Be sure to add proper drainage to your soil to allow your vegetables to have the best chance of growing fully. Compost or bark chippings achieve this for you easily.
With all this in mind you are now ready to plan your own organic kitchen garden to ensure you are supplied with tasty, home grown food all year round. With some daily dedication to your plot you’ll enjoy following the seasonal patterns of planting, pest control and feeding as you watch your vegetables grow, inspiring you with ideas for new recipes to experiment with for highly nutritious, cost effective and deliciously organic mealtimes.
Author Bio: The article is being written by Peter Smith. He loves to renovate his home every year for purchasing new furniture or accessory he trusts the brand Mayer Blue.


