Giving the Toads a Happy Home with Earth, Water and… Garden Furniture?
10.1 years ago guest post, pests, toads

There was a toad that lived in my mother’s garden, and I always considered myself lucky to happen to catch a glimpse of him by a rock before he hopped back into the dense flowers and vegetables. When the summer rain was fresh on the plants, little toad would always be hanging out by the edge of the garden. I always wondered what his home looked like, and why he lived in the garden instead of the wilderness. Now that I have my own garden, I wanted to see more of little toad and other amphibians. They truly are amazing animals, and it is such an honor to be able to provide a good habitat for them so I can sometimes look in on their life and wonder what it’s like to be a toad!
After a bit of research into what type of real estate really does it for amphibians, I found out I need to provide shelter, hibernation spots, and a breeding area. Implementing a few structures with earth, water and garden furniture will really give amphibians a nice place to settle down in. Here are some tips for making your own garden toad-friendly, whether it’s because you like the amphibians or just their positive effects on gardens.
Rocks
Toads love to hide under rocks, so scatter a few throughout the garden in piles and border any paths or boundaries. You can also use wooden logs for this. Either way, it adds some more design to your garden and comfort for the toads. Some toads will also hibernate underground, digging deep below the freezing line, but others will rely on cracks in wood or rocks because they aren’t as good at digging.
Interestingly enough, Scientific American maintains that many frogs will freeze to the point where their heart and lungs stop beating in the winter. The level of glucose in their vital organs acts as antifreeze and the heart and lungs will start working again once the temperature warms back up.
Ponds for mating, hydration, and hibernation
Even if you don’t have a pond, you may still get a happy toad to live in your garden as they are a dry-land equipped amphibian. If you want more variety such as frogs or salamanders though, install a pond to prove the adequate hydration and ecosystem they require.
Putting a small pond in or near your garden isn’t as hard as it sounds. I just dug a hole in the ground, covered it in strong plastic, and waited for the rain to fill it up. You can also fill it with water from the hose, but you will want to make sure the chlorine has fully evaporated by the time any amphibians come near it. If you pick an area of low ground where pools form naturally, the rain should be fine to fill it up.
A pond also provides a hibernation spot for aquatic frogs. They will partially bury themselves in the mud below the surface and take in oxygen from the water.
Make sure the pond is far enough away from chemically treated lawns, poisonous trees or other plants that pose a threat to amphibians and reptiles. Instead, proactively install plants that will proved shelter and attract the kind of insects amphibians enjoy.
Garden furniture for hiding
I really like the wild, overgrown look of vines twisting into everyday objects, so I decided to incorporate furniture into my garden to provide shade, depth of space, and a dense hiding spot for the amphibian residents of the garden. I found a really cool, intricate looking wrought iron bench and planted Black-eyed Susan vine transplants, weaving them through and around the bench. I like to think that the frogs, toads and salamanders love the natural looking fixture as a potential hiding spot.

I also added another bench to the front-most outer side of my garden, this time using a cute little wicker design with cushions for actual sitting. Depending on the season, I leave this piece of furniture protected with a garden bench cover for the most part, and wait for it to rain in the early evenings. Once the rain ceases I go out to the garden and quietly uncover the bench for some amphibian (and rainbow) viewing relaxation. It’s probably one of the best things ever!
Amphibians are magnificent creatures, but they’re not the only garden-beneficial animals. What is your favorite garden wildlife, and how do you attract them to your yard?
Latticework that Works!
10.9 years ago guest post, pests, rabbits, vegetables, vertical gardening

Lattice fencing has been a go-to tool for gardeners forever. Its classic crisscross or grid structure has remained unaltered since its inception for one reason: it works! And as we all know, if it ain’t broke, don’t fix it.
Indeed, the lattice is the one "fixing" things – it provides privacy fencing for yards, serves as a blank canvas for clinging vines and ivy, helps climbing vegetables to reach new heights, keeps out unwanted critters, and functions as the main building material for decorative arbors, trellises, screens, pergolas and more!
Let’s learn a bit more about lattice by delving into two of its main purposes: vertical gardening and natural pest control.
Vertical Vegetables

One of the wonderful things about the overlapping strips in latticework is the structural support they provide for climbing vines and vertically-growing plants and vegetables.
In the world of trellis climbers, you can’t go wrong with selections such as tomatoes, cucumbers, melons, peas and pole beans.
Once the frost threat passes for your region, lay out your garden in front of your lattice incorporating each plant’s specific spatial needs – this info can be found on the transplant’s nursery container.
After placing each transplant in its specified hole, cover with soil (mixed with compost for nourishment) and water liberally. From here, attach each of the climbers to the lattice by looping a soft piece of twine around the main stem of each plant and tie the loose ends to the lattice.
As the plant grows, the twine will guide the stems to grow vertically against the lattice. As soon as the vegetables ripen, harvest them and enjoy a homegrown bite of your hard work!
Natural Pest Control
Another fantastic use for lattice is as a tool for border control for those annoying animals that threaten to move into your home, completely uninvited. Just take a look around at all of the crawl-space homes surrounded with lattice under-fencing and you will understand the widespread infestation issues that lattice solves in such a lovely manner!
But more to the point is how to keep hungry critters like rabbits and deer from feasting on the fruits (and vegetables!) of your labor: installing lattice fencing is a great way to keep their grubby little paws off your peas and carrots and little hooves away from your rose bushes.
Although a picket fence works well as an exterior border surrounding your entire yard, if it is not at least 6 feet tall it may not thwart all deer, as some can clear that height in a single leap. Rather than installing a completely new fence, consider adding a level of lattice at the top of your existing fence.
Attaching a length of lattice to the upper railing of your fence not only provides the additional height to keep the deer at bay but it also adds texture and interest to your fence and can soften the entire look of your yard if you allow vines or ivy to grow on the lattice. Plus, you are repurposing what you already have which is a great way to save some green for the planet and your wallet!
When it comes to rabbits, here’s a quick tutorial on installing a lattice border around your garden:

You’ll need:
- Wire rabbit fencing, with openings no larger than an inch: Ensure you have enough wire for the length of your entire garden area that is at least four feet wide
- Decorative lattice, in the same length as the wire fencing and at least three and a half feet wide
- Garden trowel
To build your border:
- Use the garden trowel to dig a narrow channel around the perimeter of your garden, approximately 12 inches deep
- Bury the wire rabbit fencing in the trench – there should be 12 inches below the surface and three feet above ground
- Fill in the trench halfway, leaving six inches of space from the surface
- Enclose the wire rabbit fencing with the lattice, burying the lattice approximately six inches deep
- Replace the remaining soil and firmly pack the ground around the new fencing
With this type of border, you have form and function. The decorative lattice masks the presence of the wire rabbit fencing, at least partially, and cursory garden admirers may not even notice it, depending on the style of lattice you choose. By burying the fence in the ground, you discourage burrowing and digging and at three feet tall, even Bugs Bunny will have difficulty breaching your barrier!
What other garden projects do you plan to complete with lattice?
Chris Long, a long-time store associate at a Home Depot in Illinois, writes for the Home Depot website. He enjoys writing on outdoor projects ranging from lattice to lumber and fencing.
How to keep termites out of your home
10.9 years ago guest post, pests

Termites are the last insect most homeowners ever want to see on their property. Their voracious appetite for wood can do untold damage to even the newest and best-built homes in any neighborhood.
Making sure they don’t do this to you takes persistence and anticipation. Waiting for signs of termites before you initiate a treatment program is the wrong way to handle it. If you don’t already have termites, don’t think of it as a treatment program. Think of it as a prevention program, or else it may become a treatment program.
You must deal with professionals on termites. An infestation requires skills, tools, and chemicals that homeowners do not have. Finding a reputable exterminator is as easy as dropping in on www.pestcontrol.us and placing a phone call. From that initial contact, your situation will be handled by people who are well-trained in termite issues. Don’t select some no-name startup local company, staffed by freshly-minted technicians who might not be able to find termites in their own homes. To get the best results, work with the best people. This is your home we’re talking about!
Calling a professional isn’t exactly how-to instruction. But there is a significant DIY component to the process of termite-proofing your home. We’re getting there…
First, you must limit the availability of cellulose. That can best be handled at the time of construction, of course, but even with renovation you can look for places where wood is within six inches of soil. Consider lattice work, structural members, and decorative items. And note that pressure treated wood is not immune to termite damage.
Second, don’t store wood on the ground. Whether it’s firewood or scrap lumber, placing it on the ground is making it a vector for termites. When you grab a 2×4 block for a household repair, it may already be infested with termites. Bringing in an extra armload of firewood to get you through the night will also bring in a squadron of these destructive pests. Mulch, in excess, can stay moist enough to provide a home for termites that’s just inches from your home. If you like to replace mulch annually, rake away last year’s accumulation (and any previous years’!) and use a modest layer that covers the soil just enough to get the look you want. Don’t let mulch mound up in a thick, damp layer. That is Club Med for termites.
Finally, manage moisture. Termites are soft-bodied insects that cannot survive very long in a dry environment. By taking away the moisture that keeps them alive, you will force them to relocate elsewhere. That applies to inside your home and out. Check for damp areas around your foundation. Ensure that gutter downspouts can easily drain away from the home. Get a dehumidifier for summer use, and make sure you keep it emptied as needed.
The battle against termites never ends, but with vigilance on your part and skilled work by professionals on theirs, you can stay ahead of the monsters that would eat your home.
Keeping Your Garden Insect Free
11 years ago aphids, guest post, pests
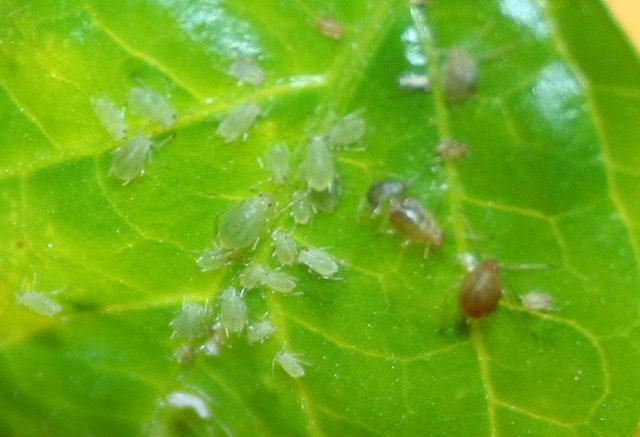
Nothing is tastier during the summer than home-grown vegetables. Unfortunately, insects feel the same way and often destroy vegetable gardens in short amounts of time. To prevent these pests from reaping the benefits of diligent gardening, consider the following tips.
Plant transfers early. While it may be somewhat risky in cooler climates to plant early, this practice can prevent initial pest problems. Insects are not as common during the earlier months, so this is the perfect time to get a head start on a healthy garden.
Keep the garden cultivated and weeded. Healthy soil is a great contributor to pest prevention. Organic mulches often attract insects, so try to avoid these. Weeds should be removed regularly. It is also helpful to add fertilizer frequently and ensure the soil stays moist.
Keep crops covered. Plastic mesh is useful for keeping common insects away, and it is an affordable prevention method.
Plant insect-resistant produce. Some types of vegetables and herbs are naturally unattractive to pests. It is also helpful to rotate crop planting locations by avoiding planting the same families in the same areas for three years. This will lower the risks of damages from overwintering pests living in the soil.
Use pesticides or pest-specific control methods. Both organic and commercial pesticides can be harmful if they are not washed off before consuming produce. However, they may be necessary for keeping certain insect populations under control. It is best to avoid using pesticides that kill both harmful and beneficial pests. Whenever possible, use a pesticide that is only targeted at a specific problematic insect. The following tips are also helpful for preventing specific pests:
- Grow chives, mint or basil to keep aphids away.
- Put crushed eggshells around the bases of plants to prevent snails and caterpillars.
- Use a repellent with eucalyptol to discourage mosquitoes.
- Grow thyme, dill or cilantro to keep leafhoppers control.
- Grow garlic, catnip or yarrow to prevent potato beetles.
Pest problems are not always limited to insects. In addition to these measures, install some chicken wire or mesh fencing around the garden to keep rabbits and other rodents out. Each of these prevention methods are affordable and easy, so they will work for any budget and skill level. And of course, if all else fails, there is always the option to call a pest control professional. Most companies have proven methods and systems to both exterminate pests and ensure that they don’t return.
My Tomato Planting Adventures
11 years ago guest post, pests, tomato

Tomato Plants are not known for being forgiving. They are not beginner plants. Tomatoes give seasoned gardeners nightmares. So why is it that I keep torturing myself by trying and trying to grow them?
Maybe I like a challenge.
Maybe I think that I’ll do better with a difficult crop, since my luck with “easy” plants is sporadic at best.
Maybe I really like Salsa.
Ok, so it’s mostly that last one. I like to do things for myself, and making salsa with my own tomatoes would be awesome.
Of course, my need to do everything for myself is part of my problem. When I first decided that I was going to take on tomatoes, I wanted to start from the very beginning, no pre-grown seedlings for me. I read up on how to grow my own seedlings and then I found the tip that was going to save me time, effort, and frustration.
I could direct-sow my seeds right in the garden as long as there was four months between frosts in my area! That was perfect! As soon as it started to get warm I would plant my seeds and I’d have tomatoes in no time.
So I spent the entire second weekend of March preparing my “garden” (an unearthed portion of my back yard). I had the hose system all prepared so I wouldn’t get water on the leaves or fruit; I’d read about those nasty black spots. I had chosen an area that had a decent sun/shade ratio, so I was happy with that. I had chosen the perfect tomato cages for when it was time to use them. I sat down Sunday night, exhausted, but with the taste of homemade salsa on my mind.
That Wednesday my heart broke because of frost. I swore I’d never enjoy snow again.
I looked at the weather report. I read gardening blogs. Looks like I had jumped the gun. Apparently Mother’s Day is a really popular day to plant tomatoes. Seedlings, of course, but supposedly it only took 5-6 weeks to grow seedlings. I still had plenty of time. But I wasn’t going to take a shortcut this time. I decided to pot them.
Two weeks later, I had managed to drown all of my newly planted tomato seeds. I was told by a friend that there was no way the seeds could survive the daily dousing I’d been giving them, so I didn’t end up living with false hope that I’d have tomatoes any time soon.
By this time, I was frustrated. I stayed home from work for two days and read everything I could about planting tomatoes. I was going to try this one more time.
I used a special seedling soil mix. I kept my plants in a warm, but dark area. I watered less often, but was sure that my seeds didn’t get dry.
They sprouted. I repotted them in a 6-pack, each plant in their own little home. I had a special spray bottle for my tomato plants. After germination, I had them in the light almost constantly, but not quite, after all, too much light was as harmful as not as much.
All that was in my head were facts about tomatoes. I coddled those poor plants, but they were making it. I fertilized them. I petted them so to “train” them to be strong. I may have talked to them a bit. I was getting ridiculous.
I of course had been depriving myself of salsa because I knew my own homemade salsa would be worth waiting for. I finally caved and made some from store-bought tomatoes. That moment (hour) of salsa-goodness reminded me why I was doing this, and I remembered to relax. After all, gardening is supposed to be good for you.
3 of my plants made it to my garden. 2 bore tomatoes. Many of those tomatoes were either spotted or devoured by bugs. But I did have one nice batch of salsa to show for all my hard work.
Since then, I’ve given in and bought seedlings. Some years I still start from seed. To my dismay, my second year yielded fewer tomatoes than my first. But then the third year was pretty good. I’ve learned lots of tricks, and I’ve turned my focus to other plants, but tomatoes have probably taught me more gardening lessons than any other vegetable. Most of all, they’ve taught me that I need to relax and have patience. I’ve also learned that the world doesn’t end when plants die, as sad and frustrating as it can be.
What gardening lessons have you learned?
Mackenzie Kupfer has been a lover of all things green since the age of six when she began gardening with her Nana. She is currently an online publisher for the tomato cage supplier, Avant Garden Decor. In her free time, Mackenzie enjoys attending garden shows, hiking, and collecting ceramic tea sets.
Deterring mystery pest from eating my tomatoes: New Updates
12.6 years ago organic, pests, tomato

This is not the first time visitors have stolen tomatoes from my garden, but this year the mystery pest has gotten every ripe tomato I have grown this year, which given out cold/wet summer has only been about a dozen ripe tomatoes. I normally go with the philosophy of this land is owned by my neighborhood animals first and I am fine sharing a tomato, some lettuce, and a few blueberries, but with the end of the season coming closer and less tomatoes left on the vines…I am going to war with the hungry critter.
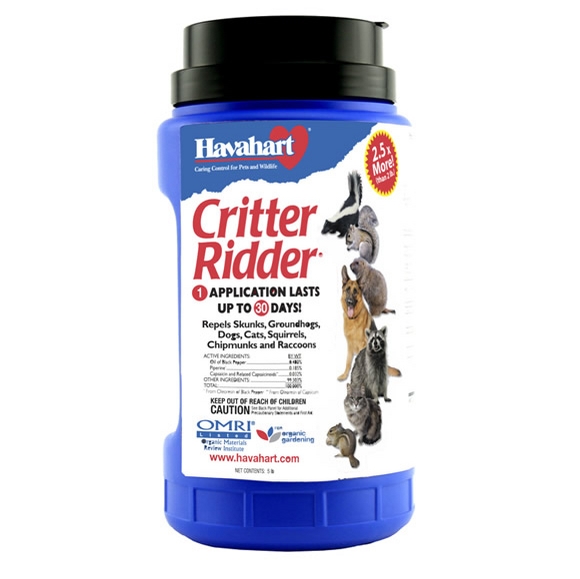
This evening I applied a liberal amount of Critter Ridder from Havahart following the directions on the packaging. Instead of trying to describe the product I will defer to marketing material to describe products I use since that is what they get paid the big bucks for.
This powerful combination of active, all-natural ingredients work together to irritate the animal immediately if it smells, tastes or touches the product. This unpleasant experience drives the animal away unharmed but unwilling to return to the treated area.
Our patented formula effectively repels groundhogs, skunks, dogs, cats, squirrels, raccoons, chipmunks and other nuisance animals.
So hoping my pest happens to one of the animals that hates the stuff. I applied this per the directions around my tomato beds and the lawn surrounding the bed. For good measure I also applied a little on a tomato they were too full to finish on their last visit. From previous observations I have found they are good about cleaning on the previous nights meal. Given the active ingredients contain black pepper oil and capsaicin (what makes peppers hot) given we are the only known species that will voluntarily eat these spices pretty sure the animal will not appreciate my seasoning of their leftovers from the previous night.
To once and for all confirm the pest I am dealing with I have setup my OutbackCam night camera to catch any returning visitors on film…hopefully I only catch them once after they have a taste of my spicy tomato I cooked up for them.

Nightly Updates
Night #1: Mystery pest returned, though moved the tomatoes around but did not eat much of his leftovers. Was a bit of a ninja and not captured on camera.
Night #2: Again the mystery pest returned and ate a little more but again did not trigger a picture
Night #3: Got a picture triggered but mystery pest must have some sort of invisibility cloak on because I do not see it in the picture. Planning on moving the camera back a little farther from the fence (or possibly turn on an outside light) since the IR LEDs seem to a little intense at that distance. Again the pest played with the tomatoes but didn’t seem to eat much (if any) and has not bothered any of the other tomatoes in the vine.


