How to save jalapeno seeds
9.7 years ago jalapeno, peppers, seed saving
I am attempting to grow the best pepper plants I can indoors (grow box) so I started with jalapeno peppers. They grow relatively small 2-3 feet and require 2-3 gallon container for growing. While this is fine for an outdoor garden, though indoors I can only sacrifice 1 gallon container. This summer I grew several jalapeno plants which spent half of their life in the grow box and spent our warm summer outdoors. All of the plants produced but there was definitely a clear winner which had incredible early yields even with its small growing quarters.
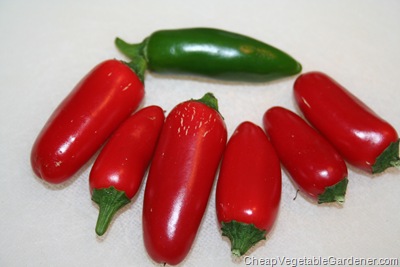
I used several immature peppers (green) for salsa this year but allowed several peppers to mature (red) which I will be saving the seeds for planting this winter and next summer for future plants. By hand selecting the best parent plants should be good old natural selection at work.
The process to collect pepper seeds is pretty simple though I must first provide this warning:
WARNING: Peppers are hot, especially the veins. When handling peppers use caution and wash your hands well with dish soap. Under no conditions do not rub your eyes or pick rub your nose before washing your hands or you will be regretting it for a couple hours. Using gloves is also recommended.
That being said slice the peppers lengthwise with a sharp knife.

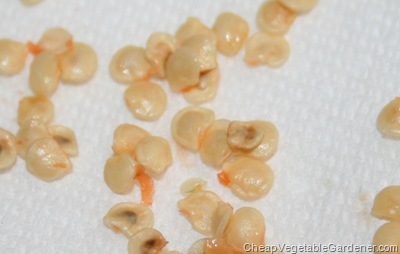
Use a fork or spoon to gently dislodge the seeds into a small bowl.

If you are lucky enough to have hot sunny weather still (week of rain here) lay they out in the sun for a couple days and store them in a cool dry place until you are ready to plant them. If you are sun challenged like me set them on a windowsill for a few days.
As I have said before saving you own seeds is very easy and free and as an added bonus you can personally pick the best plant to be the donors of seeds for your future plantings. In my case I also have the benefit of a plants that is genetically grown to following my sporadic watering and care patterns.
Tags: garden seeds, growbox, outdoor plants, pepper plants, salsa garden
How to save tomato seeds
9.7 years ago seed saving, seed storing, seeds, tomato

It is really easy to save tomato seeds is a little more difficult that other vegetables seeds, but with a little patience and the right technique you can save your seeds with very little effort.
Step 1: Get the seeds. The easiest way to get to your seeds it do cut the tomato across the hemisphere as shown below.

This will give you easy access to the seeds, though if you are slicing your tomatoes at a different angle you can easily pull out some seeds with a prong of a fork or spoon. The cutting board will normally hold more than enough seeds than I will need for the following year.

Step 2: Get the junk off the seeds. The seeds have a gel-like substance that surrounds the seeds along with some pieces of flesh that you did not take the time to pick out. There are a couple of techniques to do this:
- Add some water to the seed mixture, cover with plastic and let them ferment for a few days.
- Mix tomato seed mix with equal amount of powdered disinfectant cleanser and let sit for 30 minutes
Given the fermentation methods can stink up your kitchen and the powdered disinfectant methods doesn’t exactly sounds organic I went with my own method I call the soak and rinse technique.
Drop the seeds in a small bowl with some water and let soak for a couple hours. Pour off anything floating to the top (seeds too they won’t germinate) into your sink

Pour what remains into a strainer and give a quick rinse with water.

Repeat the soak and rinse process twice a day and notice the amount of gel decreasing.

Once the seeds look like the ones below (about 2-2.5 days) they are ready to be dried.

Step 3: Drying the seeds. I do this by spreading the seeds on a labeled coffee filter trying best to keep seeds from touching. Once they dry (couple days to a week) store them with your other seeds.

With very little effort and a few days of waiting you can collect seeds to use/share/trade for next season.
Free Vegetable Seeds
11.3 years ago cheap, free, seed exchange, seed saving, seeds

Free Vegetable Seeds
- Ask your coworkers: Are any of your coworkers gardeners? Setup a seed swap at lunch and/or see if they want to go in on a seed order and split up some seed packets for varieties you only need a few seeds.
- Harvest your own seeds: I typically grow at least one or two cilantro and pea plants to collect seeds from for the next year . Notice your neighbor has some neglected plants going to seed? Ask if you can get some they may even look at this as free weeding (important part is to ask though)
- Get seeds from the grocery store: Before putting those vegetables in the compost bin, set the seeds aside to let them dry and you got some free seeds. The riper the fruit/vegetable the better results you may have on fertility here so shortest time between picking at getting up for sale will yield the best results. So look for local fruits and vegetables or even better visit your local farmers market.
- Get free vegetable seeds from the US Government: Have a little experiment or study you want to conduct and report the results on your blog? Check out the National Plant Germplasm System from the US Department of Agriculture. Within a database of over 10,000 species of plants you are sure to find some vegetables for your experiments. Even shipping is included though can be time consuming to find what you are looking for.
- Check your spice rack: In many cases you can plant seeds from your spice rack. Just look for words like “raw” anything that has been “roasted” will probably not yield positive results. Some ideas, mustard seed, dill seed, coriander, poppy seed, celery seed. If your spice rack is lacking you can pay a few cents buy a teaspoon of organic spices in bulk, last time I bought dill seeds got about 100 seeds for $0.05 which is a significant saving over paying $2-3 for an envelope of seeds.
- Seed swap web sites: Below I have listed a few links where you can share seeds with others. This is a great way to find some heirloom seeds you might not be able to find in stores/seed catalogs. In many cases people will offer seeds for free by just sending a SASE (Self Addressed Stamped Envelope) Just remember to pay it forward when you come into a plethora of seeds yourself after this years harvest.
If this is all seems like too much effort you can just buy some very inexpensive seeds online where you can check out some of my personal favorites in my “Cheap vegetable seeds” post
Frugal way to grow a garden with bird seed for temporary spaces
12.3 years ago birds, seed saving

Many people love bird watching. It is the favorite pastime of many gardeners too. For drawing the birds to the garden, you need to use the feeders. Instead of buying and storing the feeders every season, you can as well consider turning a special part of your garden exclusively for attracting birds. If the feeders are able to sprout, you can use them for growing the plants. Once the plants grow and mature, the birds can eat the seeds from the plants directly. Apart from that, you can pick the best seeds and store them away for the next season. If this interests you, here is how to grow bird seed.
1. Find a special spot
If you have a large garden, you can make use of the space effectively. Divide it into many parts. One special spot can be left for the birdseeds. The first thing to do is to find the best spot in your garden to attract the birds. The best thing is to consider an area away from your main garden. The birds will not disturb your garden and other useful items there.
2. Choose a good mixture of seeds
Choose a good mixture of seeds that can produce a wide variety of flowers. This can add a lot of color to the area and attract a lot of different types of birds. When the plants grow and produce different kinds of plants and flowers, various birds come to your garden automatically. In order to make the seeds grow well, you have to take the necessary steps.
3. Growing the plants
The soil should be well suited for growing the type of garden and plants you are looking for. First, begin with loosening the soil with a garden hoe. This will make it easy for planting the seeds. When the soil is ready, take a handful of seeds and scatter them on the loosened soil. Rake some topsoil over the scattered seeds. Sprinkle some water lightly over the topsoil to provide enough moisture for the sprouting.
4. Harvest the seeds
After the plants grow well, they start producing the seeds. Harvest these seeds at the end of the season. Store them properly in an airtight container. They can be used for feeding the birds during the winter season. Or, you can also leave them on the plants so that the birds eat them directly from the plants.
The best thing about these plants is that they will produce different kinds of colorful flowers before producing the seeds. So you will be able to enjoy different kinds of flowers and plants in your garden. At the same time, you can get a large amount of seeds for the next season. This is one of the best ways to produce healthy bird seeds in your own garden without spending money too often. Once you get used to the procedures, it will be easy to maintain the garden and follow the different procedures for taking care of the things. Choose an ideal location in your garden and spend some time with the birds daily. Children can also learn a lot of things from your garden.
About the author: Alia Haley is a blogger and writer. She loves writing on technology and luxury. Beside this she loves gardening in free time. She recently bought a book on Japanese Garden. These days she is busy in writing an article on patio umbrellas.
Seed types: Heirloom, open pollinated, hybrids, GMO
13.4 years ago seed saving, seed types, seeds, Uncategorized
![[006[2].jpg]](http://www.cheapvegetablegardener.com/wp-content/uploads/2010/11/006%255B2%255D.jpg)
When you pick up a packet of seeds knowing what type of seeds you are growing is very important especially if you are planning on saving seeds from the fruits of your labor.
Much like man’s best friend seeds come in many varieties, sometimes these occur with careful consideration of pedigree. others are brought together to complement both parents good (or bad) physical traits, and finally there are the nature chooses their own way.
Heirloom: These would be the purebreds (English Bulldog) of the seed world. These seeds are carefully pollinated and saved for decades or even hundreds of years to preserve the quality product that has been stabilized over many generations.
Hybrids: These would be those carefully planned mixes (cockerdoodle) with both parents being specially selected to produce offspring that carries traits of both parents. The tricky thing about hybrids is the seeds these plants create more than likely will not be that of their parents since it normally requires at least a few generations to stabilized their genetic makeup. So your “tasty slow bolting cilantro” might end up being “tasty fast bolting cilantro” or “not so tasty slow bolting cilantro” Even if you decide to collect your seeds if the seed company has patented that variety you could be sued for patent infringement…though I have yet to hear of a case of this occurring to a home gardener.
Open Pollinated: These can be thought of as the “muts” of the seed varieties. Just like in the canine world these can produce some very fortunate accidents and produce some seeds no one could have even considered trying to create on their own. There are many benefits to growing with open pollinated seeds. First there are very little worries in collecting seeds from these varieties. There are no patents to worry about and these varieties have a few more generations to stabilize their genetic traits. By collecting your seeds and growing these along with other varieties to add some diversity to your garden and avoid establishing a monoculture which can be susceptible to pests and disease after a few short seasons.
I should also state that Heirlooms are also open pollinated thought for most strains extra care is taken to prevent cross pollination to keep the end products as true as possible. These
GMO: Now GMO or Genetically Modified Organism, would be the the creation of a dog which is crossed with a cat which has the loyalty of a dog but the bathroom habits of a cat. In the seed world this would be seeds that are grown with “good intents” such as the creation of a potato that is resistant to the potato beetle, reducing the need for pesticides. On the more scary side are seeds with “terminator” genes whose offspring that does not create viable seeds. From first thought, this seems like a justifiable way for seed makers to protect their patents being infringed on, until you think about cross pollination. For example lets say your neighbor is growing some GMO tomatoes where your friendly bees cross pollinate your open pollinated heirloom varieties.…now to your dismay now your seeds are now crossed with the “terminator” gene and you no longer can produce your own viable heirloom seeds.
Though I have never actually found GMO seeds being sold to home gardeners, though for commercial seeds these are much more common. Basic rule is to avoid these seeds at all costs.
Tags: seed
Saving carrot seeds
13.5 years ago carrot, harvest, seed saving

Like many of my seed saving in devours they have occurred by accident. This year saving carrot seeds with one of those cases. I must have missed picking on of my carrots last fall, this carrots would be completely woody to eat so I left in in the ground knowing that carrots go to seed after their second year.
To get the best results I only kept the first three umbels for two reasons. This will give me the largest and best quality seeds. Second, this means less flowers for the bees to pollinate so I should have a better changes of having a higher number of quality seeds. At the end of the summer I cut off the umbels and hung them upside down in my garage and forgot about them for a little while.

Harvesting the seeds is pretty easy, just rub the umbels between your hands into a large bowl or container. Pick out any remaining stems or big pieces of chaff. Rub between your hands a little more to cause the chaff to become closer to a powder.

Now with a quick shake in a sieve (used from the kitchen) most of the chaff should fall through leaving the seeds. Just to remember there are up to 2000 carrots seeds in a teaspoon so don’t go overboard since these seeds normally only last a maximum of 3 years in the refrigerator.

You may notice that the seeds do not look like the ones you buy in the packets and have funny little “beards” (which is actually technical name) surrounding the seeds. You can leave these on but it can cause the seeds to stick together making planting a bit more difficult. You can take care of these by giving the seeds a hard rub into the same sieve with firm pressure from your finger.

Though this takes a little more time than some other seeds in about 15 minutes of work I have fairly clean seeds which is more than enough that I can use for this season and more to share/trade with others.
Tags: seed


