Top gardening posts of 2010
13.3 years ago cheap, garden planter, LEDs, moisture sensor, upside down planter
2010 has been a pretty exciting year for CheapVegetableGardener.com. Bringing on a significant number of more readers and many great mentions by some large publications, I thought I would mention the top 5 posts of 2010 which helped this happen in case you missed them.
 |
Being kicked off by an awesome mention in a New York Times article and subsequent interview on Science Friday on NPR, this article on making your own tomato planter held the #1 spot. By taking a two liter bottle, a little spray paint, and a chopstick (or small stick) you can make your own upside down tomato planter. |
 |
This article has received some decent traffic from numerous sites but the mention on lifehacker.com is what put this one on the #2 spot. Now if you are trying to make a little profit from your extra harvest or just trying to save a little extra money at the grocery store this post lists the top vegetables for your gardening square foot. |
 |
Want to start some seedlings indoors without spending a fortune on lighting? Check out this Christmas light LED grow box post which has held the #3 spot. All it takes is a couple of strings of LEDs (purchased during after Christmas sales of course), a Rubbermaid container, a drill, and a little patience you can have your own indoor growing apparatus. |
 |
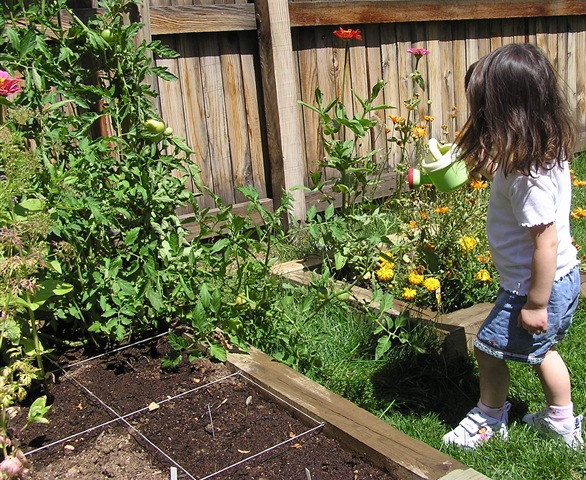
Sometimes I got busy in the early spring and forgot to water my neglected seedlings in the grow box in my garage. To solve this problem I made these great little soil sensors using galvanized nails and Plaster of Paris. Check out this post which help the #4 spot for the full build instructions. |
 |
Finally after some personal trial and error the #5 post of this year goes into detail on how to create a new garden bed. This covers the basics of picking the proper location and also some cost benefit analysis for using various materials (cinder blocks, wood, chiseled wall blocks, bricks) to build a new bed. |
Soil Logic Moisture X-Tend testing and review
13.7 years ago moisture sensor, product review, Uncategorized, water
I was contacted by SoilLogic and offered a free sample of their product Moisture X-Tend. Though I could attempt to describe their product, I will let them do it in their own words…
Moisture X- Tend helps water penetrate the surface of the potted soil easier and remain within the soil root zone up to 4X’s longer than untreated water.
This innovative soil moisture management product helps prevent water from evaporating too quickly or draining past the roots of the plant. Moisture X-Tend is so easy to use — just add and mix the recommended amount directly to our watering can and water as usual.
The specific claim on the bottle that got my attention was that by using the product you can actually water plants 4 times less often. I must say I was a little skeptical about this claim, though I decided to give it a try.
My first attempt was shortly after I brought out a couple of my pepper plants from my grow box. They both were bearing fruit of similar size and overall plants were of very similar size. I started by watering one plant with water and the second with Moisture X-Tend and I observed their physical appearance over a period of time. There was one problem on day two it rained ruining my results.
Having an empty client controlled grow box in my garage equipped with a moisture Vegetronix sensor, I decided this would be a great place to conduct my testing. I watered two identical pots filled with Miracle Grow Potting Mix (without moisture control) with 250ml of liquid. One being purified water, the second with Moisture X-Tend as described in the directions and monitored the moisture saturation over time.
As you can see the Moisture X-Tend started out with a much greater water saturation immediately after the watering and continued to hold the moisture 1.5 times longer than water alone.

Now this 1.5 times is quite a difference between the 4 times claim on the bottle, though in their defense this was from a single application and the FAQ on their website mentions that watering frequency is reduced after about a month of use. I also was using a 4 inch pot and I would suspect that a larger pot would show better results. If there is interest I am considering extending this experiment over a longer period of time to attempt to prove/disprove the 4 times claim that they mention on the bottle.
Though for me this is not practical to use all summer Moisture X-Tend is a great option when you are going away for a few days on vacation and do not have an automated watering solution or are forgetful like me and just get busy and neglect those poor plants for a day (or two) too long.
Tags: water
Best DIY cheap soil moisture sensor
14.5 years ago cheap, electronics, moisture sensor, water

My first version of my cheap soil moisture sensor has worked great for me but it did have a couple flaws. The first issue was construction, though I had great luck on my first attempt though after trying to recreate additional sensors given the small amount of gypsum between the sensor and the probes were so thin it was extremely easy to crack the sensor and I normally have about a 25% success rate on later creations (must have had beginners luck on the first one.
The second issue was durability. Given we are playing with gypsum and as it is suspended in water it will eventually breakdown and there is very little we can do about it. Though with my latest changes to my automated grow box which includes automated watering based on moisture content I want to ensure my measurements stay accurate throughout the season. To help with this I have decided to increase the sensors size and also am using galvanized nails to prevent rusting. After a few attempts I have come up what I feel is a pretty foolproof method of creating a moisture sensor.
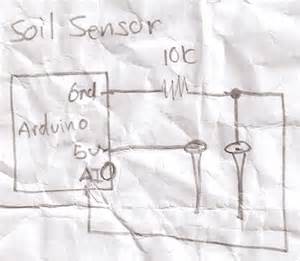
How it works:
There were many questions in the comments in the previous post so hopefully I can clear this up a little here.
Technically a gypsum block measures soil water tension. When the gypsum block is dry it is not possible for electricity to pass between the probes, essentially making the probe an insulator with infinite resistance.
As water is added to the problem more electrons can pass between the probes effectively reducing the amount of resistance between the problem to the point when it is fully saturated where the probe has virtually zero resistance. By using this range of values you can determine the amount of water than exists in your soil.
Parts for cheap soil moisture sensor:
- Plaster of Paris
- 2 Galvanized Finish Nails
- 1/2 inch plastic tubing
- utility knife

Construction:
Take your utility knife and cut the tubing slightly longer than your galvanized finishing nails. Try to make the cut as straight as possible though it doesn’t have to be completely perfect.

Use your utility knife to cut the smaller plastic tube lengthwise, this will allow easier removal of your soil sensor after the mold cures.

Optional: Make the cut diagonally to prevent a potential vertical fracture line.

If you were very careful on you vertical cuts you can avoid this step, but to completely avoid spilling plaster onto my workbench I drilled four holes slightly larger than your tubing. I used these holes for support but also to catch any of the plaster in the gaps from you less than accurate vertical cuts.

Being careful that the tubing fits together where you split the tubing vertically, insert the tubes into the holes (or carefully on a flat surface) Mix Plaster of Paris and carefully fill with to the top. The friction between the tubing should keep a water tight seal where you made the cut, though if the plaster is a little thin and it appears to be leaking through wait a couple minute for the plaster to setup some and try again, at that time it should not have the viscosity to seep through the very small gap that may be causing the leak.

Take your two galvanized nails and push them through a small piece of wax paper. You may also allow the plaster to setup for a few minutes and then float the nails in the the plaster. I like the first method since gravity will help ensure they fall straight down and parallel to each other. As for spacing, I have done some experimentation with the gaps between the probes and my conclusion was, it doesn’t make much difference. As long as there is a gap (they are not touching) you should get reliable results.

After allowing the sensor to cure for about and hour remove it from the holes you drilled in the wood.

Gently pull back the plastic tubing and you have a nice clean soil sensor.

Lay them out to dry for 24 hours to cure completely and their construction is complete.

For attaching the wires there are a couple options. The best would be to solder them to the probes though to do this you need to heat up the nail hot enough to enable a strong solder connection. My little 15W soldering iron just can’t produce the heat for this so I am option for the wire wrap method. I take about an inch of wire and strip off about an inch of insulation and tightly wrap around the probe. Given copper will rust and could be a point of failure you will want to insulate this connection and the probes from the moisture. A few dabs of hot glue works pretty well. I am planning on trying liquid plastic, though I am currently out and when I have some on hand I will update with how it went.
How to use your cheap soil moisture sensor
You can simply hook up a multi-meter and check the resistance though if you want to create anything automated you would need to use an integrated circuit (IC) or a electronics prototyping platform such as Arduino. By applying voltage to one side of the sensor and using a voltage splitting circuit connected to ground and an analog input you can then measure the voltage making it through the probe. The higher the voltage, the higher the moisture content of the soil.
Conclusion
The above should give you everything you need to know to create your own cheap soil moisture sensor and how to use it. This can be used as a moisture soil sensor for watering your indoor plants like I am using it. This same moisture sensor could be for monitoring your outside soil moisture content to trigger (or preempt your irrigation system) to save some money on your water bill and/or maintain consistent moisture levels in your plants which could drastically improve water sensitive crops such as tomatoes.
Tags: arduino, cheap, growbox, led, outdoor plants, tomato plants, vegetables
How to use Vegetronix soil moisture sensor (VG400) on Arduino
14.7 years ago arduino, moisture sensor
With the summer starting to come to a close it has been time for me to start thinking back to the computerized grow box. I have been doing some considerable work on the electronics and software over the summer. Better to break stuff while the plants are outside and not while killing them inside.
Though I have been happy with my homemade gypsum soil sensors I decided to try out a commercial option hoping for better accuracy and longer life. This is important with my current plans to include automatic watering to the latest version of my grow box. Don’t want to wake up to a flood in the garage due to a broken sensor. After some looking I came across the Vegetronix VG400 which measures the dielectric constant of the soil using transmission line techniques. Which I have no idea what that means but sounds impressive.
The hookup couldn’t be simpler, red wire to 3V, bare wire to ground, and black wire to an analog input. As you can see below in my completely not to scale diagram below.
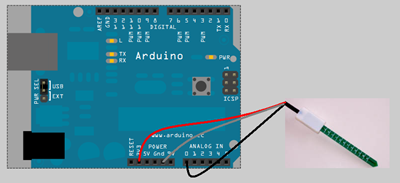
From here it all comes down to some simple code to write on the Arduino to get some values.
| void setup() { // Setup serial Serial.begin(9600); }void loop() { Serial.println(analogRead(0)); delay(200); // wait 200 milliseconds |
Upload the code to the Arduino and now I can get a moisture value from the analog input between 0 and 614 (0-3 volts) depending on the degree of water saturation.

Though not as hacky as my PS2 controller moisture sensor solution definitely more elegant and reliable. Stay tuned for more details of other improvements to the computer controlled grow box.
Tags: arduino, cheap, growbox, led, outdoor plants, vegetables


