Computerized grow box update
15.2 years ago cilantro, computer, computer power control, cucumbers, electronics, indoor growbox, tomato

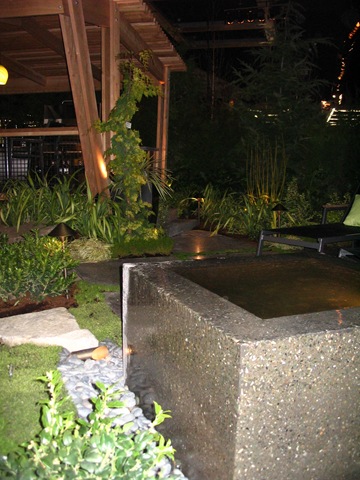
Haven’t mentioned the computerized grow box for a while, so think it is a good time for an update. The moisture sensor corroded away, but have plans to make a much more beefier one. With the exception of the hard drive failure, the basic functionality of the computerized grow box has been excellent and the plants have been thriving. The only physical improvement I have made is adding some particle board to the top and side (salvaged from packaging material from some furniture we ordered) of the grow box. This helps retain heat and allows the access panel to stay put without requiring tape and/or bags of coffee grounds propped against it. I also mounted the LCD panel securely to the top of the box.

They say as your paycheck increases, somehow your expenses follow suit. I have a feeling same concept applies for grow boxes. As the computerized grow box is about four times bigger than my PC grow box it has quickly getting pretty crowded waiting for the time I can move my summer vegetables outside. I am planning on doing some reorganization this weekend to clean things up a little bit but still going to be pretty tight quarters.

The current inventory in the grow box are 12 tomato plants (was 18 but gave six away at a recent gardening talk), 2 cucumber plants (had one fatality from Peat/WonderSoil experiment, looks like Peat lost), 6 pepper plants (need transplanting), and a cilantro plant which was the source of my first harvest of the year.
Now just hoping Punxsutawney Phil is wrong and we really don’t have six more weeks of winter, though with the snow we got two days ago and the current temperature outside, I think he might be right.
Tags: cheap, cilantro, coffee grounds, garden seeds, growbox, outdoor plants, pepper plants, tomato plants, vegetables
First/Last? trip to the NW Home and Garden Show
15.2 years ago Uncategorized
 My daughter and I made our first trip to the NW Home and Garden show yesterday. It was a great experience which if you want to know more you can check out my guest post on Flora’s Blog. Apparently there is a March 31st deadline to find a new owner, so keeping my fingers crossed since I would love to go next year with both my daughters.
Grocery store Vegetables are not as nutritious as they used to be?
15.2 years ago grocery store, organic
“University of Texas, Austin. Davis claims the average vegetable found in today’s supermarket is anywhere from 5% to 40% lower in minerals (including magnesium, iron, calcium and zinc) than those harvested just 50 years ago.”
Not only are those vegetables you been eating at the grocery store less tasty, but may be getting marginal nutritional value. They discuss some of the potential factors in this including use for synthetic fertilizer and the desire to achieve higher yield during a shorter timetable, unfortunately the poor plants do not have time to absorb the beneficial minerals (as do we)
This article is timely with my Chemistry of Gardening — What nutrients do plants need? post. If you have sufficient primary macronutrients (NPK) which is the primary contents on synthetic fertilizer you can still have great yields and fast growing plants but quality of plants are reduced. What the problem appears to me, is the secondary macronutrients are not being supplemented (magnesium, iron, calcium and zinc) which is causing the nutrient/taste deficiency. Organic methods natural provide these nutrients by the addition of organic matter to the soil.
I am cheap and organic vegetables are expensive, this is definitely a case of you get what you pay for. Hope is still here you can easily grow your own organic vegetables at home. If you still think growing your own vegetables is a bad idea here are a list of benefits from buying at the grocery store:
- Continue to rise in cost so you won’t have to worry what to do with your extra money
- No confusion with the small variety available (transport well)
- They don’t taste as good, so no guilt in enjoying eating your veggies
- Less of those pesky minerals for your body to absorb
- Opportunity of getting a trip to the ER after picking up salmonella
In all seriousness this is a scary development where people could be malnourished even with a decent supply of fruits and vegetables.
Tags: cheap, cilantro, organic vegetables, outdoor plants, vegetables
LED Plant Grow Spikes
15.2 years ago electronics, LEDs
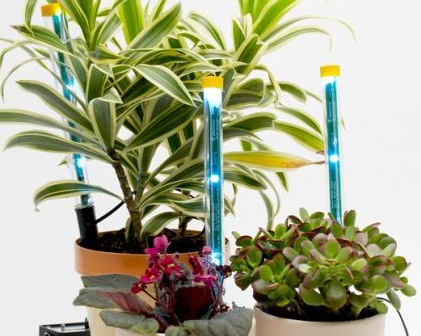
Not sure how effective these would be with so few LEDs but they do look pretty cool. In their defense they do label these as supplemental lights. If you want one, unfortunately you have to make it yourself with full DIY instructions below.
via Gizmodo via PopSci via Lifehacker
Tags: grow lights, led, outdoor plants
Chemistry of Gardening: What nutrients do plants need?
15.2 years ago alfalfa pellets, fertilizer, outdoor seed starting
 If I ask my four year old what it takes for a plant to grow she can quickly respond with response, “Sun, water, air, and soil” This is a great answer for photosynthesis since plants need energy from the sun. They leverage the carbon dioxide (CO2) from the air and water (H2O) to create starches and sugar. Now the soil part of this answer is where things get a little more complicated. Soil gives plants the ability for roots to expand and grow but also provides many nutrients to help them as well.
Similar to humans, plants need various minerals to live healthy lives. The primary macronutrients Nitrogen (N), Phosphorus (P), Potassium (K) are required to sustain life. These are the nutrients that plants consume significant amounts which is why these are advertised in big letters on the outside of packages of fertilizer.
MACRONUTRIENTS – PRIMARY
| Nutrients | Benefits | Signs of Deficiency | Sources (N-P-K) |
| Nitrogen (N) | Provides energy to allow vegetative growth. Leafy plants can’t get enough, root plants need very little, fruiting plants need plenty in beginning but too much later in growth cycle will result in big/tall fruitless plants. | Light green to yellow leaves; growth stunted | Bloodmeal (14-0-0) Alfalfa meal (7-3-4) Soybean meal (6-1-2) Cottonseed meal (6-2-2) Fish emulsion (5-2-2) Chicken Manure (3-4-3) Compost (1-1-1) Cow Manure (.2-.2-.2) |
| Phosphorus (P) | Makes plants more stress resistant, allows for fast growth, encourages bloom and root growth. | Red or Purple leaves; cell division slowed | Bonemeal (4-12-0) Chicken Manure (3-4-3) Alfalfa meal (7-3-4) Compost (1-1-1) |
| Potassium (K) | Helps with photosynthesis process, immunities to disease, and increased quality of fruit. | Vigor reduced; susceptible to disease; thin skin; small fruits | Alfalfa meal (7-3-4) Greensand (0-0-3) Wood ash (0-1-3) Chicken Manure (3-4-3) Compost (1-1-1) |
We could live off a simple food like gummy bears for quite a while, but our quality life will decrease once we picked up scurvy and exhibit significant bone and muscle loss. The same idea goes for plants, they can live simply on the primary macronutrients but they will live poor and possibly fruitless (literally) lives. This is where the secondary nutrients come in. With the exception of Calcium, these are not consumed in nearly the volumes as the primary macronutrients though supplementation may be required.
MACRONUTRIENTS – SECONDARY
| Nutrients | Benefits | Signs of Deficiency | Sources |
| Calcium (Ca) |
Helps with cell wall structure imperative for strength of plants |
Growing points of plants damaged | Dolomitic limestone, gypsum, egg shells, antacids |
| Magnesium (Mg) | Required as part of the chlorophyll required for photosynthesis | Yield down; old leaves white or yellow | Epsom salt, Dolomitic limestone, organic material |
| Sulfur (S) | Required for to allow plants to create protein, enzymes, and vitamins. Helps with seed, root growth, and resistance to cold. | Light green to yellow leaves; growth stunted | Rainwater, gypsum |
Finally are the macronutrients, these are the nutrients that most of the time, as long as you are not growing with hydroponics. should exist in your soil and rarely need to be supplemented due to the small amounts that are consumed by plants, nevertheless are still very important for plant growth.
MICRONUTRIENTS
| Nutrients | Benefits | Signs of Deficiency | Sources |
| Boron (B) | Helps in production of sugar and carbohydrate s. Essential for seed and fruit development. |
Small leaves; heart rot (corkiness); multiple buds | Organic Matter and borax |
| Copper (Cu) | Helps in plant reproduction | Multiple buds; gum pockets | Copper sulfate, neutral copper |
| Chloride (Cl) | Helps with plant metabolism | None known | Tap water |
| Iron (Fe) | Helps in formation of chlorophyll | Yellow leaves; veins remain green | Iron sulfate, iron chelate |
| Manganese (Mn) | Helps in breakdown of carbohydrates and nitrogen | Leaves mottled with yellow and white; growth stunted | Manganese sulfate, compost |
| Molybdenum (Mo) | Helps in breakdown of nitrogen | Varied symptoms | Sodium molybdate, compost |
| Zinc (Zn) | Regulates growth and consumption of sugars by the plant | Small, thin, and yellow leaves, low yield | zinc oxide, zinc sulfate, zinc chelate |
Nutrient Deficiency Information from “The Vegetable Gardener’s Bible”
Now you are armed with plenty of information, though unfortunately you can not act on any of this without knowing the chemical composition of your soil. If you simply went by the signs of deficiency (for example yellow leaves) could be caused by one or many nutrient deficiencies. Fortunately you can get this information to act on by running a soil test on your soil. There are a couple options for this if you are simply concerned about primary macronutrients there are cheap DIY home tests, electronic testers, or you can send a sample to a soil lab to give primary/secondary macronutrient and micronutrient levels and recommendations to get your soil back on track. You may also want to check with your local municipal office they may have a cheaper/free option available to you.
Just remember, your perceived lack of a green thumb my have nothing to do with your ability but the chemistry of soil you are working with.
Tags: alfalfa pellets, cheap, compost, garden seeds, led, organic vegetables, outdoor plants, vegetables
Cheap DIY fogger aeroponic system
15.2 years ago aeroponics, cheap, hydroponics, indoor growbox, indoor seed starting

In my post about basic the basics of hydroponics I mentioned the potential high cost of entry but with a little creativity this can be avoided. I went through this exercise and here is a pretty inexpensive way to try out hydroponics without having to spend hundreds on a prebuilt system. The solution I came up with cost me $1.00 to setup though I did have many of the items on hand, if I had to purchase everything cost would be in the $10-15 range.
Supplies
- Small shoebox sized plastic tub /w lid — (I purchased a clear generic one from Home Depot for $1.00)
- 2 inch hole saw and drill
- 6 — Empty Trix yogurt cups (can be any brand as long top is approx 2 in diameter)
- Duct tape (no one should be without this)
- Pond fogger – single disc (can be found on eBay for less than $10, I had one from humidifier)
- Perlite
- Water (tap water is fine, fancy bottles work as well)
Assembly
From looking at the supplies this might be able to guess the construction steps, but I will list them out anyway.
- Take lid and add drill six 2-inch holes using hole saw. If the tub is not made of rubbery material be sure to take your time to slowly create the holes to prevent cracking/shattering. You can also do this with a utility knife but for non-rubber lids I highly suggest against it if you like your fingers.
- Test fit your cups and ensure they fit snuggly, if they do not quite fit you can use some sandpaper to expand the holes slightly
- Remove cups and cut (utility knife) or burn (soldering iron) 1/4 in lines in a pattern similar to the
 figure to the right to ensure extra support and prevent the medium (perlite) from falling through. WARNING: Burning plastic emits toxic fumes and should be done (if at all in a well ventilated area) Knifes are sharp and can cut fingers so if you not careful. I would recommend buying 2 inch hydroponic net pots which can be purchased for about $0.25 each online, which I would have done if I wasn’t so impatient.
 - Given that nutrients+water+light=algae, be sure that your box is as light tight as possible. If you container is not clear like mine you should be in good shape, otherwise cover your box with duct tape or spray paint the box using plastic adhering paint. I would recommend keeping a small vertical line exposed so you can get a quick look at water condition and level without having to disturbing the plants.
- Fill cups with perlite 4/5 full (some expansion may occur)
- Pour water into cups until reservoir is full
- Dump water out water
- Repeat steps 4-6 until water appears clear
- Cut small hole in the corner of the lid and feed power line to fogger through
- Put fogger in tub and fill with water until it is about 1/2 inch above fogger
- Replace lid and plug in fogger and enjoy the mysterious fog

What can I grow with this?
The short answer is anything. Self regulation wicking properties of perlite it should keep most plants happy for some time. The major limitation you may see is some types of plants will outgrow this setup and will require transplant outside in soil or in a larger hydroponic setup (coming soon). Though with careful selection of plants and frequent harvesting you can grow many plants to maturity in this small system. It did not occur to me until after I completed the project but the size and spacing is pretty close to that of an AeroGarden so plants like greens, herbs, strawberries, cherry tomatoes, peppers would do well in this system. For starting plants you can simply drop a few seeds, cover with some perlite and a clear plastic container (I used empty applesauce cups, but bottom of water bottles also would work well) You may also add seedlings by carefully placing in them in the damp perlite.

What about nutrients?
Keeping the project cheap I opted to use some balanced liquid plant fertilizer I use for my seedling/indoor plants. I mixed it at the recommendation it stated for indoor watering (2 pumps per gallon) I noticed it did not contain any Magnesium I also added a half a teaspoon of Epsom salt. After a couple weeks empty contents and replace with water let run for about an hour to allow sediments to clear up and then empty contents. This is good for your plants but also can help keep the disc on your fogger clean. Refill with water and nutrient mix and repeat. This will work for most plants in vegetative state of growth though if you want your plants to move to a flowering state (peppers, tomatoes, etc) I would recommend purchasing specific hydroponic solution for flowering plants.
For a very small investment you can have your own hydroponic system and experience the benefits of growing without soil.
Tags: cheap, garden seeds, herb garden, outdoor plants, pepper plants, strawberry plants, tomato plants, vegetables


