Make your own paper seed packets (origami)
15.3 years ago seed saving, seed storing

When I posted about my adventures in saving onion seeds I mentioned the desire to purchase some small envelopes to hold the seeds. jimmycrackedcorn promptly responded with a comment scolding me for my lack of cheapness. Which I shamefully have to agree completely and took his advice and decided to make some of my own.
I followed the directions from the ICPS Seed Bank though I did do a little improvising to make the packets a little smaller and I got lazy on my folding so I have provided the cheap/lazy directions below.
Step #1: Start with a sheet of paper and fold down the middle, this will allow two seed packets per sheet of paper:

Step #2: Use scissors to cut out the individual triangles which will be come your seed packets

Step #3: Fold one corner one third of the way across the paper

Step #4: Insert the other corner inside the fold and fold flat

Step #5: Open top and pour in seeds, add a label, and fold over top

I like this design since it is easy enough that even I can do it, it naturally has a funnel to pour in/out seeds, and is fairly compact which is good since my pickle jar seed holder in my refrigerator is getting pretty full.
Tags: cheap, garden seeds, outdoor plants, vegetables
How to collect and save onion seeds from your garden
15.3 years ago onions, seed saving, seed storing

Last year I collected cilantro seeds and they were a great success in my garden that this past Spring I made a commitment to myself that I would try to collect more seeds this season. Though I wanted to get more I was able to collect seeds from my onions, jalapenos, and cilantro. The jalapeno seeds were pretty easy I set some seeds aside on a paper towel while making some salsa. After they appeared to be dry I threw them in a brown paper lunch bag.
For the onions once the florets (flower balls you see above) got real ugly and dry and I could see the black seeds emerging I placed them in a paper bag before the birds got to them. I then put the bag on top of our kitchen cabinets and forgot about them for couple months. Today I pulled the bag down and confirmed they definitely were dry. To separate the seeds from the pods I broke apart (which happens easily) and placed the contents into a metal strainer. I gently broken open any remaining pods and agitate the strainer. This causes the small black seeds to move to the bottom, allowing the pods to float to the top and forcing many of the stems to fall through.

I then skimmed off as many of the stems/pods as possible leaving and putting the seeds into a brown paper bag until I can get into town to buy some more manageably sized brown envelopes (recovering from Seattle snowstorm)
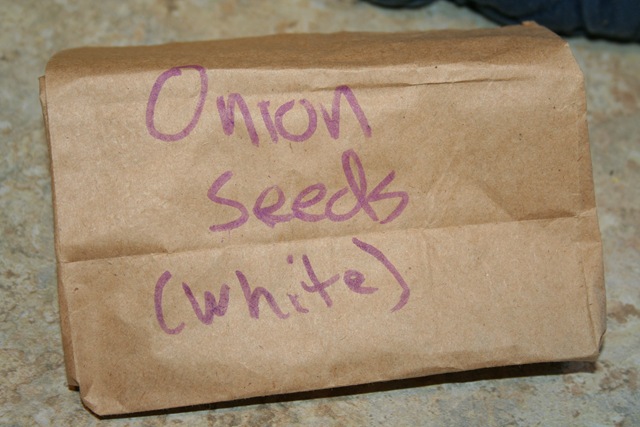
After a few minutes of work I now have hundreds of onions seeds which I probably only have use for couple dozen. Seed exchange anyone?
Tags: birds, cheap, cilantro, garden seeds, led, salsa garden, vegetables
Healthy Choice Cafe Steamers for seed starting/hydroponics
15.3 years ago indoor seed starting

Many times I see some packaging and eventually get an idea how I can reuse it with some minor modifications for starting seeds or some other purpose in the garden. I had one of these moment as soon as I opened my Healthy Choice General Tso’s Spicy Chicken Café Steamer In case anyone is wondering what the purpose of this new packaging is, I could try to explain it but I will allow their marketing department do it for me:
“Our innovative product line utilizes a new and unique microwave Steam Cookerâ„¢–so you can lock in all the naturally fresh flavors of restaurant-inspired meals by steaming them yourself. With new Healthy Choice Café Steamers, vegetables stay bright and crisp, meat and seafood are juicy and tender, rice is moist and fluffy, and pasta is firm.”
After being delighted in the science of their frozen food steaming technology, I discovered I could easily repurpose the packaging completely as-is.
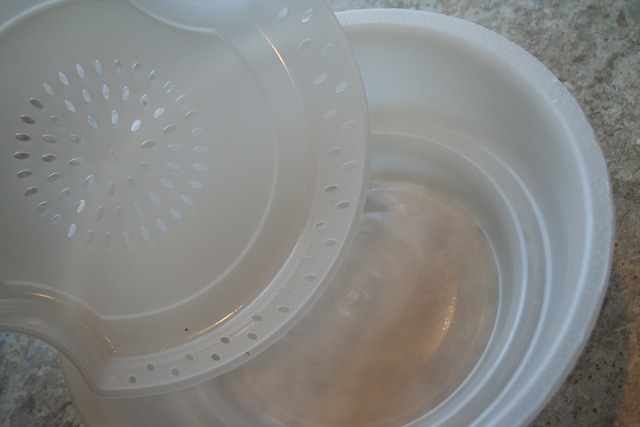
My first initial thought was to use this for starting seeds since it is the perfect size and depth for seeds starts before requiring their first transplant. As an added bonus they already have great drainage holes and even a reservoir in case of excess watering or allowing for wicking if I am going to be away from my seedlings a couple days.
My second thought was hydroponics, which is the process of growing vegetables without using soil. The basic idea is the plant gets all it needs from the nutrient solution which is applied always keeping the roots wet in the preferred growing medium. By adding a growing medium such as coconut fiber or Rockwool, adding some nutrient solution and an air bubbler to the bottom portion of this tray you have a cheap hydroponic system. It is even big enough to support at least three small plants.
With either option the removal tray is also easily removable incase of overwatering or to change nutrient solution with very little disturbance to the plant(s).
One other benefit use is actually consuming the contents (preferable before used for gardening) which I did try and though the packaging has some interesting uses after you eat it, the meal tastes just about as bad as any other TV dinner I have eaten.
Tags: cheap, garden seeds, outdoor plants, vegetables
Effects of color spectrums on plant growth
15.3 years ago indoor growbox, LEDs, spectograph
I have written about the importance of lumens when growing indoors but the intensity of the light at specific wavelengths can be over even more important. NASA has done some significant research on the subject to determine the possibility of growing leafy vegetables on a trip to Mars using as little electricity as possible to get the most benefit out of every watt. In space any wasted energy (heat or light not used by plant growth needs to be severely limited.
It should not be a surprise that using LEDs is part of the solution they came up with since they use 20-30% of the energy of a comparable HPS (High Pressure Sodium) bulb which is considered very efficient given the lumen output per watt. The most interesting part of their findings was how specific red and blue wavelengths were imperative to the growth of plants and actually could sustain growth with just these limited wavelengths. Given the freezing temperatures and masses of snow on the ground the best use of this information for indoor gardening and specifically my $20 PC Grow Box. Understanding the wavelengths that your artificial lights creates can help you have increased plant growth and save on your electricity bill at the same time.
When evaluating which light you must consider wavelength and also the intensity of the light at that wavelength. A tool to do exactly this is a spectrograph, which you can purchase, make your own (this was a fun project with the kids), or just trust other peoples readings. I chose made my own, but am displaying results (led museum) since I would have to estimate the intensity based on the brightness of the spectrum created which would lack some accuracy.
Just to get some perspective, this is what how various light sources appear to a spectrograph:
| Sunlight | 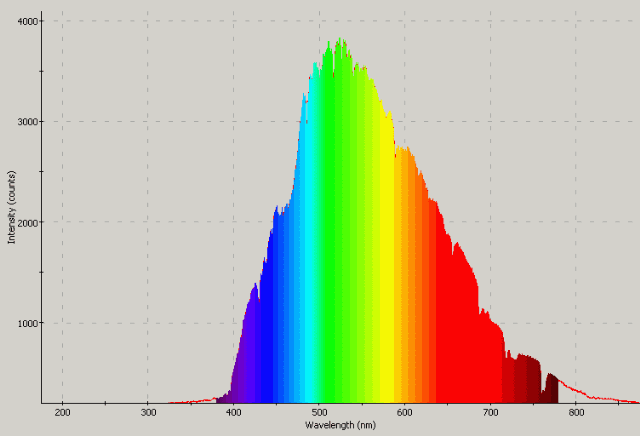 |
| Florescent Bulb | 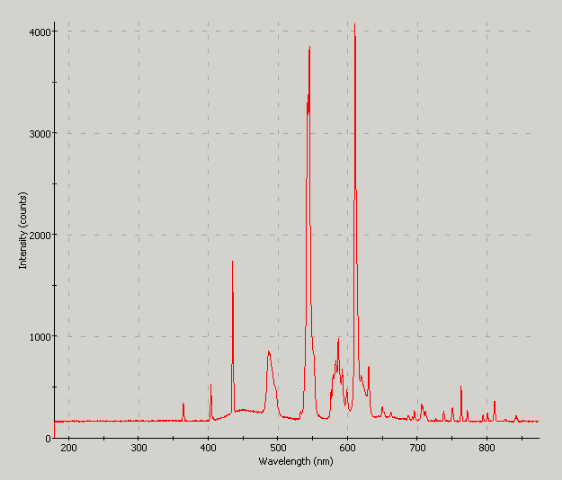 |
| Incandescent bulb | 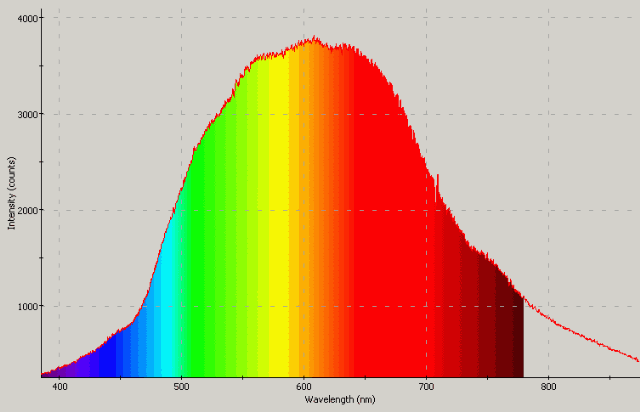 |
| Low power blue LED (5mm) | 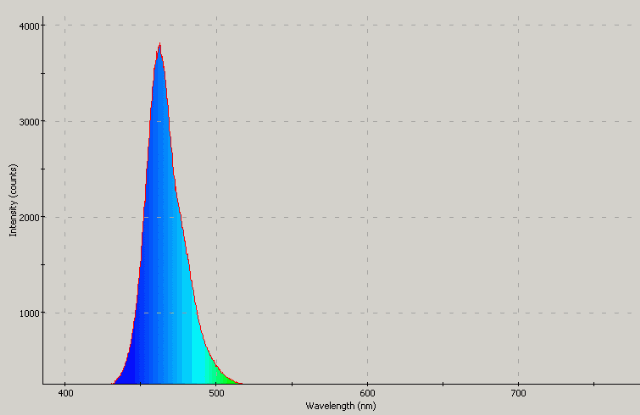 |
| Low power red LED (5mm) | 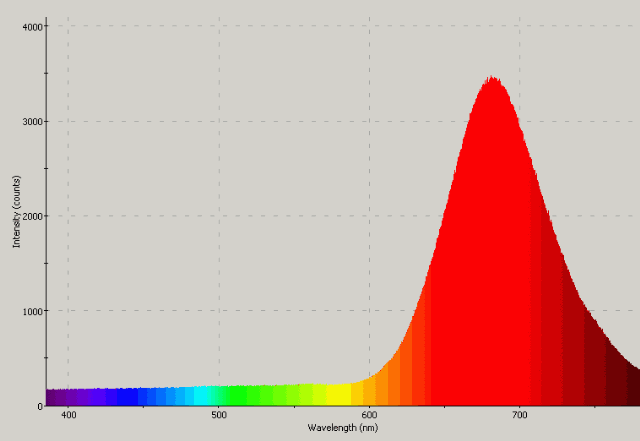 |
| Low power white LED | 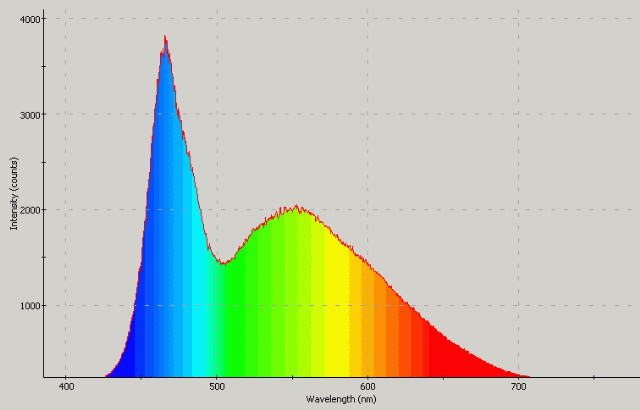 |
As you can see incandescent appears to be the closest to matching the wavelengths and intensities of sunlight though it we need to remember that the orange/yellow/green wavelengths provide essentially are wasted from the plant’s perspective due to natural reflection of these colors. So if a light looks bright to you, there is a good chance you are wasting electricity, as humans our eyes respond well to these wavelengths why we will find these bulbs to be much “brighter” from our perspective. The fluorescent bulb is a good example where we see this light as bright for plants other than the small slices spectrum much of the light is unusable. I have had good luck growing indoors with CFLs along with incandescent, but from the information above I my results cold have less spectacular if hadn’t included the incandescent bulb. At the time the only reason I used it was to generate a little extra heat on some of the cold nights.
The key point is I could easily have much better results using significantly less power. According to NASA’s research the most efficient configuration is to only have red/blue LEDs consisting primarily of red (80-85%) with the remaining (15-20%) being blue LEDs. I would recommend replacing the some of the of the blue LEDs with white LEDs to provide a full spectrum including a pretty intensive blue spectrum in itself. As an added bonus this will provide some “human” light in orange/yellow/green spectrum to allow us humans to view plants with less strain.
By replacing the two 24 watt CFL and one 80 watt incandescent bulb with a few hundred LEDs I could drop at least 124 watts with my new configuration. Assuming I am running my grow box every day for 14 hours a day this could save me over $45 a year as well as just being the more environmentally conscious thing to do.
So during these cold winter months if you grow indoors whether just for seedlings or vegetables all year round be sure to remember that not all indoor lights are created equal.
Tags: cheap, garden seeds, grow lights, growbox, led, outdoor plants, vegetables
Another way for your plants to talk to you
15.4 years ago electronics, water

If the Botanicalls DIY Plant Twitter Kit is out of your technical expertise (or just too ashamed to have your plants tell on you) There is another product out there called Thirsty Light which you place in your plants and when the light blinks when you have neglected your watering duties. At only $10 this is not a bad investment for gardening nerds like me. You also have the option of pulling it out and checking the moisture in all of your plants to see who else you have neglected.
Tags: cheap, led, outdoor plants, vegetables
Are Poinsettias poisonous?
15.4 years ago Uncategorized

Sorry this one is busted, if you really want to you can eat a Poinsettia this Christmas though I have heard it tastes really bad and may give you a stomachache. Apparently this myth started over 100 years ago when sadly a child was found dead next to a Poinsettia plant and was a case of being in the wrong place at the wrong time for the plant and it got the rap. If you still are not convinced you can check out the National Capital Poison Center’s site.
Tags: cheap, outdoor plants, vegetables


