The Plant Whisperer
13.2 years ago electronics, planter, water

The author had a problems keeping his plants alive and provided the plants could not call out for help, he fixed this with a little bit of electronics. It will call out when it is dry and needs watering by saying phrases such as, “I’M THIRSTY! WATER ME!”
It is also detects the ambient light level and makes comments on that as well. This was put together with a little knowhow and about $30 worth of parts.
Wet Circuits water resistant power strip review
13.3 years ago electronics, power strip, product review, water, waterproof, wet circuits

One problem with growing plants indoors is the requirement for indoor lighting, combined with the need to pour water on plants around such lighting causes a potential electrical disaster. When I heard about Wet Circuits water/tamper resistant power strip I simply had to try it out. Not having the $70 to buy one myself, the nice people at WetCircuits sent me a sample to try out these claims for myself.
After reviewing their very informative infomercial style demonstration (see below) I felt I would not be doing my job unless I reproduced at least some of these demonstrations for myself.
Being cautious I started with sticking in my voltmeter while having my homemade supplemental LED light plugged in.

Test #1 one passes with flying colors

Next it was time to pour water on the live outlet…now using a normal socket this would result in a nice spark if you were lucky. As you can see from the video below, this also passed without any problems.
I decided to skip the tweezers test provided that the voltmeter answered the expected result and well it is just plain scary to try even when I know it won’t shock me.
Now if you have shelves of grow lights or your own grow box for $70 this is a decent investment though it does buy you some piece of mind.
Controlling my growbox with a mobile phone
13.6 years ago computer, electronics, indoor growbox, Uncategorized, windows phone

How many times have you been riding the bus and have been curious what temperature your computer growbox was running and if the plants needed to be watered? Ok maybe never, but I decided to solve this problem anyway. There is also no point in identifying that you may have a problem without having a way to do something about so I also implemented the ability to override the controls on the growbox by using a Windows Phone 7 application on your new T-Mobile cell phone or any other cool Windows phone.
Design

I made the design for this pretty simple, unfortunately I could not connect with my growbox directly using a mobile device because the computer is behind a firewall (which is a good thing) so I used machine that both the mobile phone and growbox can contact cheapvegetablegardener.com. After creating a quick web service with the following methods the growbox and mobile device could now talk to each other:
- SetStatus(StatusInfo) – GrowBox sets this status every minute
- SetOverride(OverrideInfo) – Mobile sets override to default functionality
- GetStatus() – Mobile Phone gets status
- GetOverride() – GrowBox checks for potential overrides requested by Mobile device
Mobile UI
Now I have the two devices talking here is the basic UI. The top half of the screen shows the growbox temperature, cpu temperature, and the moisture content. All of these statues change color (to yellow and red) as their values get to critical levels (too hot, too cold, too dry)
The middle section shows the current state of the growbox letting me know if the lights, heater, exhaust fan, and/or water pump are on or off. If a situation occurs where you want to override this state you can do this by simply clicking the status indicator.
The bottom part of the screen shows temperature and moisture levels over the past 24 hours. The graphs are rendered using Google Charts for simplicity though am thinking about creating my own custom solution to get the graphs just right. It also displays a current screenshot inside the grow box and you can transition between views with a finger swipe.
Screenshots
| Temperature history graph | Moisture saturation history graph |
 |
 |
Overriding the heater setting |
Status screen following heater override |
 |
 |
Though this covers most of my required functionality, I still need to add some cool transition animations and some additional analytics, but thought I would share my current version.
Tags: growbox
Solar Powered automated Rain Barrel watering system
14.1 years ago electronics, water
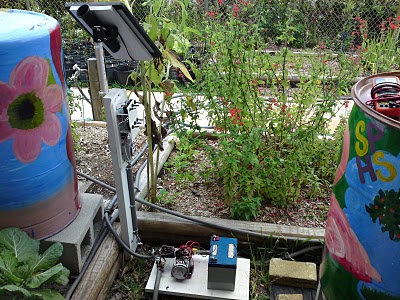
This is a very cool project, grab a few rain barrels, timer, water pump, and a solar panel and have automated the tedious task of watering. With all the rain we get (especially this week) in WA could fill up a dozen barrels in a short time. My only suggestion would be to add a moisture sensor to only water when it has not rained lately.
Might be another project to add to my ever growing list…
Tags: cheap, vegetables
Homemade waterproof digital thermometer
14.3 years ago arduino, electronics, thermometer, Uncategorized, waterproof

Now I am playing with hydroponics in my grow box I want to monitor the temperature of my nutrient tank. This is important too hot it can bread disease too cold it can shock your plants. I also want to use the data to identify how ebb/flow cycles affect ambient and solution temperature (for my own nerd curiosity)
I have been thoroughly impressed with the Dallas DS18S20 temperature sensor so decided this would be a great component to use for this project and this is how you can make your own.
Materials:
- DS18S20 temperature sensor
- 1/2 inch plastic tubing (could go smaller but had some lying around)
- Aquarium/food grade silicone
- 18 gauge solid core wire (long enough to get from arduino to what you want to measure)
- Glue gun with glue
- Soldering iron with solder
Construction
Step 1: Solder the two wires to pins 1 and 2 of the DS18S20 and apply a little dab of hot glue to all of the exposed metal. This is not entirely necessary but a small safety precaution so you don’t discover you shorted the connection during assembly.


Step 2: Cut approximately 1 inch length of plastic tubing using a utility knife
Step 3: Apply liberal amount of silicone to one end of the tubing cut in step 2.

Step 4: Allow silicone to set for 15 minutes and do a visual inspection for leaks. You may also try blowing very gently into the tube to check for leaks, though not too hard to create a hole in the process.

Step 5: Attach the DS18S20 to the tube using a drop of hot glue. This is not entirely necessary but when trying to get a perfect watertight seal the less moving parts the better.

Step 6: Again apply a liberal amount of silicone to seal the top paying special attention to the area around the wires

Step 7: Give the silicone at least 24 hours to completely set.
Step 8: Testing. First off the sensor may be buoyant, if this is the case carefully attach a 1/2 hose clamp or something else to help tether it down. Next suspend in a glass of water (preferably clear) and watch for a few minutes for leaks and or bubbles. If you see bubbles try to get an much water as you can out and apply a more silicone and let set for another 24 hours
Hooking it up
This part is pretty straightforward. Pin 1 is your ground and pin 2 is your DQ which for most people doesn’t make much sense but it is a combination power source and bus output. To get this to work you hook up your ground (black wire) to your ground on your arduino and the red wire to digital in and 5v with 4.7K resistor between. Sure that is very confusing so hopefully the breadboard visual below is much more helpful.

Writing the Code
Since I am planning on using this with my grow box controller, I will show how to use this with arduino to get some numbers. You could look at my arduino code in the grow box controller post to get the values but in my case I need to get values from two DS18S20 temperature sensors so I found a great OneWire library which helps make your arduino code very simply. Simple extract the two folders in the zip archive to [ArduinoPath]\hardware\libraries and enter the following code into the arduino UI:
#include <OneWire.h> #include <DallasTemperature.h>
OneWire oneWire(8); // on pin 8 DallasTemperature sensors(&oneWire);

void setup()
{
  Serial.begin(9600);
  // Initialize sensors
  sensors.begin();
}

void loop()
{
    sensors.requestTemperatures();
    Serial.print(“Sensor #0: “);
    Serial.println(sensors.getTempCByIndex(0));

    Serial.print(“Sensor #1: “);
    Serial.println(sensors.getTempCByIndex(1))

    delay(100);  // wait a little time
}
If all goes well you should see output similar to the following (values in Celsius):
 Sensor #0: 20.3
 Sensor #1: 30.4
 Sensor #0: 20.3
 Sensor #1: 30.4
 Sensor #0: 20.3
 Sensor #1: 30.4
For people like me who are used to Fahrenheit you can simply use the following equation to convert Celsius to Fahrenheit:
°F = °C x 9/5 + 32
Though I am using this for my grow box controller there are many other uses you could use this for:
- Aquarium temperature monitoring
- Brewing temperature monitoring
- Weather station
- Soil thermometer
Tags: arduino, cheap, growbox, outdoor plants, vegetables
Best DIY cheap soil moisture sensor
14.5 years ago cheap, electronics, moisture sensor, water

My first version of my cheap soil moisture sensor has worked great for me but it did have a couple flaws. The first issue was construction, though I had great luck on my first attempt though after trying to recreate additional sensors given the small amount of gypsum between the sensor and the probes were so thin it was extremely easy to crack the sensor and I normally have about a 25% success rate on later creations (must have had beginners luck on the first one.
The second issue was durability. Given we are playing with gypsum and as it is suspended in water it will eventually breakdown and there is very little we can do about it. Though with my latest changes to my automated grow box which includes automated watering based on moisture content I want to ensure my measurements stay accurate throughout the season. To help with this I have decided to increase the sensors size and also am using galvanized nails to prevent rusting. After a few attempts I have come up what I feel is a pretty foolproof method of creating a moisture sensor.
How it works:
There were many questions in the comments in the previous post so hopefully I can clear this up a little here.

Technically a gypsum block measures soil water tension. When the gypsum block is dry it is not possible for electricity to pass between the probes, essentially making the probe an insulator with infinite resistance.
As water is added to the problem more electrons can pass between the probes effectively reducing the amount of resistance between the problem to the point when it is fully saturated where the probe has virtually zero resistance. By using this range of values you can determine the amount of water than exists in your soil.
Parts for cheap soil moisture sensor:
- Plaster of Paris
- 2 Galvanized Finish Nails
- 1/2 inch plastic tubing
- utility knife

Construction:
Take your utility knife and cut the tubing slightly longer than your galvanized finishing nails. Try to make the cut as straight as possible though it doesn’t have to be completely perfect.

Use your utility knife to cut the smaller plastic tube lengthwise, this will allow easier removal of your soil sensor after the mold cures.

Optional: Make the cut diagonally to prevent a potential vertical fracture line.

If you were very careful on you vertical cuts you can avoid this step, but to completely avoid spilling plaster onto my workbench I drilled four holes slightly larger than your tubing. I used these holes for support but also to catch any of the plaster in the gaps from you less than accurate vertical cuts.

Being careful that the tubing fits together where you split the tubing vertically, insert the tubes into the holes (or carefully on a flat surface) Mix Plaster of Paris and carefully fill with to the top. The friction between the tubing should keep a water tight seal where you made the cut, though if the plaster is a little thin and it appears to be leaking through wait a couple minute for the plaster to setup some and try again, at that time it should not have the viscosity to seep through the very small gap that may be causing the leak.

Take your two galvanized nails and push them through a small piece of wax paper. You may also allow the plaster to setup for a few minutes and then float the nails in the the plaster. I like the first method since gravity will help ensure they fall straight down and parallel to each other. As for spacing, I have done some experimentation with the gaps between the probes and my conclusion was, it doesn’t make much difference. As long as there is a gap (they are not touching) you should get reliable results.

After allowing the sensor to cure for about and hour remove it from the holes you drilled in the wood.

Gently pull back the plastic tubing and you have a nice clean soil sensor.

Lay them out to dry for 24 hours to cure completely and their construction is complete.

For attaching the wires there are a couple options. The best would be to solder them to the probes though to do this you need to heat up the nail hot enough to enable a strong solder connection. My little 15W soldering iron just can’t produce the heat for this so I am option for the wire wrap method. I take about an inch of wire and strip off about an inch of insulation and tightly wrap around the probe. Given copper will rust and could be a point of failure you will want to insulate this connection and the probes from the moisture. A few dabs of hot glue works pretty well. I am planning on trying liquid plastic, though I am currently out and when I have some on hand I will update with how it went.
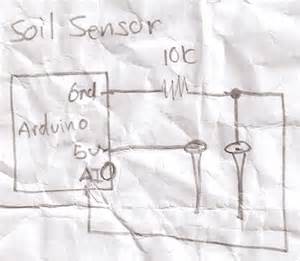
How to use your cheap soil moisture sensor
You can simply hook up a multi-meter and check the resistance though if you want to create anything automated you would need to use an integrated circuit (IC) or a electronics prototyping platform such as Arduino. By applying voltage to one side of the sensor and using a voltage splitting circuit connected to ground and an analog input you can then measure the voltage making it through the probe. The higher the voltage, the higher the moisture content of the soil.
Conclusion
The above should give you everything you need to know to create your own cheap soil moisture sensor and how to use it. This can be used as a moisture soil sensor for watering your indoor plants like I am using it. This same moisture sensor could be for monitoring your outside soil moisture content to trigger (or preempt your irrigation system) to save some money on your water bill and/or maintain consistent moisture levels in your plants which could drastically improve water sensitive crops such as tomatoes.
Tags: arduino, cheap, growbox, led, outdoor plants, tomato plants, vegetables


