Tomatoes: Upside down, Ground, and Self Watering Container
9.7 years ago DIY, self watering, tomato, upside down planter
On of a common questions I still get is, do you still grow tomatoes upside down? Does that really work better than just planting in the ground?
Well I decided to do a little experiment and start several tomato plants from seeds and grow two in an official Topsy Turvy planter, two in the ground with fertile soil, and one in a homemade self watering container.
Each plant was placed in the same area in my yard and was watered the same amount at the same time. About every 10 days I would also water with a diluted solution of water with fish emulsion. You can see some results in the pictures below.
Upside Down Planter


Self Watering Planter


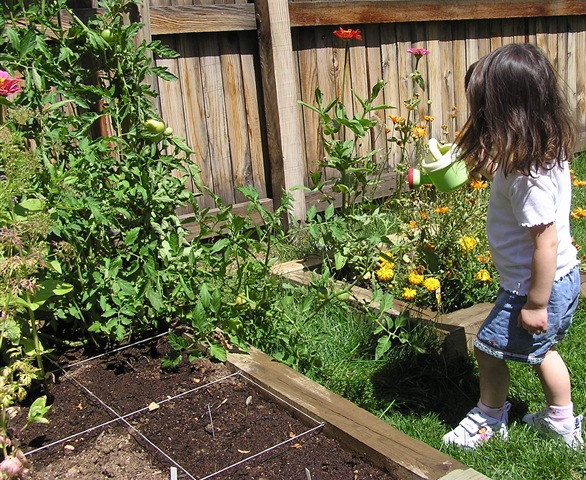
Ground

Overall the upside down planters by far are having the best yields getting fruit 3 weeks before other plants. The self watering planters had the healthiest looking plants though yields were decent though taking their time. The plants in the ground are having some serious issues though still producing some tomatoes though doubt the plant will survive to have red fruit.
After this and previous years results I really don’t think I will be planting tomatoes in the ground in the near future…
vertical gardening recycling two liter bottles
12.1 years ago cheap, planter, recycle, upside down planter, vertical gardening

I am always looking for ways to enable myself to grow more in my small suburban yard. One technique to do this is using the maximum vertical space to your advantage. Whether this is growing your tomatoes and cucumbers up a trellis or growing some tomatoes from hanging upside down planters the more you successfully make use of this space the higher yields you can achieve.
One part of my yard has a great location which southern facing but do to concrete supported fence posts I can not grow anything there until now. With my homemade vertical planter I can grow a variety of small root vegetables such as lettuce, herbs, cherry tomatoes, flowers, etc.
Step #1: Cut to size. Depending on the soil needs of the plants you are growing cut off the tops using a utility knife or a good pair of scissors/kitchen shears. Cut just a bit lower on one side of the “planter” to provide a little more room for the next step and give the plant a natural way to hang over the side of the planter.
Step #2: Drill holes in top two caps. Not much else to describe here…this is done to restrict the flow of water to the planters below this one and prevent erosion of dirt out of the planters due to too high of water flow.
Step #3: Attach bottles. Pick any scrap piece of plywood you have around and attach the bottles with a couple of small screws. You can be as creative as you want on this one. A couple things to keep in mind, you want the water to flow between the planters to save yourself some time when watering these (you only have to water the top one) You also want to thing about how the plants may mature and couple block the sun from some of the plants below it, so staggering directions can help with this.
Step #4: Fill with dirt. Add some good potting soil (I went with my favorite coconut coil) and water from top to ensure water drips as expected. If you aim is off you can always add another screw (or adjust) to get everything lined up.
Below is a video of this vertical planter in action.
Growing peppers in a Topsy Turvy strawberry planter
13 years ago cayenne, jalapeno, peppers, strawberries, upside down planter

I made a little discovery last year and that is that peppers really don’t need a lot of room to grow, require soil a little warmer than it normally gets around here, and do not mind getting a little dry between watering. This seems like great characteristics to grow peppers in vertical containers. With this in mind at the end of last year I picked up a couple of Topsy Turvey Strawberry Planters at over 50% off when the season was well over. Topsy Turvey does make hanging pepper plant containers but I chose the strawberry planters instead for two main reasons; first they normally sell for a few dollars cheaper. Second, they are much larger and make better use of more vertical space and I can plant at least 18 pepper plants in each one.
For my mix I started with your typical soil mix and then amended it with perlite at a ratio of 3 parts potting soil and 1 part perlite. I also added a cup of bone meal to since it much easier to add now then in a couple months when they really will need it.

As you can see from this shot there is plenty of room for these peppers to spread out and should have enough root space for some decent yields

I then filled up the hanging container until it was filled up to the bottom most hole.

Next I carefully placed my pepper plants into the wholes than reached in from the inside and provided just a little bit of pressure to pack the soil enough to keep the plant secure in place. I repeated this process for the 11 other pepper plants I had ready to plant.

Finally my assistant and I poured in about a liter of water (soil was already a bit wet putting it in) and admired our work. With some strange bit of crazy luck we actually started having some great weather after we planted these and hung them up. So you can thank me Pacific Northwest…

As you can also see from the picture above I still have 6 more holes to add some more pepper plants which I have plenty in my grow box which I am allowing to mature a little longer. I will plan on providing updates on this post as highlights with this experiment develop.
RESULTS
After a cold summer weather we finally have had a good month of good weather with what appears to be at least another week of sunshine coming. This has been great for the peppers in the strawberry planter.

In this planter I have 18 pepper plants, even with the cold spring/summer they all survived and are now thriving on the top part of the plant I have hot peppers (cayenne) and on the lower half I have sweet peppers. All that was required on maintenance was watering every few days where I also rotated about a quarter turn to get even sunlight on all of the plants.

As these pepper on the plants ripen more I plan on making some cayenne pepper and some paprika (possible some smoked paprika as well) from the sweet peppers. Overall I have been very impressed with the results of this little experiment and plant to grow more peppers using this method next year.
Top gardening posts of 2010
13.3 years ago cheap, garden planter, LEDs, moisture sensor, upside down planter
2010 has been a pretty exciting year for CheapVegetableGardener.com. Bringing on a significant number of more readers and many great mentions by some large publications, I thought I would mention the top 5 posts of 2010 which helped this happen in case you missed them.
 |
Being kicked off by an awesome mention in a New York Times article and subsequent interview on Science Friday on NPR, this article on making your own tomato planter held the #1 spot. By taking a two liter bottle, a little spray paint, and a chopstick (or small stick) you can make your own upside down tomato planter. |
 |
This article has received some decent traffic from numerous sites but the mention on lifehacker.com is what put this one on the #2 spot. Now if you are trying to make a little profit from your extra harvest or just trying to save a little extra money at the grocery store this post lists the top vegetables for your gardening square foot. |
 |
Want to start some seedlings indoors without spending a fortune on lighting? Check out this Christmas light LED grow box post which has held the #3 spot. All it takes is a couple of strings of LEDs (purchased during after Christmas sales of course), a Rubbermaid container, a drill, and a little patience you can have your own indoor growing apparatus. |
 |
Sometimes I got busy in the early spring and forgot to water my neglected seedlings in the grow box in my garage. To solve this problem I made these great little soil sensors using galvanized nails and Plaster of Paris. Check out this post which help the #4 spot for the full build instructions. |
 |
Finally after some personal trial and error the #5 post of this year goes into detail on how to create a new garden bed. This covers the basics of picking the proper location and also some cost benefit analysis for using various materials (cinder blocks, wood, chiseled wall blocks, bricks) to build a new bed. |
Getting some great deals on gardening supplies
13.6 years ago cheap, jalapeno, peppers, strawberries, upside down planter

With stores making way for Halloween and Christmas decorations, now is the perfect time to find some great closeout deals at your local grocery store or garden center. I had meant to imitate the Topsy Turvy planters above, but at 60-70% off I was not even cheap enough to pass up on these deals for the Topsy Turvy Strawberry Planter (picked up two at $1.99 each) and the Topsy Turvy Hot Pepper Planter
(picked up one for $4.99)

Given my desire to grow even more peppers next year the pepper planter will work great to try out a few new plants.

And no, there was nothing wrong with camera on the picture above that’s what the boxes actually look like. I combination of too much sun and then getting heavily rained on over the past couple weeks led to an even bigger discount. Hoping to fill these with the strawberry runners that are trying to escape their garden bed.
So head down to your local garden center and check out those items you have thought about but never pulled the trigger, you just might find a deal you are glad you did not miss out one.
If you found any good deals, I would love to hear about it in the comments…
First Tomato 2010
13.7 years ago tomato, upside down planter

This is an unfortunately record, being the latest I have gotten my first ripe tomato. In case if anyone was wondering, this was on the 1 gallon milk carton upside down garden planter.


