Grow box during the summertime – UPDATE
14.8 years ago computer, indoor growbox
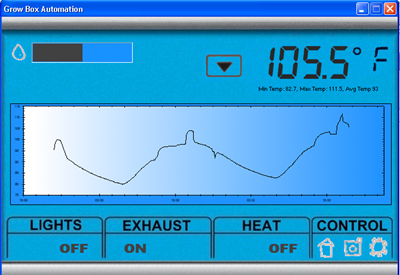
UPDATE: With weather climbing my grow box got up to 111.5 degrees today with the lights off. If I was using one of those fancy computers with temperature sensors it would have turned itself off by now. Turning off computer so I will have something working this winter…
[July 25, 2009] I was planning on growing my jalapeno peppers in my grow box this summer, but given the higher than average weather we have been having.
With the weather being in the 90’s 100’s and given the CFLs on average increase the temperature by around 10 degrees the grow box has not been great place to grow plants unless I was thinking of growing cacti. Looking at my historical data the highest temperature this summer was 107.6 111.5 degrees.
As you can see above I have been making some progress on the computerized grow box, which I will plan on writing it up soon…
Tags: cheap, grow lights, growbox, outdoor plants, pepper plants, vegetables
Black Bean and Corn Salsa Recipe
14.8 years ago corn, peppers, recipe, salsa

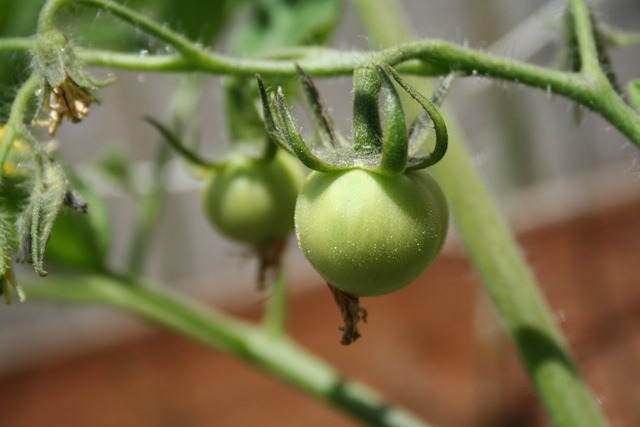
My jalapeños peppers have been growing like crazy and I have had to start harvest to prevent the plants from stop producing. Given my tomatoes are still green I have been itching to do something with them, I decided to make some corn salsa. Given I couldn’t find a recipe that matched the ingredients I had on hand I decided to make my own.

CVG Black Bean and Corn Salsa Recipe
- 2 ears of corn (1-1/2 cups frozen corn)
- 1 small onion (chopped)
- 1/4 cup chopped cilantro
- 1/4 cup sliced green onions
- 2-3 cloves of garlic (chopped)
- 1/4 cup white vinegar
- 3 T sugar
- 1 chopped seeded jalapeño
- 1 chopped unseeded jalapeño
- 1-1/2 cups black beans (canned)
Directions: Cook corn for 2 minutes in boiling water and submerge in ice cold ice water. This helps stop the corn from cooking any more and also make handling while cutting the kernels a little more pleasant. Cut off kernels and add to bowl. Chop/slice remaining ingredients and add to bowl, stir, and refrigerate and serve chilled.
If you like your salsa a little spicier leave both pepper seeded.
Tags: cilantro, garden seeds, garlic bulbs, led, outdoor plants, pepper plants, salsa garden, tomato plants
How to fertilize/side dress tomatoes/peppers in your garden
14.8 years ago alfalfa pellets, compost, fertilizer, peppers, tomato
When your fruiting plants are flowering and bearing fruit this is a good time to give them a little extra boost. Though you don’t want to throw any old fertilizer at them at this point. You want them to get the nutrients they need to produce high yields of produce, though you don’t want to shock them with an abundance of nitrogen to stimulate new vegetative growth when you would rather the plant expend its energy making you food.
The solution to this problem is to provide your plants with a low dose of balanced fertilizer. I couple of my favorites are compost and alfalfa pellets applied every couple weeks while the plants are blooming/fruiting. This ensures the plants have all the nutrients they be lacking without throwing the plant into a growth spurt.
If you have a little extra time take the compost and add some water and let it sit in the sun for several hours and water or spray onto the foliage for a great dose of compost tea.
If you forgot to apply a little bone meal when you planted your peppers/tomatoes this is also a good time to sprinkle a handful under your plants and work into the couple inches of soil to provide your plants with a boost of phosphorous and also a little calcium to help prevent blossom end rot.
Hopefully with these tips you can help your green tomatoes turn into bright delicious red tomatoes.
If you want to learn more about the chemistry of organic fertilizers I have a whole post on that subject
Tags: alfalfa pellets, cheap, compost, organic vegetables, outdoor plants, pepper plants, tomato plants, vegetables
How to save pea seeds from your garden
14.8 years ago harvest, peas, seed saving, seed storing, seeds
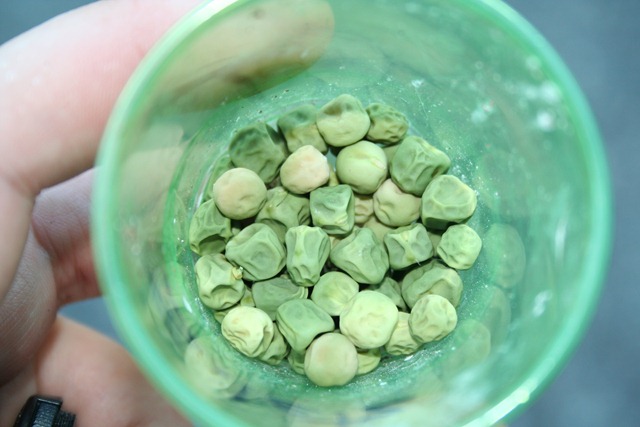
Most of the seeds I purchase, I am able to keep for at least a few seasons before running out. The one exception to this rule is peas, which I always have to buy each season. To save myself a couple dollars next year after I had my fill of peas from my garden I let quite a few mature which I will reuse for seeds this fall and next spring.
Out of all the seeds I have collected peas definitely are the easiest by far. If you want to go with the ultra lazy easy approach just let them dry on the vine until the pod no longer has any moisture and the peas are loose in the pod. You even can store them in the pod and crack them open for planting. One disadvantage to this technique is the peas could end up getting enough airflow and could result in some moldy peas.
To be on the safer side here is a more conservative approach:
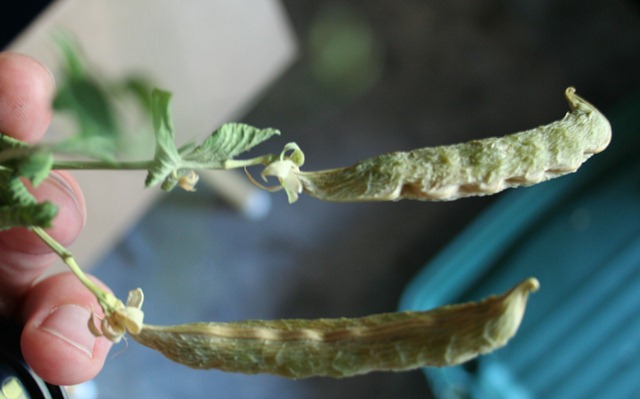
- Pick pods when fine is yellow. The basic idea at this point the plant is not really providing anything to the pods so you might as well take on the responsibility
- If the pod still feels a little moist store it in a dry location. If the pod feels dry using a small knife carefully cut a small slit lengthwise into the pod being careful to not to injure the peas.
- Once the peas get all shrived up and look like what you planted to begin with store in a cold dry location (jar in the refrigerator)
Now you have seeds ready for fall planting (or spring planting next year) If you go a little crazy with your dried peas you can also add them to soups or stews during the winter time.
Tags: garden seeds, outdoor plants
How to save spinach seeds from your garden
14.8 years ago harvest, seed saving, spinach
Growing up in rural Washington state, the job market was a somewhat lacking for those under the age of 16. Given this at the age of 14-15 I was sucked into the attractive and lucrative career of spinach rouging, also known as “The Worst Summer Camp Ever” The basic premise of the job was to walk down endless “female rows” in the hot sun and destroying any male spinach plants. For every 12 “female rows” there were 4 “male rows” of higher quality spinach plants which were desired for pollination. So in other words I was facilitating the hybridization of spinach plants.
Hoping to keep these memories behind me when I decided to grow spinach seeds this year, I realized I actually learned something which I thought I would share. In my case I am open pollinating so no rouging required though it is good to still know how to identify the boys and the girls since no matter how hard you try those boys will not be creating any seeds.
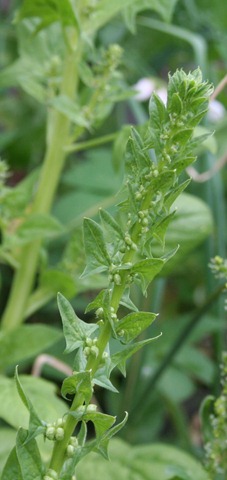
The plant on the left is a male plant, you can identify it by the little yellow balls under the leaves. As you may have guessed the one on the right is a female plant which only have green balls under the leaves. Not to over complicate things there is also monacious plants which are basically both male and female which I would normally just pull up since it will make things easier during harvest time.
Spinach seeds for the most part will wind pollinate on their own but if you garden is somewhat protected from winds it may be helpful to flick the male plants every week or so to help out the process.
Once the plants turn yellow go ahead and pull them up. If they are males throw them in the compost. If they are females hang them in a dark dry place. I chose to hang mine off my mountain bike’s brake cable.
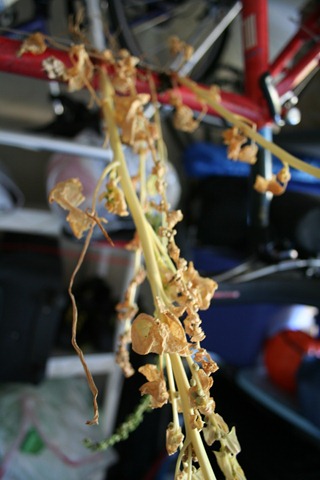
After a few weeks of drying you should see the seeds brown and dry just like they came out of the package you planted them with. Store the seeds in a dry cool place (jar in refrigerator) and you should have a great stock of seeds for the next year.
Tags: compost, garden seeds, outdoor plants
How to freeze herbs
14.8 years ago cilantro, freezing, herbs, mint, peppermint
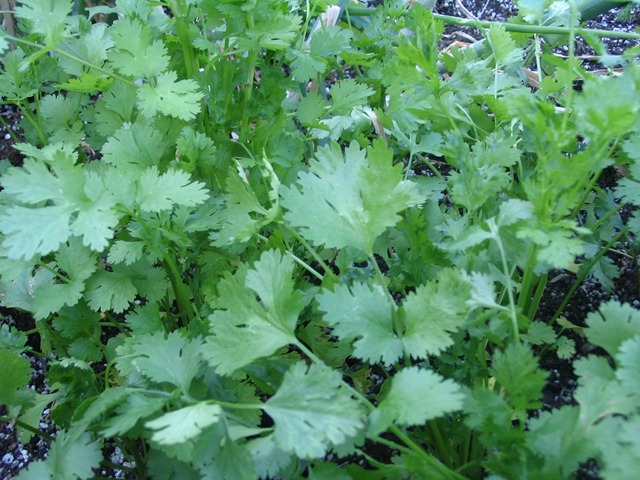
One of my goals in my garden is to make salsa entirely from ingredients from my own garden. In the past I have come close only requiring the purchase of a couple jalapeño peppers from the grocery store but this year with much effort and a strangely hot summer for the Pacific Northwest I have all the ingredients growing in my garden. Though unfortunately the ingredient cilantro could be my elusive ingredient since hot weather means great growth then subsequent bolting. My solution to this problem is successive planting and freezing herbs.
Now drying is also a viable option though I prefer freezing since many moist herbs can lead to mildew without the right equipment to dry efficiently. Frozen herbs also maintain the same potency for several months in the freezer as fresh so no guessing on measurements of your frozen herbs.
There are actually a few different methods for freezing herbs, each of which depends on how you plan on using them later.
The first method is great for keeping the herbs texture and flavor intact. The process is nearly identical to that of freezing berries.
Flash freezing herbs
- Pick the best freshest herbs you can find
- Wash and pat herbs dry
- Lay on layer of wax/parchment paper on cookie sheet
- Freeze overnight
- Place leaves in freezer bag(s), using a straw to suck out excess air
If you are planning on using your herbs in soups or stews, I would definitely recommend the ice cube method.
Ice cube tray method
- Pick the best freshest herbs you can find
- Wash and pat herbs dry
- Hand chop (or use food processor) leaves
- Put chopped pieces into ice cube trays and fill with water of stock
- Freeze overnight
- Place cubes in freezer bag(s), using a straw to suck out excess air. You may also put the trays right into the freezer bag sucking out the air if you wish.
Note: Also try mint with a little extra water to add to drinks during the summer (or winter)
Now if you are planning on using your herbs for dishes that require oil such as Pesto with your Basil. This is a great time to do a little up front preparation.
Ice cube tray method (with oil)
- Pick the best freshest herbs you can find
- Wash and pat herbs dry
- Add 1/3 cup of oil for each 2 cubs of herbs to food processor or blender
- Put chopped pieces into ice cube trays
- Freeze overnight
- Place cubes in freezer bag(s), using a straw to suck out excess air. You may also put the trays right into the freezer bag sucking out the air if you wish.
Now in a few months you can add some parmesan and have some previously frozen pesto in the middle of winter.
Tags: cilantro, herb garden, outdoor plants, pepper plants, salsa garden


