How to make cayenne powder
13.5 years ago cayenne, dehydrator, peppers

After letting my cayenne peppers ripen some more in the grow box I decided that this was good enough and decided to make some cayenne pepper for winter BBQs. The different stages of ripeness provides slightly different flavors, from what I have read partially ripe can give an excellent heat with a unique flavor. As you can see the color is also a little different than what you would typically think for for cayenne peppers. The process for this is very similar to making jalapeno powder with a few minor differences.
Step 1: Clean the peppers. Simply give them a quick rinse and a towel dry

Step 2: Cut off the stems (stocks).

Step 3: Remove seeds. This is an optional I chose not to do this for laziness but also to give my powder a little extra heat. To remove seeds slice lengthwise and scrape out the seeds carefully. Recommend gloves on this step to prevent burning eyes later.
Step 4: Cut the peppers in half. Again this is optional but I did this to speed up the drying time since I didn’t split them to remove the seeds

Step 5: Dry the peppers. These peppers are very tough and can handle almost any temperature for drying. You can go with the slower method by stringing them through the middle using some fishing line and hang them until dry. You can also dry them in your oven at 225-300F checking every couple hours for dryness (about 8 hours). I opted to use my dehydrator (12-14 hours) since I have one and I didn’t want to get up in the middle of the night to check them. Just like the jalapenos you want to dry the peppers until they are crisp and break when you bend them. Just as another warning be careful when handling these peppers even when dry, you still can get burned.

Step 6: Grind the peppers. Use a coffee grinder (or Magic Bullet with grinder blade like me) to a fine powder and store in an air tight container for about 6-8 months for best flavor but still can be used for 1-2 years with decent results.

Tags: pepper
How to make jalapeno pepper powder
13.7 years ago dehydrator, jalapeno, peppers, Uncategorized

Other than gardening I also enjoy cooking manly foods such as chili and BBQ rubs. One seasoning I have heard being used for both recently was jalapeno pepper powder. Not seeing any in local stores and having an abundance of jalapeno peppers in my garden I decided to attempt to make my own.
1. First picked some nice green jalapeno peppers from my garden, I chose to use young green ones but you could also use more ripe red ones for a different and less spicy flavor.

2. Next I cut the ends off the pepper, split them in half, and removed any seeds. After a little trial and error I noticed that if I cut perpendicular to the line in the middle of the pepper (see below) it was much easier to remove the seeds


3. I then placed the halved peppers in a plastic tray and put them in my dehydrator at 90F for 24 hours until they were brittle (when you break them in half they snap with minimal bending) with no soft or moist areas.
Tip: For difference flavor you can dehydrate at a higher temperature to roast/cook them a little but you will lose some of their heat.

4. Place your dried peppers into a blender or spice grinder and pulse until they create a fine powder.

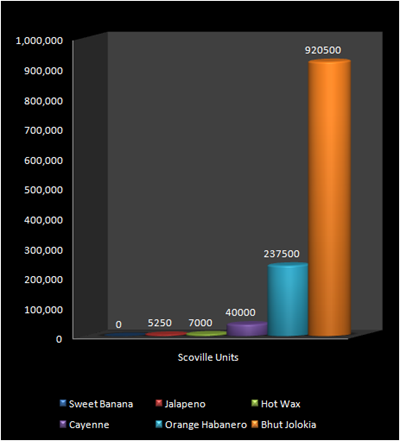
Be sure to let the powder settle some and be careful to not inhale the powder, though much less heat then some of its pepper cousins (see chart below) getting a nose full of jalapeno pepper powder is not a pleasant experience (I did try this not too painful, though should have a nice little coughing fit).
5. Finally carefully pour powder into a airtight container and store for 6-12 months.
![009[5]](http://www.cheapvegetablegardener.com/wp-content/uploads/2010/08/0095.jpg "009[5]")
As I mentioned above you can use this in meat rubs and chili but also can be used anywhere you may use other pepper powders. Some ideas I am thinking about is complement to Mexican foods, omelets, popcorn, and potatoes.
Making your own garlic powder
13.7 years ago cheap, dehydrator, garlic bulbs

I like to use garlic powder for making my own BBQ rubs and in cooking where I am too lazy to cut up some fresh garlic. Whenever I go to buy garlic powder at the grocery store I normally end up convincing myself to get 11 ounces of garlic salt at $3.99 versus the $7.49 for a 9 ounce container of garlic powder. Though this not what I really wanted, the cheapness in me always wins. Given I picked up a fancy food dehydrator recently, this year I have opted to make my own.
When creating my garlic braid I found many imperfect bulbs as well as some small bulbs which I set aside to be the victims into making garlic powder.
Step #1: Peel the and clean the cloves

The title pretty much sums it up but you need to get the cloves and peel off the outer layer of all the cloves. I normally following this up with a quick rinse to help get rid of the various loose pieces and make them a little less sticky (and smelly)

Step #2 Slice the garlic
The size is not that important, though the general idea is all of the slices should be about the same general size. This way they all should complete drying at the same time. Obviously the smaller you slice the quicker they will dry which may not be a good thing which I will explain later.

Step #3 Dry the garlic

Place the garlic in your food dehydrator with no pieces touching at 125-130F (or as close as yours can get) and if you sliced thin they could be ready in about 12 hours or if they were huge hunks like mine more like 3-4 days. The easy way to tell if they are done is by picking the largest clove chunk you can find and break it in half with your fingers. If it brittle and breaks cleanly they are ready, if it is soft and bends some check again in about 8-12 hours.

Step #4 Grind the garlic

Here is where you have a couple options, you can grind all of the cloves using a spice/coffee grinder and store in an airtight container or simply store the chunks in an airtight container and grind into powder as needed.
If you smell the chunks you may be surprised that there is not a strong garlic smell, that is because the outside has become oxidized. Though if you break one in half and take a smell or pop it in your mouth (if you are daring) you will see there is plenty of flavor inside. If you grind the garlic chunks they will start to oxidize reducing their effectiveness and given the new much larger surface area of the small particles it will not take long for your garlic to lose the great aroma it previous had.
You can preserve this potency longer by keeping the garlic as chunks and grinding it into powder right before using. Though bringing out and cleaning a spice grinder each time you cook with garlic can be a pain, so I would recommend grinding as much as you expect to use for a couple months and save the garlic chunks in an air tight contain and grind when needed so you always have fresh garlic powder ready to use.
As with any spices once opened they are good for about 6 months ground or 12 month whole when stored in an airtight container and twice those numbers if vacuum packed. So the garlic chunks are useable for one year with about half that for ground variety. You can also store garlic powder or garlic chunks in an airtight container in your freezer to gain a few extra months.
Tags: garlic
How to make dried basil
13.8 years ago basil, dehydrator, herbs

Summer has finally appeared here in the Pacific Northwest with temperatures in the 90s I decided this would be a good time to dry some herbs in the garage given it was already at the right drying temperature without any heating required.
Here is the basic steps to harvest, dry, and store your own dried basil.
- 1. Pick and clean (optional) the leaves
- Start by trimming as much as you may need for the next month. If the leaves are dirty give them a quick rinse and pat them dry with a paper towel. If the leaves are clean you can skip this step. You want to pick the greenest leaves you can find. In my case many of the leaves were not as green as I would have likes (they are getting better now the weather is improving)
- 2. Strip the leaves from the stem
- Unlike oregano this part if very easy use scissors (or just pinch off with your finger nails.
- 3. Dry the leaves
- If you have a food dehydrator place the leaves in a single layer and set to 90-100 degree F for about 24 hours. Alternately you can also dry the leaves by placing them in a screen in a dry warm place. You will know they are down when the leaves are crispy and can be pulverized easily with your fingers.
- 4. Storing the leaves
- Now you have two choices:
- 1. Keep the leaves whole and chop them as you need them for added flavor
- 2. Chop them up using a spice/coffee grinder (or Magic Bullet
with the grinding blade) and use them immediately as needed
As you can see the freshly dried basil (left) looks much better than the stuff hanging around in my spice rack, which was only a few months old.

The picture above had two purposes, I actually place my herbs on paper then fold to easily pour into the old bottles.

Tags: herb garden, herbs
More Fun with Food Dehydrator
14 years ago dehydrator, herbs, strawberries
I decided to be adventurous with the food dehydrator and grabbed some stuff from the refrigerator to make some nice nutritional snacks.

I started with some strawberries, the process is very simple, take some strawberries slice about 1/4 inch thick and place on the tray.

Next I moved on to apples which I soaked in a solution of lemon juice (about 1/4 cup) with 1 cup of water. To add a little extra sweetness I also dumped in a packet of artificial sweetener to reduce the sourness from lemon. After letting the apples soak in this solution for about 3 minutes I added them to the tray.

After slicing bananas about 1/4 inch thick I also soaked these in the same lemonade bath I did for the apples for 3 minutes as well.

Finally I spliced some watermelon at the same approximately 1/4 inch thickness while removing as many seeds as possible and then placing the slices on the trays and moving them into the dehydrator preheated at 100 degrees F.
After about 24 hours the apples were ready and very delicious, these did not last wrong. Next came the strawberries which tasted ok, but were very difficult and basically not worth the time to attempt to wedge from tray and eventually gave up a through most of these away. This was followed by the watermelon which wasn’t quite as messy and tasted like semisweet candy with a light watermelon flavor which seems about right since watermelon does not have nearly as strong a flavor naturally as you would get in artificially sweetened gum or candy. Lastly were the banana chips which were good and were all eaten though for the long time required to dry I probably will opt to buy the non-fried version of these at the store.
Overall it was fun to make these but apples will probably be the only ones in a future rotation but looking forward to drying some garlic, onions, and herbs later this year.
Tags: cheap, garden seeds, garlic bulbs, herb garden, strawberry plants, vegetables
Drying peppermint leaves
14 years ago dehydrator, herbs, peppermint

Excited to try out my new to me food dehydrator, I collected some peppermint leaves from my 2 year old peppermint plants which is fighting the confirms of the 1 gallon pot I have used to keep it from consuming my entire flowerbed, lawn, house, etc.
For the best potency, it is best to collect mint right before they start to flower and first thing in the morning when their oils are at their peak. Given it is a couple months before they will be flowering I picked them in the early afternoon.
If they were dirty you should wash them off and pat them dry with a paper towel and add directly to your dehydrator. In my case we had a rain the night before and they were very clean so I skipped the washing step.
Next I simply put them into the dehydrator at 100F degree and in a few hours later they were all crumbly and looked like what you see below.

To store the leaves I went with the poor man’s vacuum packing technique…Ziploc bag and sucking the air out with a straw which should keep the herbs fresh for a few months.

Lastly I tried out the product by taking a pinch of the leaves and quickly breaking them up with my fingers and added them to a tea strainer.

After a few minutes of steeping I had some good looking and tasting peppermint tea.

I would say my testing of my new dehydrator was a success…now off to see what else in the fridge I can dry out.
Tags: cheap, garden seeds, herb garden, outdoor plants, pepper plants, peppermint plant, vegetables


