Search Results

Cost of Hydroponic Nutrients

The first time you walk into a hydroponic store there can be a little sticker shock.  At first it doesn’t look too bad, $14 for this bottle…oh wait I have to buy these three as well and you leave the store paying $80 to grow some basil and lettuce.  Being cheap I like to know how much I will be spending on a hobby before I start out so I did a little exercise.

I took a look at the major nutrient manufacturers and determined using their recommended feeding schedule what it would cost per gallon to complete a 4 week vegetation cycle and a 8 week vegetable and bloom cycle.

To be fair I only included products that provided the primary/secondary macronutrients and micronutrients.  Though I am not discounting the effectiveness of various supplements that these companies provide and I wanted to stick with the basics and have a close to an apples to apples comparison as possible.

  Avg, Price Size Nutrients Used
over 4 weeks (Veg Only)
Cost per Gallon of mixed nutrients Nutrients Used
over 8 weeks (Veg/Bloom)
Cost per Gallon of mixed nutrients
General Hydroponics       $ 1.08 $ 2.80
   FloraGrow $ 12.50 qt 8.08 tsp $ 0.53 12.12 tsp $ 0.79
   FloraBloom $ 12.50 qt 2.02 tsp $ 0.13 14.14 tsp $ 0.92
   FloraMicro $ 15.95 qt 5.05 tsp $ 0.42 13.13 tsp $ 1.09
Dutch Nutrient Formula       $ 0.82 $ 2.30
   Advance Grow A $ 7.50 L 11 tsp $ 0.41 11 tsp $ 0.41
   Advance Grow B $ 7.50 L 11 tsp $ 0.41 11 tsp $ 0.41
   Advance Flower A $ 7.50 L 0 tsp $ – 20 tsp $ 0.74
   Advance Flower B $ 7.50 L 0 tsp $ – 20 tsp $ 0.74
Dyna-Gro       $ 0.66 $ 2.03
   Liquid Grow $ 15.00 qt 3.5 tsp $ 0.27 3.5 tsp $ 0.27
   Liquid Bloom $ 18.95 qt 0 tsp $ – 7 tsp $ 0.69
   Mag-Pro $ 17.95 qt 0.875 tsp $ 0.08 3.875 tsp $ 0.36
   Pro-TeKt $ 13.90 qt 4.25 tsp $ 0.31 9.75 tsp $ 0.71


At first glance these numbers look pretty promising, until you remember the fact that this is the cost per gallon.  So if you had a 40 gallon reservoir this can make your cost obvious jump up significantly.  Fortunately in my case I only fill my tank up to 9 gallons so a 4 week cycle would cost me on average $7.68 for a 4 week vegetative cycle or $21.39 for a 8 week vegetative and bloom cycle.

Now given I am planning on growing some legal herbs in my hydroponic system (basil/oregano/cilantro) and maybe a little lettuce.  This would result in some pretty expensive produce.  For this reason and that fact I love chemistry and don’t get to play with it much these days I am planning on going for the less expensive homemade nutrient route, which I will provide more details once I get some more conclusive results of success or failure…

Homemade waterproof digital thermometer

057

Now I am playing with hydroponics in my grow box I want to monitor the temperature of my nutrient tank.  This is important too hot it can bread disease too cold it can shock your plants.  I also want to use the data to identify how ebb/flow cycles affect ambient and solution temperature (for my own nerd curiosity)

I have been thoroughly impressed with the Dallas DS18S20 temperature sensor so decided this would be a great component to use for this project and this is how you can make your own.

Materials:

  • DS18S20 temperature sensor
  • 1/2 inch plastic tubing (could go smaller but had some lying around)
  • Aquarium/food grade silicone
  • 18 gauge solid core wire (long enough to get from arduino to what you want to measure)
  • Glue gun with glue
  • Soldering iron with solder


Construction

Step 1: Solder the two wires to pins 1 and 2 of the DS18S20 and apply a little dab of hot glue to all of the exposed metal.  This is not entirely necessary but a small safety precaution so you don’t discover you shorted the connection during assembly.

image

052

Step 2: Cut approximately 1 inch length of plastic tubing using a utility knife

Step 3: Apply liberal amount of silicone to one end of the tubing cut in step 2.

053

Step 4: Allow silicone to set for 15 minutes and do a visual inspection for leaks. You may also try blowing very gently into the tube to check for leaks, though not too hard to create a hole in the process.

055

Step 5: Attach the DS18S20 to the tube using a drop of hot glue.  This is not entirely necessary but when trying to get a perfect watertight seal the less moving parts the better.

056

Step 6: Again apply a liberal amount of silicone to seal the top paying special attention to the area around the wires

058

Step 7: Give the silicone at least 24 hours to completely set.

Step 8: Testing.  First off the sensor may be buoyant, if this is the case carefully attach a 1/2 hose clamp or something else to help tether it down.  Next suspend in a glass of water (preferably clear) and watch for a few minutes for leaks and or bubbles. If you see bubbles try to get an much water as you can out and apply a more silicone and let set for another 24 hours

Hooking it up

This part is pretty straightforward.  Pin 1 is your ground and pin 2 is your DQ which for most people doesn’t make much sense but it is a combination power source and bus output.  To get this to work you hook up your ground (black wire) to your ground on your arduino and the red wire to digital in and 5v with 4.7K resistor between.  Sure that is very confusing so hopefully the breadboard visual below is much more helpful.

image

Writing the Code

Since I am planning on using this with my grow box controller, I will show how to use this with arduino to get some numbers.  You could look at my arduino code in the grow box controller post to get the values but in my case I need to get values from two DS18S20 temperature sensors so I found a great OneWire library which helps make your arduino code very simply.  Simple extract the two folders in the zip archive to [ArduinoPath]\hardware\libraries and enter the following code into the arduino UI:

#include <OneWire.h> #include <DallasTemperature.h> 
OneWire oneWire(8); // on pin 8 DallasTemperature sensors(&oneWire);

void setup()
{  
  Serial.begin(9600);
  // Initialize sensors
  sensors.begin();
}

void loop()
{
    sensors.requestTemperatures();
    Serial.print(“Sensor #0: “);    
    Serial.println(sensors.getTempCByIndex(0));

    Serial.print(“Sensor #1: “);
    Serial.println(sensors.getTempCByIndex(1))

    delay(100);  // wait a little time
}
 

If all goes well you should see output similar to the following (values in Celsius):

 Sensor #0: 20.3
 Sensor #1: 30.4
 Sensor #0: 20.3
 Sensor #1: 30.4
 Sensor #0: 20.3
 Sensor #1: 30.4


For people like me who are used to Fahrenheit you can simply use the following equation to convert Celsius to Fahrenheit:
°F = °C  x  9/5 + 32

Though I am using this for my grow box controller there are many other uses you could use this for:

  • Aquarium temperature monitoring
  • Brewing temperature monitoring
  • Weather station
  • Soil thermometer

Building of an indoor computerized grow box

Before going into my latest version of the grow box, I think it would be good to go through the brief history of my computerized grow boxes.

Version 1: PC Grow Box

It all started with my daughter’s question for her science project “Why don’t strawberries grow during the wintertime?”  After some discussion she decided because it was too dark and too cold (pretty smart for a kindergartener)  To prove her hypothesis we created the original computer grow box.

IMG_8097

Now the only thing computerized about this one was the fact that it was made from an old PC case using a simple lamp timer hooked up to control the CFL lights and a incandescent to provide a little extra heat.  This system worked great the strawberry plant thrived and produced about a dozen berries and we had proven that yes you can grow strawberries during the wintertime.

IMG_8515

As with any iterative development process I did look at some of the shortcomings of this design and made some improvements.  Though this was the perfect size for this experiment when I started consider using this for starting some of my seedlings the plants quickly overgrew this small space.  The other problem was the ability to maintain ideal temperatures for growing.  As the ambient temperature rose in my garage so did the grow box (by plus 15F normally) so this became a maintenance issue trying to keep this in check.  This led to the next version.

Version 2: The True Computerized Growbox

GrowBoxController

This is where things started to get a little technical, my primary concern was temperature control.  This would allow me to create the perfect growing environment for my seedlings and plants by using a pretty simple software program, an arduino prototyping board for the electronics, and a few solid state relays I was able to achieve pretty consistent temperature in the grow box.

This design led to a couple of issues; first it worked great for seedlings but as the plants matured I ran out of room fast.  Second was temperature control, the CFL/incandescent combo was good at adding 10-15 degrees to the ambient temperature but when weather got very cold or hot there was not much that could be done to get the box out of these extremes.  These we the inspirations for the most recent build.

Version #3: The deluxe computerized grow box

002

Space: First off the new box is over 3 times bigger than its predecessor.  This allows ample space for plants to grow up and out as needed.  Specially the dimensions are 4 feet wide and tall with a depth of 2 feet.  It is constructed underneath my workbench which is supported from studs in the wall and 2”X2” posts as legs supporting the actual workbench.  The walls of the grow box is made from a single sheet of quarter inch plywood…I probably should have spend a couple extra dollars for half inch for a little more insulation but hey this is the Cheap Vegetable Gardener.  Speaking of insulation…there is none, I might rethinking this while growing peppers over the summer to save a little on heating costs but for now I don’t need it.

001

Lighting and Heating: Here are a couple more major improvements in this build. I have installed a 120 watt LED system from Advanced LED Lights and picked up a pair of 150 watt ceramic reptile heaters for $17 each on Amazon. Now for me this was a pretty big purchase but they were a steal provided they normally sell for $40 each at my local pet store. Between the very cool LEDs putting almost no heat and the heaters pumping out as much as I can need, this grow box is ready for any adverse weather that comes my way no matter what season.

008

Ventilation: I went simple with this high performance CPU fan dangling from a couple of wires…this is on my list to create a better install of this but hey I have a newborn at home give me a break =)

003

Watering: I really liked the bottom feeding system that I had in the old grow box but provided that now I have four separate trays to fill this makes things a little more complicated.  For the watering system material I chose to go with PVC pipe because it is easy to work with and is fairly inexpensive.  Another benefit is because I am using a low pressure system to pump the water in (low end pond pump) just making them hand tight is good enough to prevent leaks and allows me to make quick and easy modifications as needed.

IMG_4153

This was good when I made the misfortune of making the intake (see picture above) a little two low and accidentally created a syphon and if I wouldn’t happened to have been in the garage when it kicked on I would have had nearly my entire 5 gallon bucket of water on the floor of my garage.

006

The next problem was that water will simply flow out the first free flowing outlet, so to create a small amount of water pressure to ensure the trays were getting filled evenly I used a threaded 1/2” cap with an 1/8” hole in the middle to restrict the flow enough for even distribution.  The rest of the piping included a couple of elbows, 4 T-joints for each tray and an end cap to stop the flow of water at the end of the pipe.

Hardware: The PC I scraped together from spare parts and was showing an end in life was near, so I upgraded the 12 year old desktop with my 7 year old laptop.  Which added a little performance but also cleaned up the need for LCD display, keyboard, mouse.  As an added bonus this made the brains of grow box much more portable which allowed more evenings of troubleshooting in my living room versus cold garage.

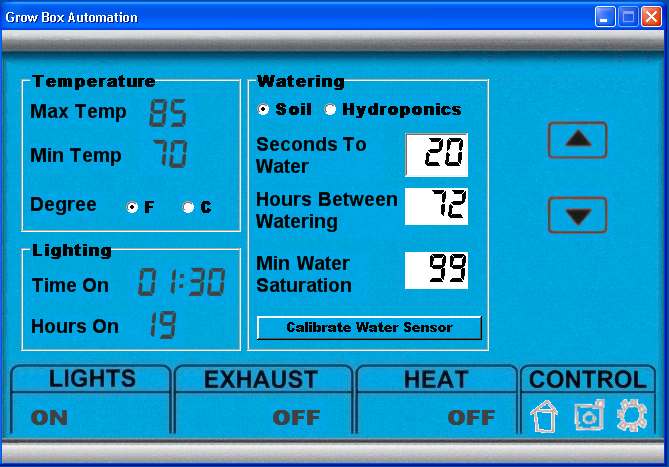
Software: This is an area where I will be the first to admit I went overboard on, but when you find something you are passionate about it is very easy to do.  Building upon the previous version of my software for the old grow box I made some cosmetic changes to give the UI a design that is similar to a thermostat.  I also included some temperature trending (up/down arrows next to the temperature) along with some basic (Min/Max/Avg) information for quick analysis for the climate of the grow box on that day.

image

To have easy access to see how the plants have been doing while I have been away I have the ability to view the current conditions inside the box but also to check on images taken in the past.

image

Finally we have the “Settings” screen which allows the ability to change optimum temperature range, lighting conditions, and watering configurations.  I also added an hydroponics mode which works on timed on/off cycles versus being based on moisture content in the soil.

GrowBoxControllerSettings

Lastly as I mentioned previously I have implemented Windows Phone 7 mobile support, which I am still limited to using on an emulator given Verizon taking their sweet time bring a model for to market for me to purchase…this provides a view into the grow box and also allows me to remotely turn on/off the controls watering, lighting, heating, and the fans within the grow box.

imageimage

004

Overall I couldn’t be more pleased with my current configuration and the plants are thriving in their closely monitored and controlled climate…now I just have to hope that the temperatures outside will fall into some reasonable ranges to they can thrive outside of this box.

Cheap desktop aquaponics system

WP_20140330_002

I wanted to create a fun project with my daughter and a proof of concept for an aquaponics setup to have running in my grow box.  For those of you new to this concept this is growing plants in a soilless environment (much like hydroponics) but instead of paying for expensive nutrients you use naturally occurring bacteria and fish poop to grow plants.

Now there are fish farm kits out there but given most of the parts for this build I had sitting idle in my garage I decided to construct my own.

First after a trip to IKEA I found some plastic tubs just the right size for my grow box.  I got two of the bins and one lid.

WP_20140315_010

This is the basic idea of how this goes together, fish in the bottom plants on top.

WP_20140315_006

Next I took a 1/4 inch drill and made several holes on both the bottom of the top tub and also through the lid.  I also added a few extra hole in the lid to ensure water can drain faster from the lid than the water coming in from above.  I also drilled a big enough to fit some 1/2 in plastic tubing from an old fountain pump I had lying around.

WP_20140330_003

It is a bit hard to see from this picture but I cut the top of a 2 liter bottle off and drilled a hole in the cap just big enough to fit the top of the plastic tubing through.  I then drilled six 1/4 holes and pushed a 6 small pieces of irragaction tubing (pieces of straws could probably work here as well) and positioned them right under the plants roots.

WP_20140330_005

I then filled the top tub 1/3 with aquarium gravel (washed pea gravel would work as well) that I had sitting the the garage and topped the rest with some clay pellets.

WP_20140330_001

Next add some plants and pour water from the top until the tub below is full, start the pump and add a few goldfish and the process begins.

WP_20140330_004 

As the fish breath, poop, and pee they will produce ammonia (NH4) this is pretty worthless to the plants but after a few weeks Nitrosomas bacteria will begin converting the ammonia (NH4) to Nitrates (NO2) which plants can absorb some of the nitrogen from but not very efficiently.  Finally Nitrospira bacteria will convert the Nitrates (NO2) to Nitrates (NO3) which is easily converted by the plants producing some nice vibrant greens with fish poop.

image

You can even do this whole process without even having fish by simply adding pure ammonia to you water which will create the same natural bacterial processes without having to remember to feed your fish and a small bottle of the stuff only costs a couple dollars on Amazon.


IKE