How to fertilize/side dress tomatoes/peppers in your garden
14.8 years ago alfalfa pellets, compost, fertilizer, peppers, tomato
When your fruiting plants are flowering and bearing fruit this is a good time to give them a little extra boost. Though you don’t want to throw any old fertilizer at them at this point. You want them to get the nutrients they need to produce high yields of produce, though you don’t want to shock them with an abundance of nitrogen to stimulate new vegetative growth when you would rather the plant expend its energy making you food.
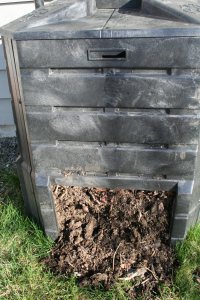
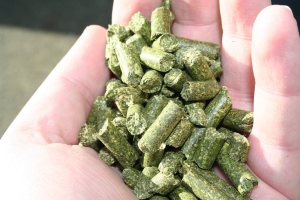
The solution to this problem is to provide your plants with a low dose of balanced fertilizer. I couple of my favorites are compost and alfalfa pellets applied every couple weeks while the plants are blooming/fruiting. This ensures the plants have all the nutrients they be lacking without throwing the plant into a growth spurt.
If you have a little extra time take the compost and add some water and let it sit in the sun for several hours and water or spray onto the foliage for a great dose of compost tea.
If you forgot to apply a little bone meal when you planted your peppers/tomatoes this is also a good time to sprinkle a handful under your plants and work into the couple inches of soil to provide your plants with a boost of phosphorous and also a little calcium to help prevent blossom end rot.
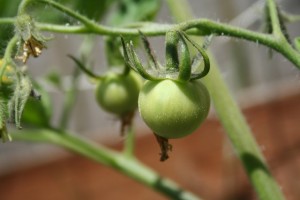
Hopefully with these tips you can help your green tomatoes turn into bright delicious red tomatoes.
If you want to learn more about the chemistry of organic fertilizers I have a whole post on that subject
Tags: alfalfa pellets, cheap, compost, organic vegetables, outdoor plants, pepper plants, tomato plants, vegetables
Chemistry of Gardening: What nutrients do plants need?
15.2 years ago alfalfa pellets, fertilizer, outdoor seed starting
 If I ask my four year old what it takes for a plant to grow she can quickly respond with response, “Sun, water, air, and soil” This is a great answer for photosynthesis since plants need energy from the sun. They leverage the carbon dioxide (CO2) from the air and water (H2O) to create starches and sugar. Now the soil part of this answer is where things get a little more complicated. Soil gives plants the ability for roots to expand and grow but also provides many nutrients to help them as well.
Similar to humans, plants need various minerals to live healthy lives. The primary macronutrients Nitrogen (N), Phosphorus (P), Potassium (K) are required to sustain life. These are the nutrients that plants consume significant amounts which is why these are advertised in big letters on the outside of packages of fertilizer.
MACRONUTRIENTS – PRIMARY
| Nutrients | Benefits | Signs of Deficiency | Sources (N-P-K) |
| Nitrogen (N) | Provides energy to allow vegetative growth. Leafy plants can’t get enough, root plants need very little, fruiting plants need plenty in beginning but too much later in growth cycle will result in big/tall fruitless plants. | Light green to yellow leaves; growth stunted | Bloodmeal (14-0-0) Alfalfa meal (7-3-4) Soybean meal (6-1-2) Cottonseed meal (6-2-2) Fish emulsion (5-2-2) Chicken Manure (3-4-3) Compost (1-1-1) Cow Manure (.2-.2-.2) |
| Phosphorus (P) | Makes plants more stress resistant, allows for fast growth, encourages bloom and root growth. | Red or Purple leaves; cell division slowed | Bonemeal (4-12-0) Chicken Manure (3-4-3) Alfalfa meal (7-3-4) Compost (1-1-1) |
| Potassium (K) | Helps with photosynthesis process, immunities to disease, and increased quality of fruit. | Vigor reduced; susceptible to disease; thin skin; small fruits | Alfalfa meal (7-3-4) Greensand (0-0-3) Wood ash (0-1-3) Chicken Manure (3-4-3) Compost (1-1-1) |
We could live off a simple food like gummy bears for quite a while, but our quality life will decrease once we picked up scurvy and exhibit significant bone and muscle loss. The same idea goes for plants, they can live simply on the primary macronutrients but they will live poor and possibly fruitless (literally) lives. This is where the secondary nutrients come in. With the exception of Calcium, these are not consumed in nearly the volumes as the primary macronutrients though supplementation may be required.
MACRONUTRIENTS – SECONDARY
| Nutrients | Benefits | Signs of Deficiency | Sources |
| Calcium (Ca) |
Helps with cell wall structure imperative for strength of plants |
Growing points of plants damaged | Dolomitic limestone, gypsum, egg shells, antacids |
| Magnesium (Mg) | Required as part of the chlorophyll required for photosynthesis | Yield down; old leaves white or yellow | Epsom salt, Dolomitic limestone, organic material |
| Sulfur (S) | Required for to allow plants to create protein, enzymes, and vitamins. Helps with seed, root growth, and resistance to cold. | Light green to yellow leaves; growth stunted | Rainwater, gypsum |
Finally are the macronutrients, these are the nutrients that most of the time, as long as you are not growing with hydroponics. should exist in your soil and rarely need to be supplemented due to the small amounts that are consumed by plants, nevertheless are still very important for plant growth.
MICRONUTRIENTS
| Nutrients | Benefits | Signs of Deficiency | Sources |
| Boron (B) | Helps in production of sugar and carbohydrate s. Essential for seed and fruit development. |
Small leaves; heart rot (corkiness); multiple buds | Organic Matter and borax |
| Copper (Cu) | Helps in plant reproduction | Multiple buds; gum pockets | Copper sulfate, neutral copper |
| Chloride (Cl) | Helps with plant metabolism | None known | Tap water |
| Iron (Fe) | Helps in formation of chlorophyll | Yellow leaves; veins remain green | Iron sulfate, iron chelate |
| Manganese (Mn) | Helps in breakdown of carbohydrates and nitrogen | Leaves mottled with yellow and white; growth stunted | Manganese sulfate, compost |
| Molybdenum (Mo) | Helps in breakdown of nitrogen | Varied symptoms | Sodium molybdate, compost |
| Zinc (Zn) | Regulates growth and consumption of sugars by the plant | Small, thin, and yellow leaves, low yield | zinc oxide, zinc sulfate, zinc chelate |
Nutrient Deficiency Information from “The Vegetable Gardener’s Bible”
Now you are armed with plenty of information, though unfortunately you can not act on any of this without knowing the chemical composition of your soil. If you simply went by the signs of deficiency (for example yellow leaves) could be caused by one or many nutrient deficiencies. Fortunately you can get this information to act on by running a soil test on your soil. There are a couple options for this if you are simply concerned about primary macronutrients there are cheap DIY home tests, electronic testers, or you can send a sample to a soil lab to give primary/secondary macronutrient and micronutrient levels and recommendations to get your soil back on track. You may also want to check with your local municipal office they may have a cheaper/free option available to you.
Just remember, your perceived lack of a green thumb my have nothing to do with your ability but the chemistry of soil you are working with.
Tags: alfalfa pellets, cheap, compost, garden seeds, led, organic vegetables, outdoor plants, vegetables
Make your Garden/Lawn into a gigantic worm bin
16 years ago alfalfa pellets, vermicomposting, worms
My soil is consisted of a high percentage of clay, as a result I am required to aerate my lawn twice a year to avoid my soil getting too compacted. I am cheap so I purchased a $10 aerator from Home Depot which I walk around the lawn giving it a nice look of a goose bathroom until the next good rain or mowing. Of course nature has an answer which is the garden earthworm. As a finished limping behind my aerator I thought how can I get more earthworms to do some of this work for me, which brought me to the conclusion to turn my lawn and garden to a gigantic worm bin.
As worms wiggle through the ground they break up the soil and provide pathways for water and air to flow and while they are at it drop their nutrient castings along their way. Now looking at my tips on how to care for a worm bin, the same principles apply to doing the same on a larger scale. Our course my wife and HOA would appreciate me just throwing our kitchen waste out in our front yard so I have to be a little more creative. For organic matter to feed the worms (and the lawn) I will be using alfalfa pellets and grass clippings (mulch) As for moisture, given I live in the Seattle, WA area our frequent rains take care of this until mid summer where short frequent watering will keep the grass and the worms happy. I will avoid chemical fertilizers, herbicides, and pesticides using organic options to control weeds and pests and occasional application of alfalfa pellets to fertilize the lawn.
At this time the results look good the lawn looks great and I have definitely seen an increased number of worms in my garden and yard. The birds have also noticed and are taking advantage of my increased population and taking care of some of the excess in my lawn (guess it is better than them eating my seeds planted in the garden)
Just as a warning like everything in life too much of anything is normally not a good idea which can apply to worms as well. Worms can move enough soil and leave piles of castings on the surface which can create a lumpy lawn, which as long as you don’t have a putting green for a lawn this will probably not be unsightly and on the next rain will give some extra nutrients to your soil/lawn. Given the current state of my soil I have quite a while until I am burdened with having too loamy soil and need to be concerned on how to drive the worms away.
Tags: alfalfa pellets, birds, cheap, compost, garden seeds, organic vegetables, outdoor plants, vegetables, worms
Speed Composting
16.1 years ago alfalfa pellets, compost

Unfortunately I have a small yard so my space to compost is limited so my goal is to make sure the most use out of the limited space I have. I am also impatient and don’t want to wait a couple years to finally get some compost. Here are some of my suggestions on how to be a speed composter.
Make stuff smaller: The small the you break up the material the faster it will decompose, instead of putting in those leaves freshly raked run over them with your lawn mower or take a few passes with your weed whacker. If you have kitchen waste chop or blend them to help the bacteria out.
Be selective about what you add: The basic idea if the material was alive at some point in its life it will decompose. That gives you a lot to choose from but if you want to speed compost you need to be a little selective about what you add. Lettuce, fruits, most vegetables (carrots take awhile unless you shred), leaves, grass clippings, shredded newspaper will decompose quickly. Items like small branches, vines though will compost over time I would recommend adding these to your yard waste bin.
Create a good environment: You want to create a healthy environment for microorganisms to be happy and reproduce. To thrive they need moisture and air so if you bin it should have the consistency of a wrung out sponge. If you find your bin is lacking moisture just add some while you mix it. This is definitely one of those situations where more is not better too much moisture and you will suffocate the microorganisms due to lack of oxygen. If you find your bin is too wet (usually will start to smell) simply mix (aerate) with an compost mixer or a pitch fork. If it is more of a muddy mess spread it out for a couple days and you should be back to having a microbial breading ground again.
Provide a good diet You want to provide your bin with a proper balance of nitrogen and carbon. The documented best ration is 30 to 1 (carbon to nitrogen) but I wouldn’t get too concerned about exact numbers just keep in mind a compost with just leaves or grass clippings will not be the most efficient way to get some compost into your garden. During certain parts of the season you will find that some nitrogen or carbon materials are harder to come by. For example in the fall you will have all kinds of leaves but your lawn and garden will be baron with greens, while being just the opposite in the summer where you will have a lot of nitrogen rich materials and no carbon. This is an opportunity to supplements your compost by adding nitrogen (alfalfa pellets, blood meal) during the fall/winter and adding carbon (newspaper, sawdust) during the spring/summer time.
Follow these tips and you should have great compost at record speeds.
Tags: alfalfa pellets, cheap, compost, vegetables
Using alfalfa pellets as cheap organic fertilizer for your lawn and garden
16.2 years ago alfalfa pellets, cheap, fertilizer, organic
We all know if you walk into a grocery store the organic produce is always more expensive than produce grown using non-organic methods. Using deductive reasoning it seems easy to determine that this would mean growing vegetables organically will cost me more than if I used non-organic methods. What is a cheap vegetable gardener to do?
One disadvantage (and advantage) to organic fertilizer is that it is not as potent as chemical fertilizers. So my 2 lbs of organic will not nearly go as far (at least short term) as the same amount of chemical fertilizer. One trick to being cheap is to purchase products that are not being marketed for your planned purpose. So to solve my expensive fertilizer issue I used this same logic to solve the problem of finding a location to buy organic fertilizer that was not marketed as “fertilizer.” After some research I determined a source from my local feed store. For $10 I was able to get 25 lbs of alfalfa pellets compared to 2 lbs of alfalfa meal at my local nursery for around the same price.
One great thing about using organic fertilizer is my kids can help spread it around, unlike chemical fertilizers. It also contains triacontanol which is a root growth stimulant along with plenty of organic matter to help boost some extra microbial activity. This not only helps the grass but also improves your soil at the same time. By taking a few cups of alfalfa pellets and mixing with water you can also make alfalfa tea, which I am planning on doing later but will sure to let you know how it works out. One more tip, make sure you distribute the alfalfa pellets before a big rain or watering, currently my lawn looks like some geese are using it as their bathroom.
Tags: alfalfa pellets, cheap, organic vegetables, vegetables


