LED Christmas light grow box
15.3 years ago cheap, cucumbers, indoor growbox, indoor seed starting, LEDs, wondersoil
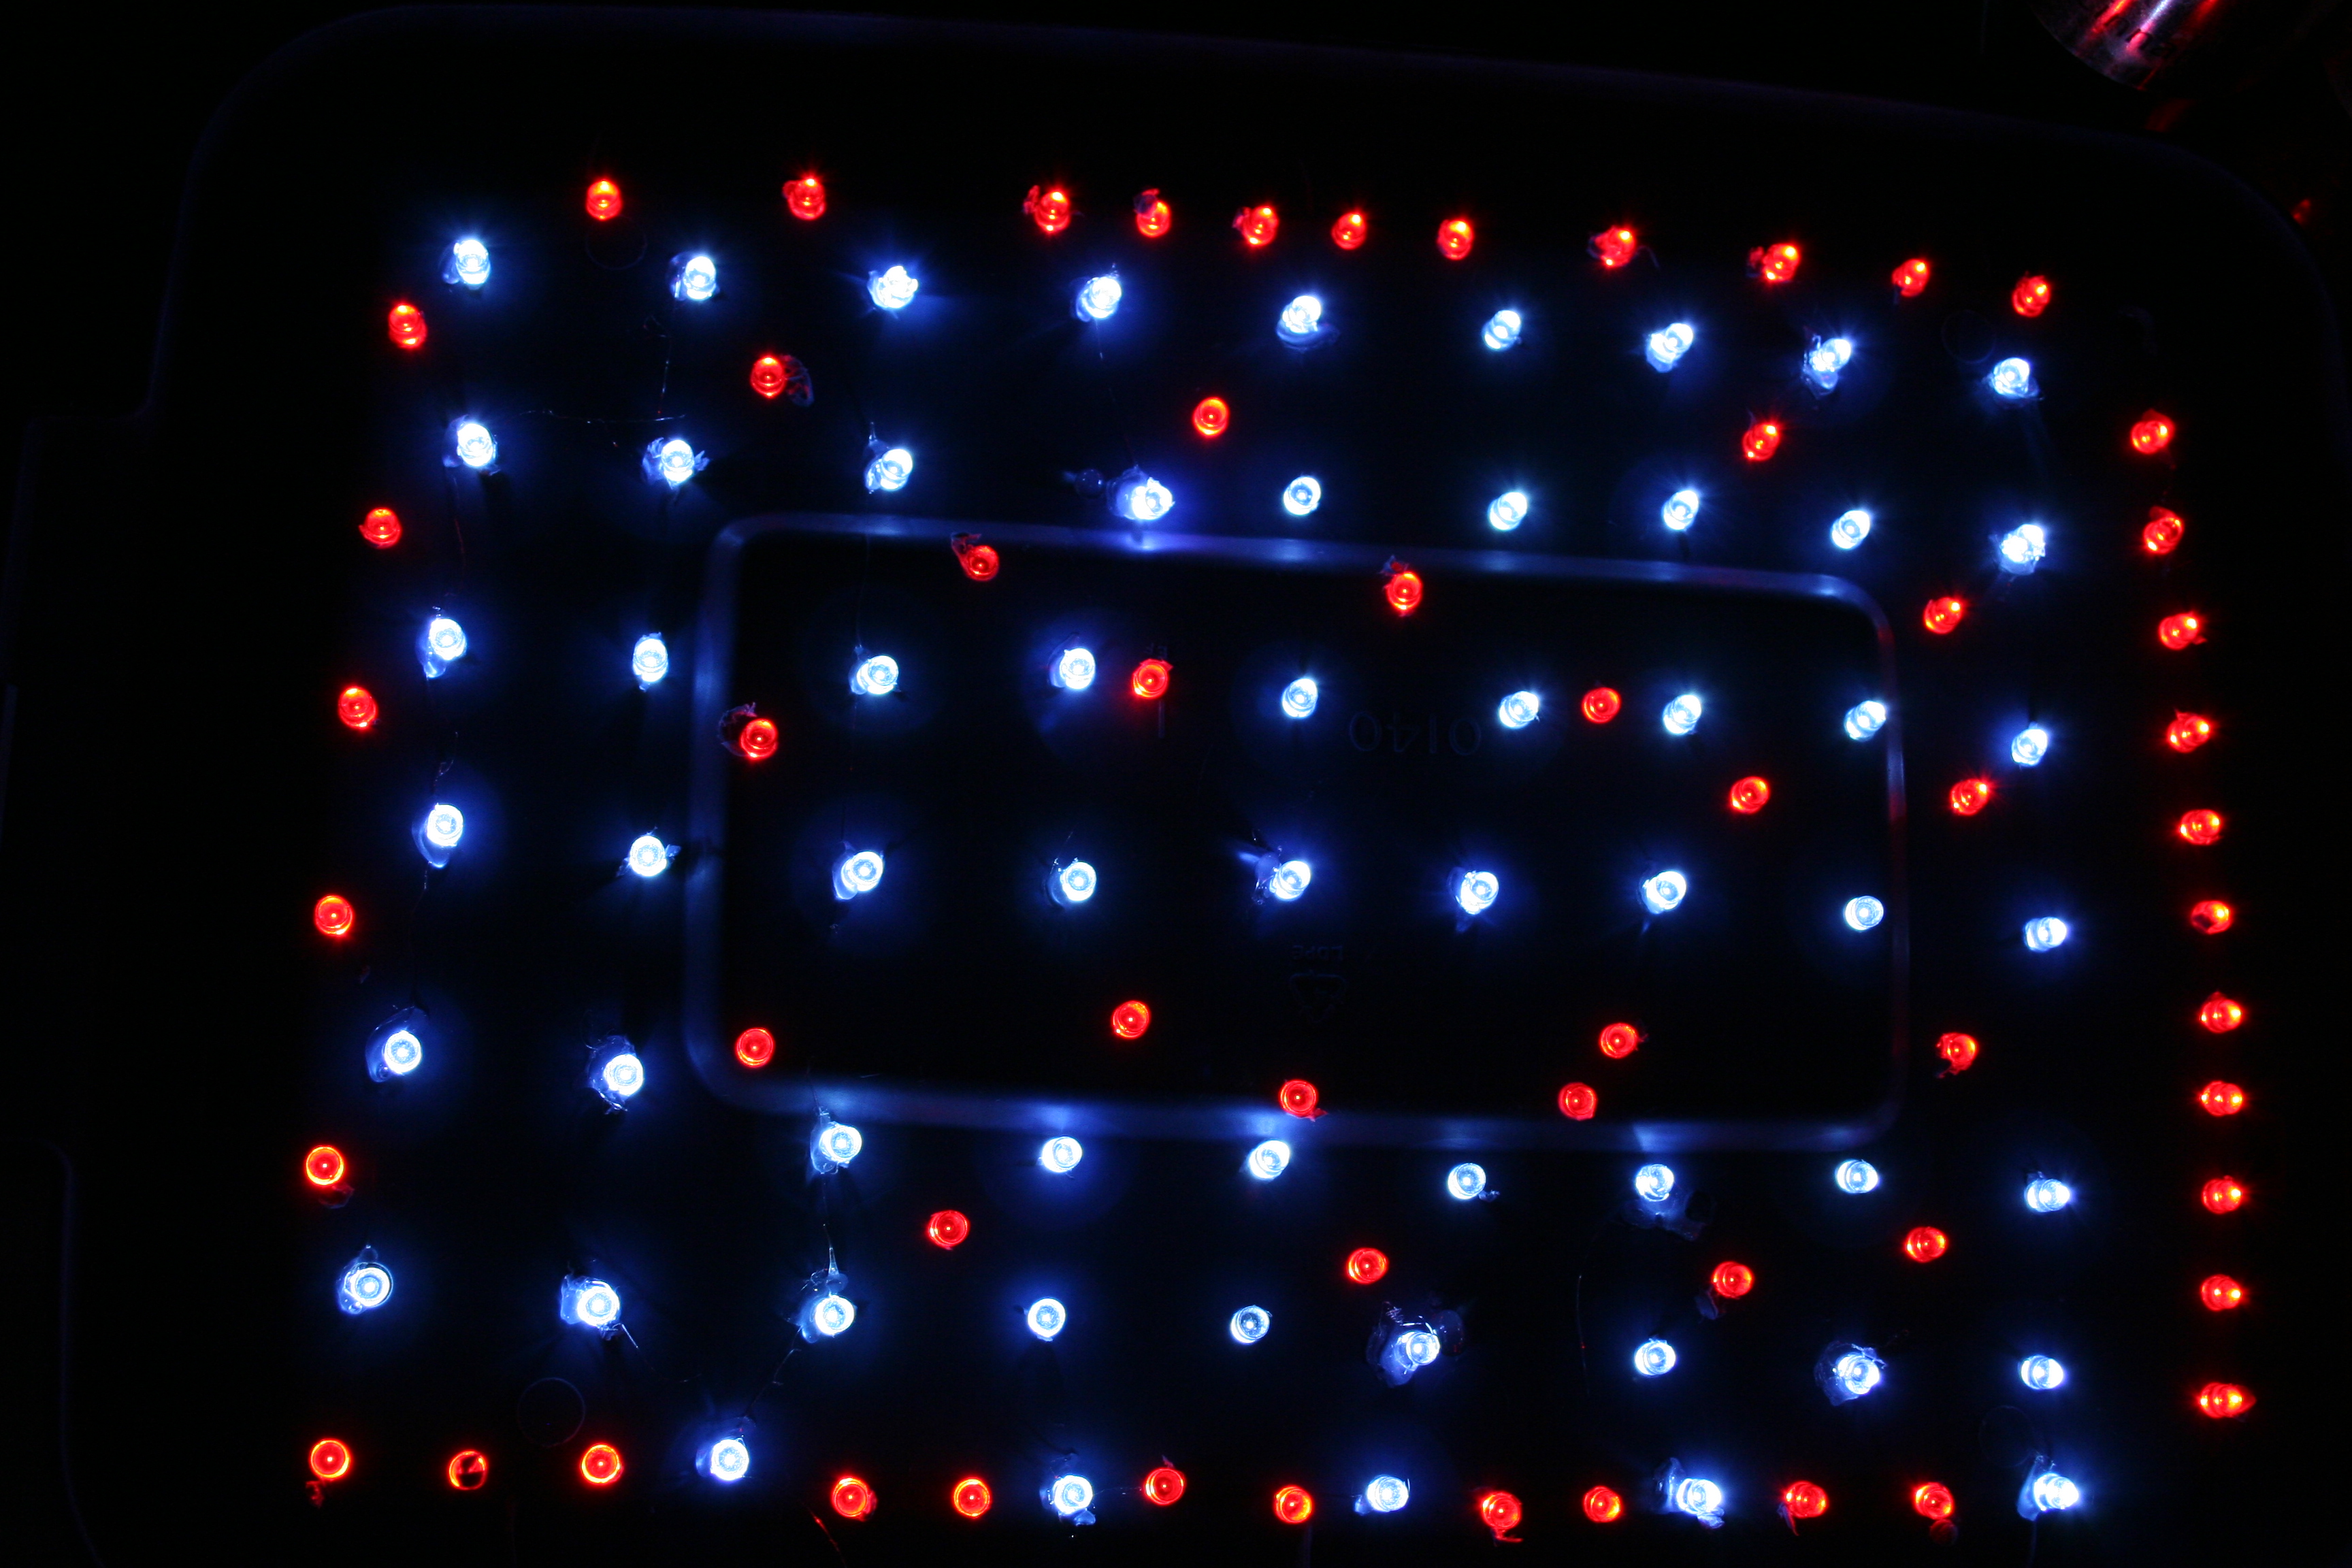
I noticed some of my daisies were getting a little leggy so added 60 more LEDs (red) to my LED grow box. This time I was a little less calculated about positioning but still fee like I got a decent pattern going. I also decreased the drill size and didn’t even need to use the hot glue gun.
As you can see from the pictures below the plants (cucumbers, onions, cilantro, purple coneflowers) have a dark green complexion and are less leggy compared to the results I would get from my window sill. The cucumber plants after two weeks have grown up enough to move into the LEDs grow box’s big brother.


Tags: cheap, cilantro, growbox, led, outdoor plants, vegetables
Christmas light LED grow box – Update #1
15.4 years ago indoor growbox, indoor seed starting, LEDs, wondersoil

I have been pretty impressed with the results of the Christmas lights LED grow box so far. I did have some preconceptions that I may need to double the lights or upgrade the LEDs, but so far the plants look healthy without white leggy stems, though still need to wait until the true leaves come in. As you can see in the picture above I have quite a selection of pots reused from previous years. The one exception are the newspaper pots which I discovered last year and am definitely a fan of. You can also see from the gross white stuff that my grow box probably could use a fan or at least prop a corner open.
Here is a picture of one of the cucumber plants up close.

My experiment is being conducted in the LED grow box so for its update, looks like is in the lead but hard to say with just germination occurring.

UPDATES:
Christmas light LED grow box – Update #2
Tags: cheap, grow lights, growbox, led, outdoor plants, vegetables
Cheap grow box with LED Christmas lights
15.4 years ago indoor growbox, LEDs, seed saving

I have one major problem last year with growing seedlings, running out of space. I grow many different types of plants with various germination/growth rates and varied start dates. This forces me to make sacrifices for placement of my movable light and eventually forced to move some plants outside earlier than I should. The light needs to be close to the newly emerging seedlings, but can’t be burning the more mature plants growing into it. My solution to this problem is a LED storage container grow box. With this I will have a portable seeding area and since LEDs practically emit no heat the plants can literally touch the lights without problems. At that time I move them to a larger grow box where it can continue to grow and start more seedlings. I thought about creating my own LED matrix and buy individual LEDs and solder them together, but that sounded like a lot of tedious work and soldering, which I most likely would mess up. Given it was after Christmas and LED lights were really cheap, this seemed like a good possible solution.
Materials cheap grow box with LED lights:
- 3 gallon Rubbermaid tub
- 1 string white or blue LED Christmas lights (50% off after Christmas)
- Drill with (1/4 in drill bit)
- Hot glue gun (may be optional)
Take a look at the number of lights on your string (mine had 60) then by measuring your tub figure out how you want to create your matrix. Best to double check your measurements as you can see below I miscounted and only planned out 55 holes which I improvised and added 5 more after the fact. You can also combine multiple strings if you want, given the low wattage you can string dozens of these together if you really wanted.

Drill holes that will provide tight friction fit to the tub, for my lights this was 1/4 inch drill bit but for yours this may be more or less, I would recommend starting smaller and increase until you find just the right fit. Once you have all your holes drilled fit each of the LEDs into the holes you drilled some of the connections between the bulbs will have a solid section in between (resistor) so depending on the spacing might be best to make this one diagonal of the previous light to make it not as tight a fit. If you have some lights that just won’t stay in, apply a small dab of hot glue between the bulb and the lid. This may diffuse the light a little but very little intensity at the base so light loss should be minimal.
Last plug it in and check out your cheap LED light. You may want to shake it upside a couple times and find any loose lights while your glue gun is still hot.

Now some of your might be thinking (including myself) are these lights intense enough to allow adequate vegetative growth? I did take a look at the LED matrix with my homemade spectrograph and it did show a high intensity of blue wavelength with minimal on red and orange/yellow/green so for this small space it may just work. I am going to test it out on some guinea pig plants now and if I start seeing tall spindly growth I can easily switch out the current while LEDs with some ultra bright blue LEDs by simply pulling out the socket, swap out old LED (save some other project), replace with new LED, trim excess terminal wire, and push back into the socket. Below is my proof of concept for this as long as the voltage/amperage is the same the circuit will continue to work, below is my proof of concept.

I also purchased a couple of red LED Christmas lights for plant flowering stage but have a couple months before I need to pull those out.
For build cost, this small storage container costs less then $2.00 and with the 50% off sale on Christmas lights at $3.00 I have a cheap grow box with full LED grow lighting for just $5.00 and about 15 minutes of assembly.
UPDATES:
Christmas light LED grow box – Update #1
Christmas light LED grow box – Update #2
Tags: cheap, garden seeds, grow lights, growbox, led, outdoor plants, vegetables
Effects of color spectrums on plant growth
15.4 years ago indoor growbox, LEDs, spectograph
I have written about the importance of lumens when growing indoors but the intensity of the light at specific wavelengths can be over even more important. NASA has done some significant research on the subject to determine the possibility of growing leafy vegetables on a trip to Mars using as little electricity as possible to get the most benefit out of every watt. In space any wasted energy (heat or light not used by plant growth needs to be severely limited.
It should not be a surprise that using LEDs is part of the solution they came up with since they use 20-30% of the energy of a comparable HPS (High Pressure Sodium) bulb which is considered very efficient given the lumen output per watt. The most interesting part of their findings was how specific red and blue wavelengths were imperative to the growth of plants and actually could sustain growth with just these limited wavelengths. Given the freezing temperatures and masses of snow on the ground the best use of this information for indoor gardening and specifically my $20 PC Grow Box. Understanding the wavelengths that your artificial lights creates can help you have increased plant growth and save on your electricity bill at the same time.
When evaluating which light you must consider wavelength and also the intensity of the light at that wavelength. A tool to do exactly this is a spectrograph, which you can purchase, make your own (this was a fun project with the kids), or just trust other peoples readings. I chose made my own, but am displaying results (led museum) since I would have to estimate the intensity based on the brightness of the spectrum created which would lack some accuracy.
Just to get some perspective, this is what how various light sources appear to a spectrograph:
| Sunlight | 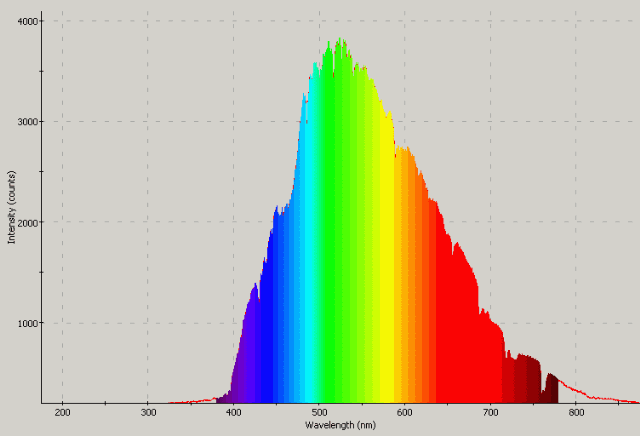 |
| Florescent Bulb | 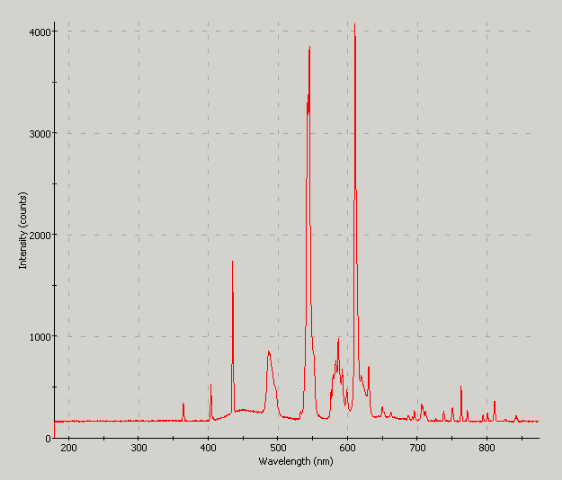 |
| Incandescent bulb | 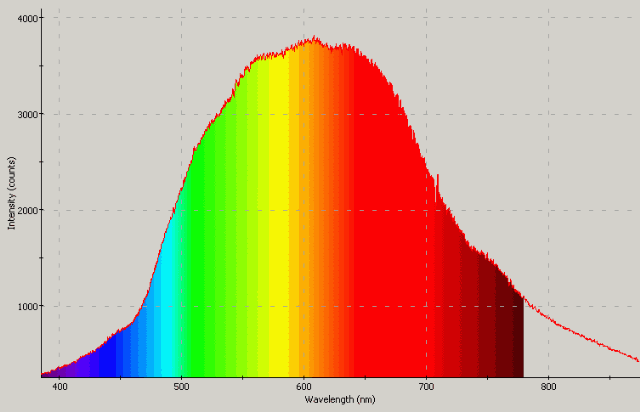 |
| Low power blue LED (5mm) | 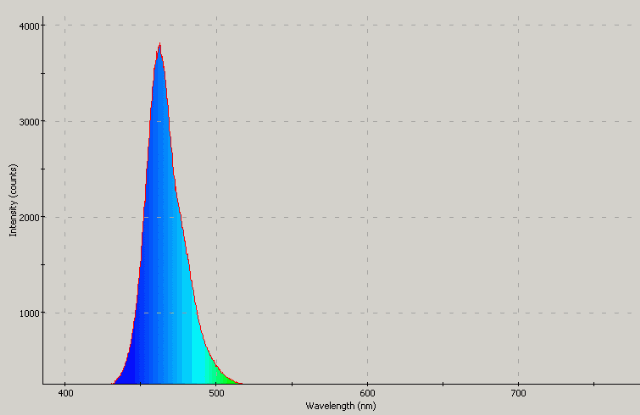 |
| Low power red LED (5mm) | 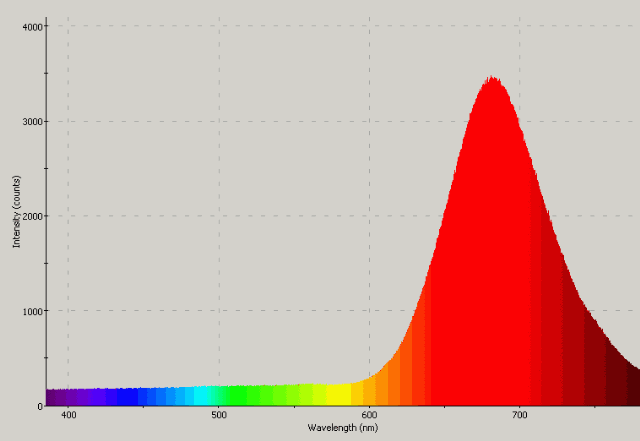 |
| Low power white LED | 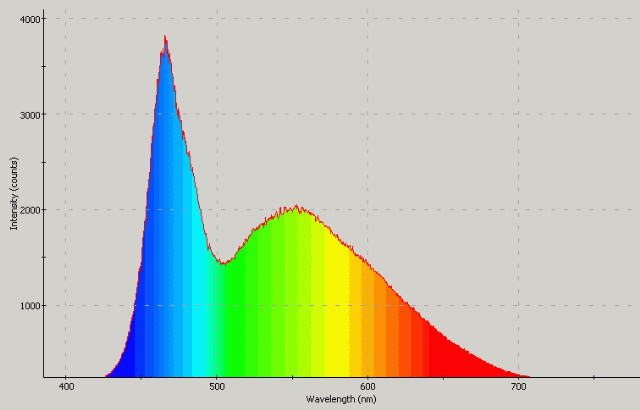 |
As you can see incandescent appears to be the closest to matching the wavelengths and intensities of sunlight though it we need to remember that the orange/yellow/green wavelengths provide essentially are wasted from the plant’s perspective due to natural reflection of these colors. So if a light looks bright to you, there is a good chance you are wasting electricity, as humans our eyes respond well to these wavelengths why we will find these bulbs to be much “brighter” from our perspective. The fluorescent bulb is a good example where we see this light as bright for plants other than the small slices spectrum much of the light is unusable. I have had good luck growing indoors with CFLs along with incandescent, but from the information above I my results cold have less spectacular if hadn’t included the incandescent bulb. At the time the only reason I used it was to generate a little extra heat on some of the cold nights.
The key point is I could easily have much better results using significantly less power. According to NASA’s research the most efficient configuration is to only have red/blue LEDs consisting primarily of red (80-85%) with the remaining (15-20%) being blue LEDs. I would recommend replacing the some of the of the blue LEDs with white LEDs to provide a full spectrum including a pretty intensive blue spectrum in itself. As an added bonus this will provide some “human” light in orange/yellow/green spectrum to allow us humans to view plants with less strain.
By replacing the two 24 watt CFL and one 80 watt incandescent bulb with a few hundred LEDs I could drop at least 124 watts with my new configuration. Assuming I am running my grow box every day for 14 hours a day this could save me over $45 a year as well as just being the more environmentally conscious thing to do.
So during these cold winter months if you grow indoors whether just for seedlings or vegetables all year round be sure to remember that not all indoor lights are created equal.
Tags: cheap, garden seeds, grow lights, growbox, led, outdoor plants, vegetables


