Getting some great deals on gardening supplies
13.6 years ago cheap, jalapeno, peppers, strawberries, upside down planter

With stores making way for Halloween and Christmas decorations, now is the perfect time to find some great closeout deals at your local grocery store or garden center. I had meant to imitate the Topsy Turvy planters above, but at 60-70% off I was not even cheap enough to pass up on these deals for the Topsy Turvy Strawberry Planter (picked up two at $1.99 each) and the Topsy Turvy Hot Pepper Planter
(picked up one for $4.99)

Given my desire to grow even more peppers next year the pepper planter will work great to try out a few new plants.

And no, there was nothing wrong with camera on the picture above that’s what the boxes actually look like. I combination of too much sun and then getting heavily rained on over the past couple weeks led to an even bigger discount. Hoping to fill these with the strawberry runners that are trying to escape their garden bed.
So head down to your local garden center and check out those items you have thought about but never pulled the trigger, you just might find a deal you are glad you did not miss out one.
If you found any good deals, I would love to hear about it in the comments…
Making homemade strawberry syrup
13.7 years ago recipe, strawberries

Though not the best summer for tomatoes, our mild summer has been great for strawberries. Until recently I was picking about a pint a day from our modest “strawberry patch” Many became a quick snack, smoothies, and others got frozen for consumption this summer.
This morning the kids wanted something special for breakfast so decided on making some homemade strawberry syrup.

Homemade Strawberry Syrup
Ingredients:
- 2 cups sliced strawberries
- 3/4 cup sugar
- 1.5 tablespoons lemon juice
- 1/2 teaspoon orange zest
Directions:
Combine all ingredients into a small saucepan and bring to a boil. Lower heat and simmer to allow the syrup to thicken and reduce to about one half by volume (15 — 20 minutes)
Remove from heat and allow to cool to room temperature before serving

This is great of pancakes/waffles but my daughters also enjoyed this on vanilla ice cream. With my oldest daughters loves of sugar and strawberries she asked if she could eat it by itself, which I had to say no too…
Tags: strawberry
Why are strawberries called strawberries?
13.8 years ago strawberries

The common theory is that the origin of the word “strawberry” is based on the practice growing the plants with a layer of straw mulch to help retain moisture, deter pests, and keep the berries cleaner for picking. There is also a thought that they were simply packaged in straw when being brought to market.
There is one problem with this theory which in this article from Snopes sums up very nicely:
The word ‘strawberry’ has been part of the English language for at least a thousand years, well before strawberries were cultivated as garden or farm edibles. They grew in the wild of their own accord, their berries gathered by folks who happened across strawberry patches. Therefore, although the word’s precise origin cannot be determined, we can certainly throw out any etymology dependent upon the plant’s being bedded in straw to protect it from the cold or keep its berries clean. Even if such practices had been used, they would have begun long after the fruit had been given its current name.
So where did the name ‘strawberry’ come from then? There are a couple more theories based on the meaning of the word “straw”
One explanation hinges on a particular meaning of “straw” a particle of straw, chaff, or mote describing the appearance of the achenes (tiny yellow seeds) scattered over the surface of the berry. Another view says it comes from “stray” or “strew,” designating the spread of the plant’s runners (slender tendrils), in that in an unchecked field of strawberries the plants appear to have been strewn across the ground with their runners straying everywhere.
In the end I guess we really do not know for sure where they got their name, so any other theories out there?
Tags: strawberry
How to freeze strawberries
13.9 years ago freezing, strawberries

One thing I realized halfway through the winter was that I did not nearly save enough berries to make it through. With local strawberries showing up in my garden and in the farmers market this seemed like a perfect time to get an early start this year.
Freezing strawberries is much like freezing other berries strawberries are just as easy with just a few simple steps:
1. Quickly wash and gently dry strawberries with a towel
2. Cut of crowns (optional but much easier to do now than when frozen)
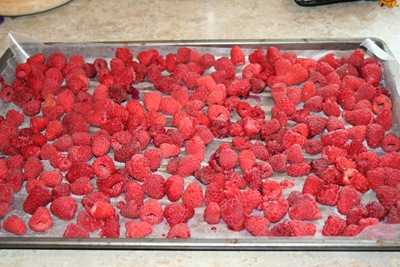
3. Place strawberries upside-down on wax paper on cookie sheet

4. Put strawberries in freezer for 24 hours

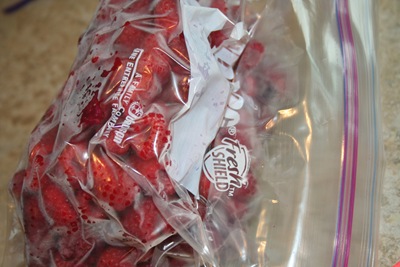
5. Dump frozen strawberries into freezer bag and use Poor Man’s Vacuum Pack*

With these simple steps you can have plenty of strawberries for making smoothies or strawberry shortcake this summer/winter. This process can scale from many flats of berries or just a handful extra from your garden. Eat what you want fresh, freeze the rest.
- * Poor Man’s Vacuum Pack: Close ZipLoc bag with only enough space to fit in a drinking straw. Suck out air with drinking straw and quickly close the bag.
Tags: preserving, strawberry plant
More Fun with Food Dehydrator
14 years ago dehydrator, herbs, strawberries
I decided to be adventurous with the food dehydrator and grabbed some stuff from the refrigerator to make some nice nutritional snacks.

I started with some strawberries, the process is very simple, take some strawberries slice about 1/4 inch thick and place on the tray.

Next I moved on to apples which I soaked in a solution of lemon juice (about 1/4 cup) with 1 cup of water. To add a little extra sweetness I also dumped in a packet of artificial sweetener to reduce the sourness from lemon. After letting the apples soak in this solution for about 3 minutes I added them to the tray.

After slicing bananas about 1/4 inch thick I also soaked these in the same lemonade bath I did for the apples for 3 minutes as well.

Finally I spliced some watermelon at the same approximately 1/4 inch thickness while removing as many seeds as possible and then placing the slices on the trays and moving them into the dehydrator preheated at 100 degrees F.
After about 24 hours the apples were ready and very delicious, these did not last wrong. Next came the strawberries which tasted ok, but were very difficult and basically not worth the time to attempt to wedge from tray and eventually gave up a through most of these away. This was followed by the watermelon which wasn’t quite as messy and tasted like semisweet candy with a light watermelon flavor which seems about right since watermelon does not have nearly as strong a flavor naturally as you would get in artificially sweetened gum or candy. Lastly were the banana chips which were good and were all eaten though for the long time required to dry I probably will opt to buy the non-fried version of these at the store.
Overall it was fun to make these but apples will probably be the only ones in a future rotation but looking forward to drying some garlic, onions, and herbs later this year.
Tags: cheap, garden seeds, garlic bulbs, herb garden, strawberry plants, vegetables
How to freeze berries
14.8 years ago blackberries, freezing, raspberries, strawberries

A well proven way to save money on your food budget is to stock up on produce while they are in season. Not only do they taste better but they also can be significantly cheaper. Now these “purchases” can be from your local grocery store, U-Pick farm, fruit stand, farmers market, free roadside berries, or even from your own garden.
Given the attractive prices of these fruits it may be tempting to buy more than you need. Which I would say go ahead and buy to your hearts content. After you have made all the jam you can eat in a year (don’t make 15 jars of jam when you only consume 4 per year) one effective and easy way to store your extra berries for winter is freezing.
For the impatient one you can simply dump the berries into a Tupperware or freezer bag and toss them in the freezer. Though in the end this will give a solid clump of berries which you would need to pull out an ice pick to separate the berries if you only require a few.
The more preferred technique is the following:
- Wash your berries: Give your berries a quick rinse and let them dry in a colander for about 10-15 minutes
- Spread your berries: Lay down some wax or parchment paper on a cookie sheet and spread your berries on a single layer just ensuring that the berries are not touching. If a couple touch it is not the end of the world they will just be close friends in the freezer.
- Freeze your berries: Carefully put the berries in the coldest part of your freezer overnight.
- Pack your berries for the winter: When it comes to freezer storage and fruit air is always the enemy. If you have a vacuum sealer that would be your best option but if you are like me and don’t here is a cheap alternative. Take a regular old Ziploc freezer bag and insert a straw on one end, close the bag as tight as possible around the straw, suck air until you get dizzy, and quickly seal the bag. Just to be extra cautious I will then throw that bag in another bag for an extra layer of protection. Note: You have a little time to complete this step but don’t want to allow enough time for your berries to begin to defrost and refreeze stuck together.

- Label the bag(s) and throw them in the freezer

Now to avoid getting too scientific (size/speed of water molecule formation) the faster you can get your berries frozen the better the quality your berries will be when you pull them out. If you have enough berries (or not enough cookie sheets) you can also add your berries and some broken up dry ice to a metal bowl (be sure to wear gloves) and stir to replace step 3. This will get you the fastest freeze and best quality though unless you are freezing many flats of berries I would recommend the cookie sheet method.
Following these steps you should have some tasty berries you can pull out individually from the freezer all winter long.
Tags: cheap, vegetables


