Search Results

My Tomato Planting Adventures

image

Tomato Plants are not known for being forgiving. They are not beginner plants. Tomatoes give seasoned gardeners nightmares. So why is it that I keep torturing myself by trying and trying to grow them?

Maybe I like a challenge.

Maybe I think that I’ll do better with a difficult crop, since my luck with “easy” plants is sporadic at best.

Maybe I really like Salsa.

Ok, so it’s mostly that last one. I like to do things for myself, and making salsa with my own tomatoes would be awesome.

Of course, my need to do everything for myself is part of my problem. When I first decided that I was going to take on tomatoes, I wanted to start from the very beginning, no pre-grown seedlings for me. I read up on how to grow my own seedlings and then I found the tip that was going to save me time, effort, and frustration.

I could direct-sow my seeds right in the garden as long as there was four months between frosts in my area! That was perfect! As soon as it started to get warm I would plant my seeds and I’d have tomatoes in no time.

So I spent the entire second weekend of March preparing my “garden” (an unearthed portion of my back yard). I had the hose system all prepared so I wouldn’t get water on the leaves or fruit; I’d read about those nasty black spots. I had chosen an area that had a decent sun/shade ratio, so I was happy with that. I had chosen the perfect tomato cages for when it was time to use them. I sat down Sunday night, exhausted, but with the taste of homemade salsa on my mind.

That Wednesday my heart broke because of frost. I swore I’d never enjoy snow again.

I looked at the weather report. I read gardening blogs. Looks like I had jumped the gun. Apparently Mother’s Day is a really popular day to plant tomatoes. Seedlings, of course, but supposedly it only took 5-6 weeks to grow seedlings. I still had plenty of time. But I wasn’t going to take a shortcut this time. I decided to pot them.

Two weeks later, I had managed to drown all of my newly planted tomato seeds. I was told by a friend that there was no way the seeds could survive the daily dousing I’d been giving them, so I didn’t end up living with false hope that I’d have tomatoes any time soon.

By this time, I was frustrated. I stayed home from work for two days and read everything I could about planting tomatoes. I was going to try this one more time.

I used a special seedling soil mix. I kept my plants in a warm, but dark area. I watered less often, but was sure that my seeds didn’t get dry.

They sprouted. I repotted them in a 6-pack, each plant in their own little home. I had a special spray bottle for my tomato plants. After germination, I had them in the light almost constantly, but not quite, after all, too much light was as harmful as not as much.

All that was in my head were facts about tomatoes. I coddled those poor plants, but they were making it. I fertilized them. I petted them so to “train” them to be strong. I may have talked to them a bit. I was getting ridiculous.

I of course had been depriving myself of salsa because I knew my own homemade salsa would be worth waiting for. I finally caved and made some from store-bought tomatoes. That moment (hour) of salsa-goodness reminded me why I was doing this, and I remembered to relax. After all, gardening is supposed to be good for you.

3 of my plants made it to my garden. 2 bore tomatoes. Many of those tomatoes were either spotted or devoured by bugs. But I did have one nice batch of salsa to show for all my hard work.

Since then, I’ve given in and bought seedlings. Some years I still start from seed. To my dismay, my second year yielded fewer tomatoes than my first. But then the third year was pretty good. I’ve learned lots of tricks, and I’ve turned my focus to other plants, but tomatoes have probably taught me more gardening lessons than any other vegetable. Most of all, they’ve taught me that I need to relax and have patience. I’ve also learned that the world doesn’t end when plants die, as sad and frustrating as it can be.

What gardening lessons have you learned?


Mackenzie Kupfer has been a lover of all things green since the age of six when she began gardening with her Nana. She is currently an online publisher for the tomato cage supplier, Avant Garden Decor. In her free time, Mackenzie enjoys attending garden shows, hiking, and collecting ceramic tea sets.
First seeds started: onions, leeks, purple cone flower

Cheap Vegetable Gardener 014

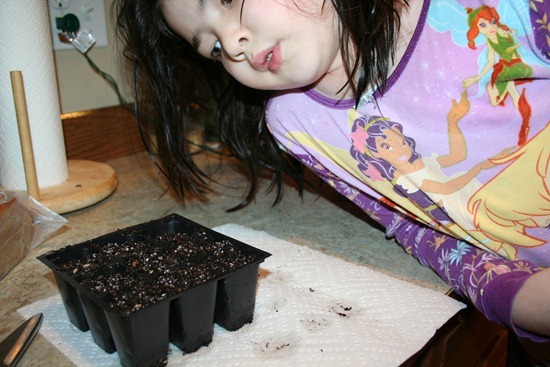
My youngest daughter has been patiently waiting all winter to plant some seeds (as have I)  Finally it was time in my area to start planting the “start 8-10 weeks before first frost” seeds.  Which for me included onions and leeks, though as I was picking up the leek seeds my daughter talked me into getting some purple coneflower seeds as well.

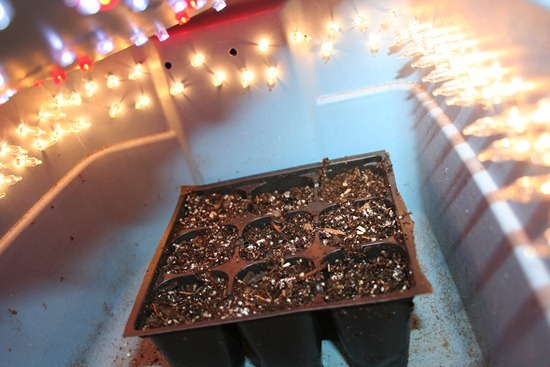
After carefully mixing my special blend of 3 parts normal potting mix with 1 part perlite we filled some trays, sprinkled on the seeds, applied some light pressure to ensure good contact, and placed them in my small Christmas light grow box

Cheap Vegetable Gardener 019

This provides me a small of convenient location to care for these seedlings until they are big enough to move into the computer grow box which if all goes well should be getting a slight makeover this weekend, which I should post about soon.

How to make your own cheap weather station

image

Though the prices for personal weather station have dramatically dropped (around $100) over the past few years, I decided to work on making my own. The primary measurement I wanted was temperature given this is the specific one that could be dramatically different from my neighbors (or neighborhood weather station) given the many unique microclimates your yard can have.

Step 1: Create an account and weather station at Weather Underground. This will allow you a place to view your weather station results as well as a permanent storage location for your data. After you have created your account it is really easy to create a weather station after clicking this link you just need to enter some basic information such as address and time zone click “Submit” and you have yourself a weather station. Now this is not very exciting unless data is being updated so we will look at this next.

image Step 2: Get some data. Hear is a point where you can go all out with every weather measurement sensor imaginable, though if this was your intent I would recommend saving some money and getting a personal weather station, but in my case all I really wanted to track was the outdoor temperature. To get this temperature I used a DirectTemp USB waterproof temperature probe from Quality Thermistor, Inc. All you need to do is plug this into an open USB port and with some simple serial communication you can start getting temperature results. This can easily be done using a language like C# with just a few lines of code:

SerialPort serialPort = new SerialPort(“COM5”, 9600); serialPort.Open(); serialPort.WriteLine(“2”); double responseValue = Convert.ToDouble(serialPort.ReadLine()); serialPort.Close();

You could also use something similar to my homemade waterproof digital thermometer and an arduino to get your outside temperature.

Step 3: Log your results. WeatherUnderground makes submitting data to them very easy. All that is required is a specially formatted query string request which you could do in any internet browser…though updating this manually every 5 minutes would be very tedious this is how can do this also using C#. All that is required is to replace the “ID” with your weather station created in Step 1 and your password used when you created your account.

string submitUrl = “http://weatherstation.wunderground.com/weatherstation/updateweatherstation.php?action=updateraw&ID=KWAREDMO38&PASSWORD=[password]&”; submitUrl += “dateutc=” + DateTime.UtcNow.ToString(“yyyy-MM-dd hh:mm:ss”) + “&”; submitUrl += “tempf=” + GetOutdoorTemp(); // Using code above WebClient webClient = new WebCLient(); webClient.DownloadString(submitUrl);

Now by calling the above code every 5 minutes using an infinite loop with some delay you can now log your temperature results and have current and historical data to have some better info to better guess your first/last frost dates or when it is safe to bring out your tender seedlings you are growing indoors.

Step 4 (optional): Leverage external weather data. As you may have noticed my weather station has more weather data than just temperature. I did this by leveraging (nicer word than stealing) some data from a weather station at a school in my neighborhood. Now this is not quite as accurate as if I was getting this information from my backyard…it is pretty safe to assume that the humidity, rain, and wind velocity and direction should be pretty much in the same ballpark. The process is pretty simple here where I extract this from a request to the external weather station and include these into my submission, which you can see in the code sample below.

   1: using System;

   2: using System.IO.Ports;

   3: using System.Xml;

   4: using System.Net;

   5:

   6: namespace WeatherStation

   7: {

   8:     class Program

   9:     {

  10:         private static WebClient webClient = new WebClient();

  11:

  12:         static void Main(string[] args)

  13:         {

  14:             while (true)

  15:             {

  16:                 SubmitWeatherInfo();

  17:

  18:                 System.Threading.Thread.Sleep(300000);

  19:             }

  20:         }

  21:

  22:         public static void SubmitWeatherInfo()

  23:         {

  24:                 string submitUrl = "http://weatherstation.wunderground.com/weatherstation/updateweatherstation.php?action=updateraw&ID=KWAREDMO38&PASSWORD=[password]&";

  25:                 submitUrl += "dateutc=" + DateTime.UtcNow.ToString("yyyy-MM-dd hh:mm:ss") + "&";

  26:                 submitUrl += "tempf=" + GetOutdoorTemp() + "&";

  27:                 submitUrl += GetExternalWeatherData();

  28:

  29:                 webClient.DownloadString(submitUrl);

  30:         }

  31:

  32:         private static double GetOutdoorTemp()

  33:         {

  34:             SerialPort serialPort = new SerialPort("COM5", 9600);

  35:             serialPort.Open();

  36:             serialPort.WriteLine("2");

  37:             double responseValue = Convert.ToDouble(serialPort.ReadLine());

  38:

  39:             serialPort.Close();

  40:

  41:             return CelsiusToFahrenheit(responseValue);

  42:         }

  43:

  44:         public static double CelsiusToFahrenheit(double temperatureCelsius)

  45:         {

  46:             return (temperatureCelsius * 9 / 5) + 32;

  47:         }

  48:

  49:

  50:         private static string GetExternalWeatherData()

  51:         {

  52:             string externalWeatherStation = "http://api.wunderground.com/weatherstation/WXCurrentObXML.asp?";

  53:             externalWeatherStation += "ID=[ExternalWeatherStationId]";

  54:

  55:             XmlDocument xmlDoc = new XmlDocument();

  56:             xmlDoc.LoadXml(webClient.DownloadString(externalWeatherStation));

  57:

  58:             string externalData = "&winddir=" + xmlDoc.SelectSingleNode("//wind_degrees").InnerText;

  59:             externalData += "&windspeedmph=" + xmlDoc.SelectSingleNode("//wind_mph").InnerText;

  60:             externalData += "&windgustmph=" + xmlDoc.SelectSingleNode("//wind_gust_mph").InnerText;

  61:             externalData += "&baromin=" + xmlDoc.SelectSingleNode("//pressure_in").InnerText;

  62:             externalData += "&humidity=" + xmlDoc.SelectSingleNode("//relative_humidity").InnerText;

  63:             externalData += "&dewptf=" + xmlDoc.SelectSingleNode("//dewpoint_f").InnerText;

  64:             externalData += "&rainin=" + xmlDoc.SelectSingleNode("//precip_1hr_in").InnerText;

  65:             externalData += "&dailyrainin=" + xmlDoc.SelectSingleNode("//precip_today_in").InnerText;

  66:

  67:             return externalData;

  68:         }

  69:     }

  70: }

How to grow onions and not onion flowers

2279

Last year, I grew a lot of onion seeds but unfortunately not many large onions I could use in the kitchen.  I have learned a few things since then which hopefully can help you not have the same problem.

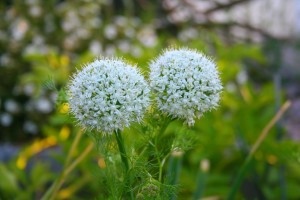
Use small onion sets: Last year I selected all of the largest onion sets in the 100 count bag which from some of my experimentation this year proves why almost all of my onions bolted to seed.  Smaller onion sets were much less likely to bolt to seed during normal temperature fluctuations.  Now what should you do with those large onion sets?  Why not think of them as flower bulbs since that is what they will end up eventually.  Given you know the onions will grow pretty small so you can plant a 1-2 inches apart and they do make a quite attractive flower and as an extra bonus you can collect the onion seeds for next year.

Grow from seeds: Well if you are like me with all of your plants bolting to seed on the positive side that gave you a considerable number of onion seeds.  Now you have a couple choices here, you can plant some seeds at the end of the summer which will create basically small onion sets which will go dormant over the winter and pop back up during spring.  The other option is to plant seeds indoors 9-10 weeks before last spring frost and plant seedlings the size of a pencil or smaller into your garden.

Try a different onion variety: The ultimate reason flowers bolt is temperature fluctuations which tricks the onion that it has completed its biennial (2 year) growing pattern which results into the onion jumping into its last stage of its life, flowering.  Now unless you are growing in a heated greenhouse or grow box, unfortunately you don’t have too many options in controlling the weather.  Fortunately you can select onion varieties that are more tolerant to temperature fluctuations.

Hopefully with these tips you can grow a few less onions flowers and a few extra onions.  Though if you still get a few onion flowers you do have a couple choices.  Pull it up and user the smaller onion in your kitchen or simply embrace the flower and the bees it will attract and get plenty of onion seeds for next year.

Getting the garden ready for winter

The leaves are changing and falling the days are getting colder and I am personally coming to the end of my vegetable growing season. I do have a few post season activities before I completely call it a year.

Remove plants: Now my plants have lived a good life but now need to be removed. I mulch my lawn so I am always lacking greens for my compost bin so this is a good time to get some new materials. Most of my remaining plants are tomato, pumpkin, and cucumber plants which have some tough skins so I will chop them up with my lawnmower prior to add them to my modest bin. While you have your mower running this is a good time to let it keep running until it runs out of gas to avoid gumming up the engine when you fire it up next spring. This is also a good time to inspect and sharpen or replace the blade since if you are like me you will completely forget about this when you finally get around to mowing next spring.

Fertilize: If you only can fertilize one time throughout the year now is the time because turf grasses have the ability to store food during the winter months to allow a very quick rebound after the winter months. My primary concern is for my lawn which I am applying alfalfa pellets, since we have had some intense rains these past weeks they should break down quickly and not have the appearance of goose poo for too long. While applying I also allowed some to fall into by beds to help microbial activity and give my empty beds a head start for next spring. Be sure to avoid beds with and vegetation since you want to avoid any new growth with first hard freeze coming up.

Turning the soil: This can be a controversial activity since messing with the soil can inhibit microbial activity though turning the soil now can give you a head start next spring. My motivation is more on the lines if killing baby slugs (I know I am cruel) The slug activity in my garden was pretty minimal but I have concerns the few visitors may have decided to raise a family in my bed for next year. If I simply turn the first few inches of the soil I can expose the tiny slug eggs which birds will eat as a snack and any remaining will be destroyed during our first good frost. As an added benefit this will be a good time to catch up on my slacking in weeding during the last few weeks.

Taking care of your tools: Now is a good time to find those missing tools that may be hiding in your yard and garden. I have no idea why manufacturers choose to make these things green; almost like they want us to lose them to buy more  If you find any of your tools it is a good idea to put a light coating of oil on metal parts of your tools. You can also apply some Linseed oil to the wood portion of your tools.

Frosting on the top: At this point my garden is looking pretty good….even tempted to start planting though I will resist the urge. I have a plan to hold me over this winter but that will require its own post. After I have had a couple good frosts to kill off any slug eggs I will break open a couple of my bags of leaves and spread on a solid layer on top of my beds. Not only will this provide some food and temperature protection for the worms in my garden but whatever remains will be a great addition of organic matter for my garden.

Now with all this work I should be ready to start gardening way earlier than I should next spring…will I ever learn.

Planting your second (fall) cold season crop

With my tomatoes changing colors and having a consistent harvest of cucumbers it is now time to start thinking about a second season crop of cold season vegetables. If you were less than successful with your spring cold season crop as I was, definitely consider giving a fall crop a try. There are many advantages since pests are less active and temperatures decrease and will lower temperatures and more rain it is a pretty low labor harvest. The cool weather can also help pull the sugar out and give you much sweeter veggies compared to your spring crop

If I have already convinced you to start a fall crop the important thing is timing, though many of the cold season plants can survive a couple light frosts you should start your planting 6-8 weeks before you first fall frost. You can extend your growing season (or take it through the whole winter) by providing some plastic covering for a little added protection. If you want more information of having fresh vegetables all winter long I recommend checking out Four-Season Harvest: Organic Vegetables from Your Home Garden All Year Long

Your choices for what to plant are basically the same as what you may have planted early last spring. Some of my favorites are lettuce, spinach, Swiss chard, beets, carrots, broccoli, cabbage, cauliflower, Brussels sprouts, scallions, and radishes.

With a little planning and minimal effort you can continue to harvest inexpensive produce with minimal effort.

IKE