Harnessing power from trees
14.7 years ago electronics

Some UW researchers have determined that if you add a couple of similar metals in a tree it produces electricity. Though only 200 mV so we won’t be moving to tree power anytime soon. Though the articles mentions some applications such as detecting environmental conditions or forest fires.
To me the most interesting part is they don’t exactly know the cause of this voltage, though they theorize that “there seems to be some signaling in trees, similar to what happens in the human body but with slower speed.”
Gadget to make time lapsed videos in your garden
15.1 years ago electronics, gadget

If you liked my time lapsed videos in my how box like the ones below. Here is an easy way to do the same in your garden. For just the mere price of $159.95 this weatherproof camera will take 1280×1024 resolution photos at an interval of 5 seconds to 24 hours.
Via Hammacher Schlemmer, Via Oh Gizmo
Hardening off plants in the grow box
15.1 years ago computer, computer power control, cucumbers, electronics, indoor growbox, tomato
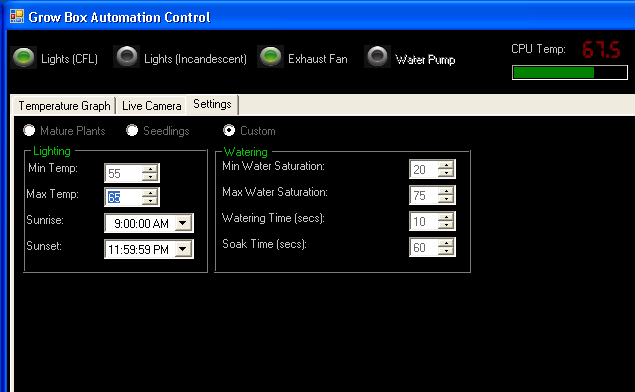
When you have seedlings growing indoors or a greenhouse during their life they have had the opportunity spending it in a near perfect environment with controlled temperatures, consistent lighting, no wind, etc. If you take this happy plant and move it directly into the wild (your garden) it can, and probably will, go into shock leading to its sudden death. The solution to this problem is to hardening off the plant. This is a process of slowly getting the plant accustomed to the real world environment a couple hours at a time.
You start by bringing the plant outside for two hours in the late evening or early morning hours. If the plant begins to wilt let it recover indoors until it appears healthy again. Each day increasing the amount of time it is exposed to the outdoors over 1-2 weeks period, or until the plant can survive a full day/night outside. At this time it is ready to get its permanent home in your garden.
This process takes a lot of patience, which as they say is a virtue. Unfortunately I believe I am missing this virtue. My history of hardening off plants follows a similar pattern; bring out a plant in the evening with the full intentions of bringing it back in after a few hours, unfortunately I forget and it spends its first day out in the cold all night which normally the demise of my summer plants.
![image[18]](http://www.cheapvegetablegardener.com/wp-content/uploads/2009/03/image18.png)
This year I am using my grow box to harden off my plants. Normally the grow box runs at about 68-72 degrees which is a great environment for my seedlings. By allowing some hot air to vent and lowering the maximum temperature setting in the software I am able to bump the temperature down to a range of 57-65 degrees. After a few days I will drop the temperature a few degrees until it has similar low temperature to the outdoors, while still staying at a safe temperature for the plants.
Given today using an unknown neighbor’s weather station we had a high of 48.2F and low of 35.1F I still have some time before I can safely bring my tomatoes/cucumbers outside but they should be toughened (hardening) up and ready to go when it is.
Tags: cheap, garden seeds, growbox, led, outdoor plants, tomato plants, vegetables
Tending your garden with am army of robots
15.1 years ago computer, electronics, garden maintenance
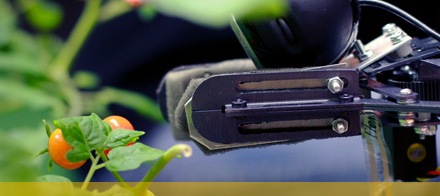
I must say gardening and robotics are a couple of non relating interests, well at least until now. Fortunately some smart students at MIT have joined these two areas into one. I am a little skeptical about the real world implementation of this, I guess if production cost was low enough and you had a large enough green house; a little army of plant tending robots would be a cool site to see.
Either way, this a really cool academic project. See the video below for the robots watering and harvesting some tomatoes.
“The idea for the project came from work done by Nikolaus Correll, a postdoctoral assistant working in Professor Daniela Rus’ Distributed Robotics Lab. Correll, who came to CSAIL in 2007, saw the possible applications of swarm robotics to an agricultural environment. In the long view, the researchers hope to develop a fully autonomous greenhouse, complete with robots, pots and plants connected via computation, sensing and communication. Each robot is outfitted with a robotic arm and a watering pump, while the plants themselves are equipped with local soil sensing, networking, and computation. This affords them the ability to communicate: plants can request water or nutrients and keep track of their conditions, including fruit produced; robots are able to minister to their charges, locate and pick a specific tomato, and even pollinate the plants.”
[via MIT via Make via Gizmodo]
Tags: outdoor plants, tomato plants
EasyBloom plant sensor review
15.2 years ago computer, EasyBloom, electronics, gadget, garden planning, product review

I will admit, I have a weakness for electronic gadgets, when I got wind of the EasyBloom I just had to try it out. The EasyBloom plant sensor is a device with built-in sensors to measure light intensity, humidity, temperature, and moisture content in your soil. It has three basic modes: Recommend, Monitor, and Water.
With the Recommend setting you place the EasyBloom into a location you want to grow something, let it sit there for at least 24 hours, plug it into your computer, and it will provide a detailed analysis of your planting area and provide a list of plants that would thrive in that location.
The Monitor setting allows you to diagnose problems with a particular plant. You first define the type of plant you want to monitor, turn on the device and place it next to the not so healthy plant, water, return 24 hours later, and plug it again into your computer. It will use the data stored in the sensors to give you a diagnosis to what the plant’s ailment might be.. Of course, this will not diagnose various pest or disease issue but can let you know if you have planted a little too early, in the wrong location, or are not watering enough (or too much) based on your soil structure.
Finally it has the water setting which the name should imply, will notify you when you need to water your plants.
To test this thing out I had three locations in mind to take measurements, each of which would provide a huge diversity of readings.
First, I put the EasyBloom in my grow box in the Recommend mode. I have complete control over the temperature and lighting I definitely could confirm the devices accuracy and I expected to see decent diversity of plants recommended. After placing the device in my grow box for almost 24 hours (see missing results below)

Overall the readings were nearly exactly what I expected though I was hoping to get a full sun rating, guess I may need to add an extra bulb to the box. Even with my conditions it did recommend 176 plants that I could grow inside it to maturity, though I am going to demand a rematch after adding a little more light

Second, I brought the sensor and set it up next to my office window. Currently I am growing Lemon Verbena I transplanted from my garden. I wasn’t concerned about moisture content so for this reading I didn’t include the moisture sensor and here were the results that were returned.

After this result I felt a little better about my grow box since it at least it was beating of an eastern facing window sill. With this result the program recommended 92 shade loving plants with Lemon Verbena not being one of them, though I have been providing some supplemental light to the plants.
Finally, I used the EasyBloom on my southern facing fence line plot (where I normally grow my cucumbers and tomatoes) This is where I wondered of the usefulness of EasyBloom to actually give good information about planning a garden in the offseason. Though I can not grow tomatoes outside right now due to cold, would it still let me know that it was still possible. Well here are the readings:

When I put the sensor outside it was raining pretty hard so passed the “weather proof” test. Though it did clear up the next day which is reflected in the “Full Sun” light reading. This was the obvious winner with 3458 plants recommended with the over 5000 in their database.
In conclusion, I will be the first to admit that the EasyBloom would not be on the necessity list for gardening tools, but for a beginning gardener it could provide some valuable incites to help your first few years be much more successful. For nerds/geeks like me it is a pretty cool toy, that I will be sure to be using in testing new lighting and grow box designs in the future.


Tags: cheap, growbox, led, outdoor plants, tomato plants, vegetables
How to make a cheap soil moisture sensor
15.2 years ago cheap, electronics, water

Soil sensors can be pretty expensive to purchase but a few minutes and a few cents worth materials around your house you can make your own accurate cheap soil moisture sensor.
UPDATE: Though this still a great sensor, check this post for the latest version of a more heavy duty soil moisture sensor.
I mentioned in a previous post that my previous soil moisture sensor did not hold up in my automated grow box update, so I needed to make a new one. After a little research there was the classic science class method of creating a homemade sensor by simply putting two galvanized nails in the soil and measuring the resistance between them. A major problem with this solution is the soil composition can significantly vary the resistance and keeping the spacing between the nails could be troublesome.
After a little more research I came across the method that has been working well for over 50 years. This method includes taking two metal probes and inserting them into a gypsum block and measuring the resistance between them. The gypsum absorbs the water and provides a decent range of resistance and moisture measurement.
Unfortunately I was fresh out of gypsum (sort of), so I looked around the garage and found a good substitute, Plaster of Paris. Plaster of Paris is created by heating gypsum to around 150 degrees where it becomes calcium sulfate hemihydrate. After adding water and allowing to dry it magically turns back into gypsum with the added bonus it also has the ability to mold to any shape I could come up with . On to construction…..
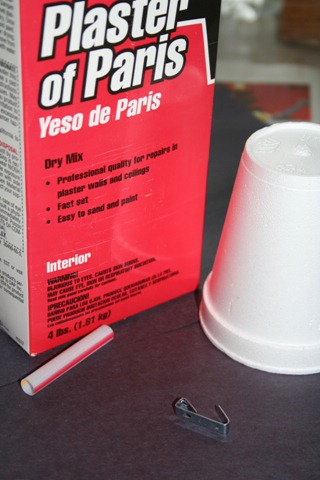
Materials for cheap soil moisture sensor:
- 1 tsp Plaster of Paris
- 1/2 tsp cold water
- Disposable cup for mixing
- wide straw (I used one from McDonalds, but most fast food straws should work)
- 2 small pieces of metal (I used wall hangers, but nails, paper clips, etc will work as long as they can fit inside the straw with room for plaster to form around)
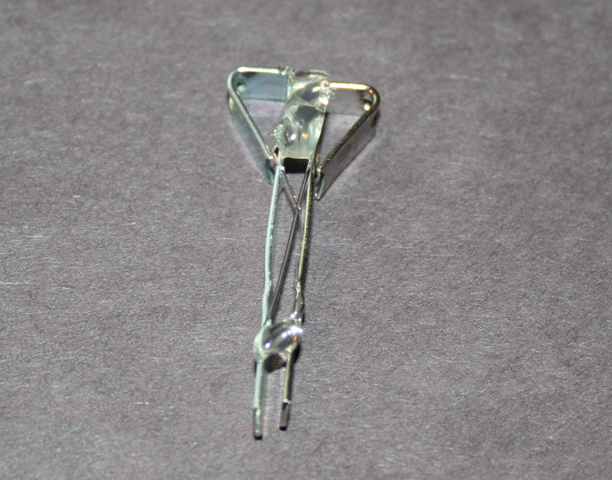
I straightened out one end of both wall hangers the best I could with some needle nose pliers. I then carefully positioned them approximated 15mm apart, the exact measurement is less important though if you are creating multiple sensors I would recommend making them the same gap to ensure consistency of measurements without having to individually calibrating each sensor. I then used some hot glue (insulator) liberally at the top and at the bottom just enough to keep it in place during while pouring the plaster and while the mold solidifies.
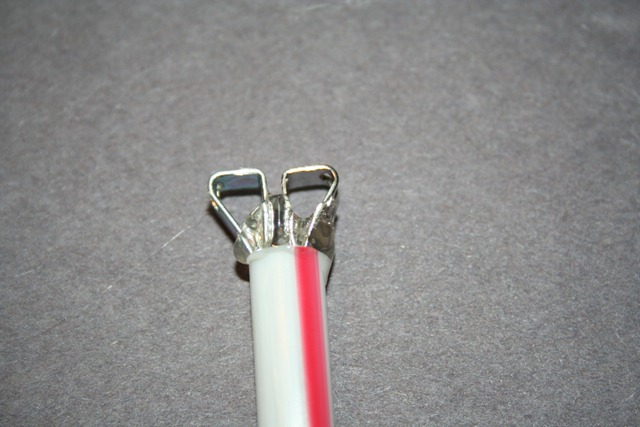
Now insert your secured metal probes into the straw, ensuring that both metal probes are equal distant from the sides of the straw. The great thing about the wall hangers is they do this automatically due to their wedge shape at the top. Once you have them centered apply gobs of glue to keep the probe in place but also to seal any gaps between the straw and the bottom of the straw. This needs to be water tight since this will be the bottom our your mold.

Prepare the Plaster of Paris according to the instructions on the box. On my box it said 2 parts mix to 1 part colder water. Given the small size of the mold 1 tsp of mix and 1/2 tsp of water which gave you more than enough to make one sensor. I used a bamboo skewer to stir since I would have gotten in trouble for trying to use our new silverware.
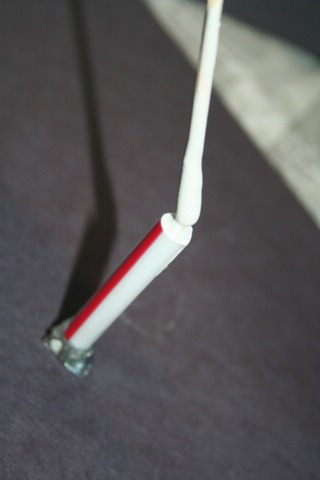
Now it is time to pour your mold, depending on how steady your hands are you should be able to pour the plaster right into the top of the straw. Fill about 1/4 of the length then tap the probe gently to help the plaster settle between the gaps. Repeat the previous step until the straw is full. If you have problems pouring you can also dip the skewer into the plaster and scrape it against the top edge of the straw. This step is optionally but I wanted to give my sensor a little point so I carefully added plaster beyond the end of the straw to provide a sharp point. Once you are done filling the straw, use your glue gun to secure the probe onto the paper you are working on and allow at least 1 hour to set.
After about an hour you can remove the bottom part of the probe. Do this by carefully cutting around the diameter of the bottom 3/4 of the straw, along with a lengthwise cut as shown in the lines marked above using a utility knife. You must be very careful in your cutting going too deep can result in cracking the plaster and you need to start all over.
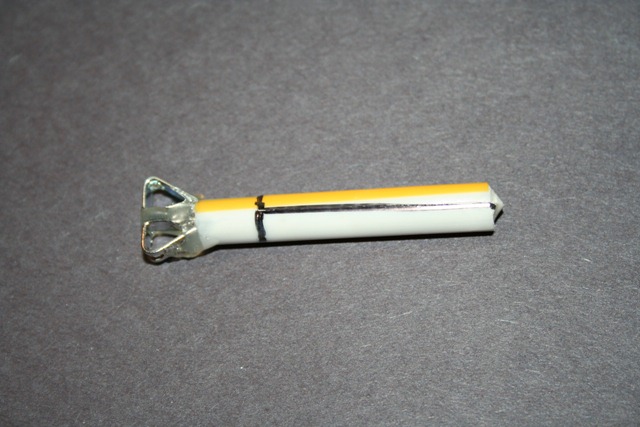
Allow the plaster to dry for 24 hours and it should be ready for testing. With my probe it is essentially an insulator dry (beyond what my ohmmeter can measure) and a reading of 957 ohms when slightly damp which was a great range for measuring moisture level in my computerized grow box.

Finally, I attached attach wires to my analog measuring device (in my case a PS2 Controller) and I started getting readings. At this point you should calibrate the sensor by getting a reading with the probe dry then again when it is full saturated in water. Ironically, the probe I made was almost exactly specifications as the one I re-purposed from a cheap commercial soil moisture sensor so I didn’t even have to modify the constants on the automated computerized grow box software.
Given you can make hundreds of these things with a regular sized box of Plaster of Paris, box of paper clips and a few trips to your favorite fast food restaurant. The cost of each of these things would be pennies and given the cost of buying a commercial product seems like a very economical alternative.
Tags: cheap, growbox, vegetables


