Search Results

How to use Vegetronix soil moisture sensor (VG400) on Arduino

With the summer starting to come to a close it has been time for me to start thinking back to the computerized grow box.  I have been doing some considerable work on the electronics and software over the summer.  Better to break stuff while the plants are outside and not while killing them inside.

Though I have been happy with my homemade gypsum soil sensors I decided to try out a commercial option hoping for better accuracy and longer life.  This is important with my current plans to include automatic watering to the latest version of my grow box.  Don’t want to wake up to a flood in the garage due to a broken sensor.  After some looking I came across the Vegetronix VG400 which measures the dielectric constant of the soil using transmission line techniques.  Which I have no idea what that means but sounds impressive.

The hookup couldn’t be simpler, red wire to 3V, bare wire to ground, and black wire to an analog input.  As you can see below in my completely not to scale diagram below.

vegetronixArduino

From here it all comes down to some simple code to write on the Arduino to get some values.

void setup()
{
// Setup serial
Serial.begin(9600);
}void loop()
{
Serial.println(analogRead(0));

delay(200);  // wait 200 milliseconds
}

Upload the code to the Arduino and now I can get a moisture value from the analog input between 0 and 614 (0-3 volts) depending on the degree of water saturation.

vegetronixOutput

Though not as hacky as my PS2 controller moisture sensor solution definitely more elegant and reliable.  Stay tuned for more details of other improvements to the computer controlled grow box.

Create your own PC moisture sensor via PS2/Gamepad Controller


Yet another component for “Project Everbearing” where I need the ability to monitor the moisture level of my soil. There are a couple options on how to do this; the classic method is to take two galvanized nails at a fixed distance apart in the soil. If you run electricity through one of the nails, some of the electricity will pass through the other nail depending on the amount of moisture, in much the same way as a variable resistor works. If the soil is completely dry it will have no conductivity (infinite resistance) since low voltage electricity does not pass through dry soil, as water is added the resistance is decreased and with completely drenched soil almost having complete conductivity.

Unfortunately, I did not have any galvanized nails and with our current snow storm I wasn’t going to venture out to the local Home Depot. I did fortunately have something even better, a handheld soil moisture sensor, which I bought when I started gardening before I learned I can see if I need to water by putting my finger in the soil.


With a little manhandling I got the cover off the back and realized that this tool works with the same principle as the galvanized nails with just two wires with provide variable resistance depending on the water content.


[And I thought my soldering was bad]

Now all that is needed was to solder these wires to a couple open points on my PS2 Controller which I am already using as a cheap temperature sensor The great thing about this implementation is the “resistor” has a broad range from no conductivity to nearly zero. Which is great since it gives a very accurate representation of the soil’s water saturation. For the calibration I was a little lazier this time and only took two points “Dry” and “Really Wet” With these measurements I then calculated the water saturation percentage. So now I can see my plants are at a 43% water saturation level, which I have no idea what exactly that means, but I do know I don’t need to water for a few more days.

One warning though since electrical conductivity can be affected by application of fertilizer (especially synthetic fertilizer which may contain sodium) and temperature so accuracy may be around 70-85% but for higher accuracy there are other expensive ($500) alternatives out there but I can live with this for my application.

How to keep deer out of your garden


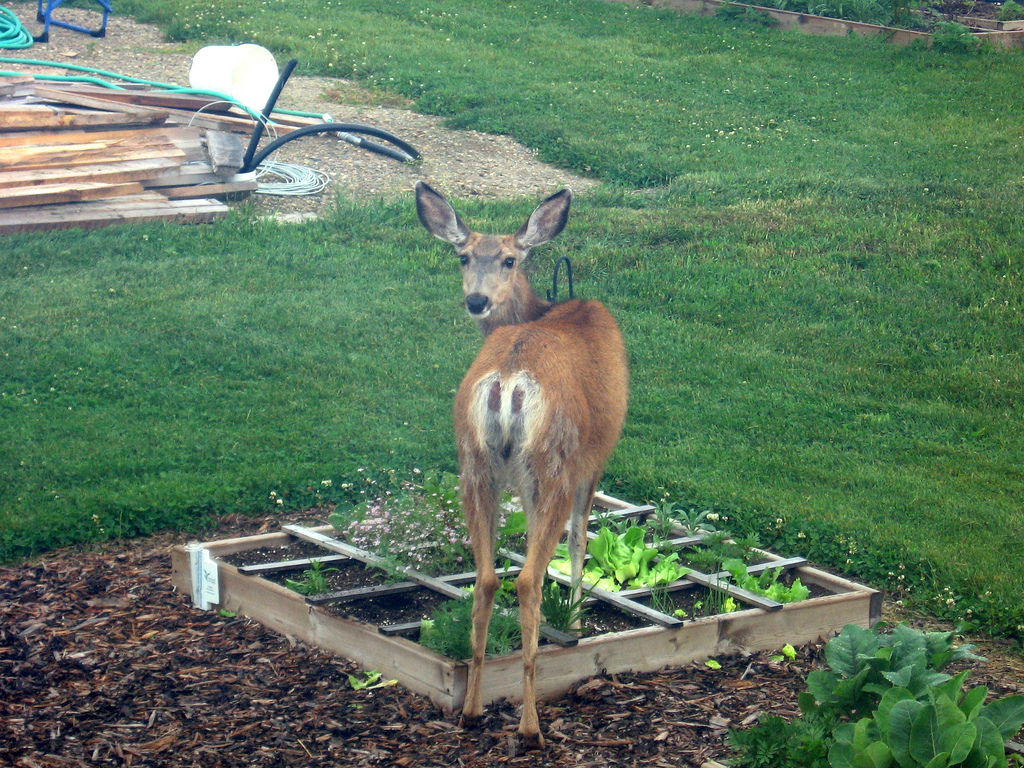
Photo from Alberta Home Gardening

Ever-Increasing Deer Damage

Deer are one of the most widely distributed mammals, inhabiting every continent throughout the world, except Antarctica and Australia. As the human population increases, the natural habitats of deer continue to decline causing deer to have no where to go, but developments and suburban areas. The result is a continual increase in property damage caused by deer. Not only is property damage an issue, deer harbor diseases that can be passed to humans, pets and livestock. Finding an effective deer repellent is crucial to protecting your family, pets and yard.

There are many ways to control deer from entering your land and destroying your property. Some are effective and others are not. One method that is not very effective is planting “deer proof” plants. The label “deer proof” is in fact a misnomer because a hungry deer will eat any plant when preferred food sources are scarce.

Another option is installing a fence around your property. This method is also not the best deer repellent as deer can jump over fences, even as high as 8 feet. Installing a fence is not only ineffective, it is also costly and detracts from the look of your landscape.

There are more effective and cost-efficient methods to stop deer from entering an area. They include motion detector sprinklers, liquid deer repellents and electronic deer repellents. These methods harmlessly condition deer and other wildlife to stay away. (Preventing Deer Damage)

A Motion Detector Sprinkler – An Innovative Deer Repellent

An effective, cost-efficient, and safe deer repellent is the innovative motion detector sprinkler. This type of deer repellent utilizes water spray and noise to create a humane and highly effective solution to property damage caused by deer. Not only is it effective on deer, it can protect areas from all types of destructive animals, including cats, dogs, raccoons, groundhogs, opossums, skunks, squirrels and geese. The motion detector sprinkler keeps cats from using gardens as their litter box, prevents dogs from digging up recently seeded lawns, and keeps rabbits from feasting on gardens. Moreover, it is the perfect way to prevent cats, raccoons and birds from eating fish out of a decorative pond. A safe, effective alternative to chemical repellents, the motion detector sprinkler is also a highly economical solution in place of fences, perfect in those areas where fencing is not an option due to aesthetics or local land ordinances.

How The Motion Detector Sprinkler Works

This humane animal and deer repellent offers 24-hour protection for yards, gardens and landscaping. When the infrared motion sensor detects movement, a startling burst of water ejects from the sprinkler. The “tic tic tic” noise of the sprinkler, combined with the sudden jet of water, causes a negative experience for the trespassing animals and wildlife. This negative experience conditions them to avoid the area in the future. Motion detector sprinklers will guard up to 35 feet in every direction for a total of 1000 square feet of coverage. To protect a greater area, link multiple sprinklers together. Thanks to the random spray pattern and adjustable sensitivity detector these innovative sprinklers use, animals won’t become accustomed to the water sprayer.

Setting Up A Motion Detector Sprinkler

A motion detector sprinkler installs quickly and easily. First, determine proper placement to increase its effectiveness. Place the system where you see animal or deer paths. Look for tracks or droppings and intercept the animals on their way to food, such as vegetable plants, flowers, shrubs or ponds. The simple set up consists of installing a standard battery, connecting the sprinkler to a hose, and using the step in stake to push the unit into the ground. High-tech systems include an infrared proximity and pivoting sensor, which automatically turns the unit on when deer are in sensing range. Eco-friendly models use only 2-3 cups of water per spray. Mid-range models offer remote functionality, timer options and a sprinkler mode. Premium models can be placed in any location since they are solar-powered and hose-less, as water is supplied by a refillable basin (Havahart Spray Away).

Liquid Deer Repellent

The most effective liquid deer repellents target both the highly developed sense of smell and taste of deer. Putrescent egg and garlic target the deer’s sense of smell. To a deer, these scents mimic the smell of a decaying animal, fooling the deer into thinking a predator is nearby. This activates the deer’s flight response, causing the deer to flee the area out of fear. Capsaicin, the active component of chili peppers, targets the deer’s sense of taste. A deer will immediately stop feeding on plants treated with capsaicin due to the burning sensation upon contact, making capsaicin an excellent deer deterrent. Liquid deer repellents are applied directly to plants and come in convenient, ready-to-use formulas. Higher end liquid deer repellents are undetectable to humans after drying and only need to be reapplied every few months. If using in vegetable gardens, be sure the liquid deer repellent has the OMRI logo, which means it is approved for use in organic gardening (Capsaicin).

Electronic Deer Repellents

Electronic deer repellents work very similar to an electric fence. They are battery-powered and installation is easy. Simply apply a scent lure to the deer repellent posts and stake them along paths that deer frequent. The deer that wander on a homeowner’s property won’t be able to resist temptation of the scented lure and will touch the posts and receive a static shock. This gentle, yet unpleasant, shock will condition the deer to stay clear of your yard, providing effortless 24-hour protection (Havahart Electronic Deer Repellent).

Works Cited

Preventing Deer Damage. 12 May 2010

Capsaicin. 19 April 2010. 22 April 2010

Havahart Spray Away. 12 January 2011

Havahart Electronic Deer Repellent. 12 January 2011

Guest Post Written By Havahart®

CheapVegetableGardener.com in the Press

Majority of the time when we are featured in magazines, press, radio, or web sites we don’t know until our awesome readers bring it to our attention.  If you happen to hear (or heard) about our site out in the wild please let us know and we love to hear about it.

Radio


Newspapers


York Times Logo

Magazines

  • Link Coming Soon (hopefully)

Websites

Make Magazine Logo

Planet Green Logo

Christian Science Monitor

Computer controlled grow box – Part 1

IMG_4158

The Idea and Design

My PC Grow box was very effective though it did have some shortcomings along with my desire for tinkering caused me to create a new version code named “Project Everbearing” after the test subjects for the project, several Everbearing strawberry plants I propagated from my garden last Summer/Fall.  The specific shortcomings I wanted to overcome were temperature control and limited size.  My grow box has to live in my garage so on cold nights the temperatures can fall low enough to kill my summer seedlings (tomatoes/cucumbers)  Size is an easy fix just make it bigger though it is more difficult to keep a larger grow box warm and still well lit.�

My solution to both of these problems was the addition of a computer to the system.  First computers generate heat, using this along with computer controlled fans and incandescent lights (heater)  allow me to regulate the heat to my desired levels.  This is the point a normal person may have just stopped, but I am far from normal and decided a few more features, which I will explain more below.

tottutors

image

The Structure and Insulation

First comes the structure, upon inheriting a set of shelves from my sister, we ran out of room for some of our existing storage shelves (see above), though we used the buckets to store loose toys on our new shelves we had the structure of the old one sitting in the garage for some time.  After many passes by in the garage not knowing what do do with this shell, it finally came to me that this would be perfect for my new grow box, (Reduce/Reuse/Recycle) in action.  The only customization required was the removal of a couple of the wooden dowels and I was ready to add some hardware.  Of course you could do the same thing with an old bookshelf, cabinet or just with construct your own frame with a 12”X1”X8’ foot board cut in two along with two 1”X1”X8’ pieces of lumber cut into two.  Screw one 1”X1” in each corner and should should have a pretty solid frame.  For the top I used pegboard mainly because I bought a 4’ by 8’ sheet when I only needed half of it but worked really good to use zip-ties to secure various components and provides decent airflow between the computer and growing areas.

Second comes insulation, after some not so careful calculations and measurements I determined I could cover the 3 exposed areas with 2 sheets of 2’ by 4’ sheets of insulating Styrofoam.  I glued and taped (duct tape of course) the Styrofoam which was cut using a utility knife and straightedge to cut to size making sure I made the top straight and flush.  I then created an exactly copy of the other side and one more piece for the top.  Using a long strip of duct tape I created a hinge for the top and glued side of the box.  The last piece I simply fit into place using a tool box to ensure a tight fit but also allows easy access to plants when needed.

The Lighting

I went cheap on the lighting taking from the success of the PC grow box I decided to go with a similar setup using $2.00 home depot wired sockets hooked up to an couple old computer power cords.  I went with two 24 watt CFL bulbs and one incandescent bulb.  Though the incandescent is not as efficient and the CLFs it does provide a full spectrum of light and a little extra heat which the box can use in the many times cold garage where it lives.  The CFLs and incandescent exist on two separate circuits so they can be controlled independently by the software.


The Software — Grow box brains

Now I know all of this could be done with a Basic Stamp or Arduino pretty easy, but I wanted the ability to track history and have a decent user interface to look at, so I wrote a windows form application using C#.  To cover the basic functionality of temperature control I used the parallel port outputs hooked up to the computer’s parallel port to give the software the ability to turn the lights on and off.  By configuring a “sunset” and “sunrise” time which I am in complete control over the lights will turn on and off as appropriate.  I added some logic to ensure the plants stay at a comfortable temperature (thresholds configurable) by turning on the incandescent bulb when it is too cold and an exhaust fan when it gets too hot.  In order to allow the computer to know these temperatures I used a PS2 controller to create two temperature sensors one for the area the plants are growing and another for the top area where the CPU resides (computer was too old to have onboard temperature sensor)

ControllerSettings

My daughter thought it would be cool if we have some sort of automatic watering system.  I agreed, so I added a moisture sensor and created an algorithm to periodically check the moisture level and activate a water pump to add water until it reaches the specified moisture level.  I still need to buy and hookup the pump but coding portion is complete and tested.

I live in the Pacific Northwest it rains a lot and can get cold in the evenings and I don’t want to trek out to check on my plants.   solved this by adding the computer to my Wi-Fi network now I can take look at them by connecting to the machine wirelessly and see how they are doing through it’s webcam.  I also take periodic pictures of the plants so I can create cool time-lapse videos of progress like the one below.  I also have the ability to browse through pictures taken at specific time periods.

controllerPhoto

Finally to store all of this data I installed SQL Server 2005 Express (free) which allows me to track historical data of the conditions and images over time.  If you have data, you definitely need some graphs.  Being too lazy to do this graphic work I leveraged ZedGraph (free) to allow some visual tracking of temperatures and moisture content.

Controller

Features for future versions (Beta 2?)

  • Finish automated watering
  • Add automated red LED lights for flowering stage
  • Install LCD Panel
  • Make box look better (real door which does not require tape to open/close)
  • Create single USB controller for lights/sensors
  • Better/additional camera

Video of grow box “booting” up, personally I like the flashing lights when the computer sends signal through the parrallel port.  If you are old enough to ever have a printer that used a parallel port this is when it would make its annoying sound letting you know it was alive.

Updates:

Computerized Grow Box Update #1

Gardening Gadget Deal of the Day

image

Want a EasyBloom but $59.95 is a little out of your price range?  Well good news, right now it is on sale for $20 off so you can have this little gardening gadget for the low price of only $39.95 with free shipping through Amazon.com.  I have no idea how long it will stay at this price so if you were thinking about picking one of these up, now is the time.

If you have no idea what I am talking about, check out my full review of the EasyBloom Plant Sensor.

IKE