cayenne peppers growing indoors
12.9 years ago cayenne, indoor growbox, peppers

Well this is the soonest I have gotten peppers growing, but the temperature controlled grow box did help out a lot. I brought this pant indoors last year when it still had a half dozen green peppers on it when the temperatures started to decline. The peppers turned red and a picked and dried them out for cayenne powder and sort of forgot about this plant.

It went dormant and by sheer neglect somehow survived so when I noticed that leaves started growing from it I quickly gave it a good watering and put it back in the grow box where it has come back strong and plan on getting enough peppers from this plant to meet my BBQ needs for a good year.
10 Tips for growing tomatoes in the Northwest
13 years ago alfalfa pellets, blight, blossom end rot, disease, fertilizer, indoor growbox, Pacific Northwest, tomato

Unfortunately we do not have no where near the preferred climate to grow tomatoes. We have extremely mild temperatures with summer maximum average high of 78°F and maximum average lows of 59°F. Take that with our very short window of consistent rain (bringing blight) tomato plants are lucky to even be surviving when planted in our area let alone have a tremendous yield, though with a little planning and care you can be eating delicious tomatoes from your garden.
1. Pick the right variety. You want to choose a plant that has has a low number of days to maturity. Given we have a very short growing season this can significantly improve your chances of growing some ripe red tomatoes. Some good examples of tomato varieties to try followed by the average days to maturity Early Girl (52), Goliath (60), Juliet (60), Oregon Spring (58), Sugary (62), or Sunsugar (62). You may also want to consider growing smaller tomato varieties such as cherry or globe which can be beneficial given the smaller the fruit the shorter amount of time is takes to ripen which could allow you to harvest your tomatoes before the rains along with the diseases.
2. Start with big plants. Paying a couple dollars more on your tomato plants can shave off a 2-3 weeks off your “days to maturity” number so go for the largest plant you can afford. On a budget (or just cheap like myself) plant your seeds early and make use of a greenhouse or grow box to make your own more mature tomato plants and save yourself a considerable amount of money. If you do purchase a larger plant, don’t be in a hurry to get it into the ground…let they nursery keep it alive for you until you have optimum environment to plant it in your garden.
3. Plant at the right time. Even more important that the air temperature is the temperature of the soil you can actually plant tomatoes with a soil temperature of 50°F but the closer you can get to 60°F the better your plants will respond. When it comes to measuring your soil temperature you can use a standard inexpensive soil thermometer but personally I just use my handy digital grill thermometer and if you are concerned about using the same probe in your meat than your dirt you can always pickup a extra temperature probe.

4. Work in the trenches. The temperature of the soil can vary by 5-10°F as you dig deeper into the soil. By planting your tomato plants in a trench no only do you get the benefits of a larger root but also a root system much closer to the surface of the soil which can provide several additional degrees to your advantage. One disadvantage to this method is you do need to be diligent with your watering due since the ground will obviously dry out on the area closest to the surface.

The process for planting trenched tomato plants is very simple. Dig a shallow trench about an inch lower than the root ball. Lay the plant on its side removing an stems that are about to be buried. Cover with soil and pack down lightly and use some sticks to help support the plants until they get adapted to their new orientation. Unless it is pouring down rain when you plant them like I did be sure to water your plants well after planting.

Note: I intentionally took the photo of these plants a few hours after planting to show the expected shock they should encounter…this is normal don’t be alarmed they will perk up in a day or two.
5. Keep your plants warm. As mentioned before the temperatures are almost ever warm enough but fortunately there are a few products to help out a little for this:
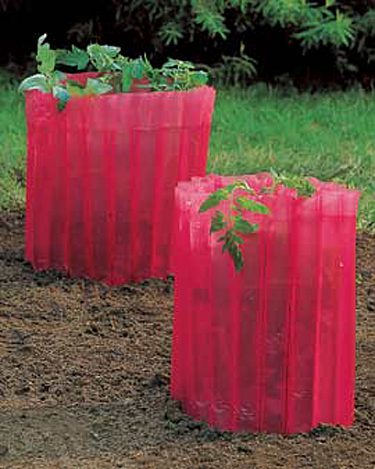 |
These Red Tomato Teepees are simply filled with water and absorb heat during the day and then slowly release it during the night and is advertised to help bring you yields up to 6 week earlier than without them. This provides more adequate temperatures for your plants and also some insurance for cold spring mornings. These are fairly inexpensive and can easily be collapsed and stored away when not needed. |
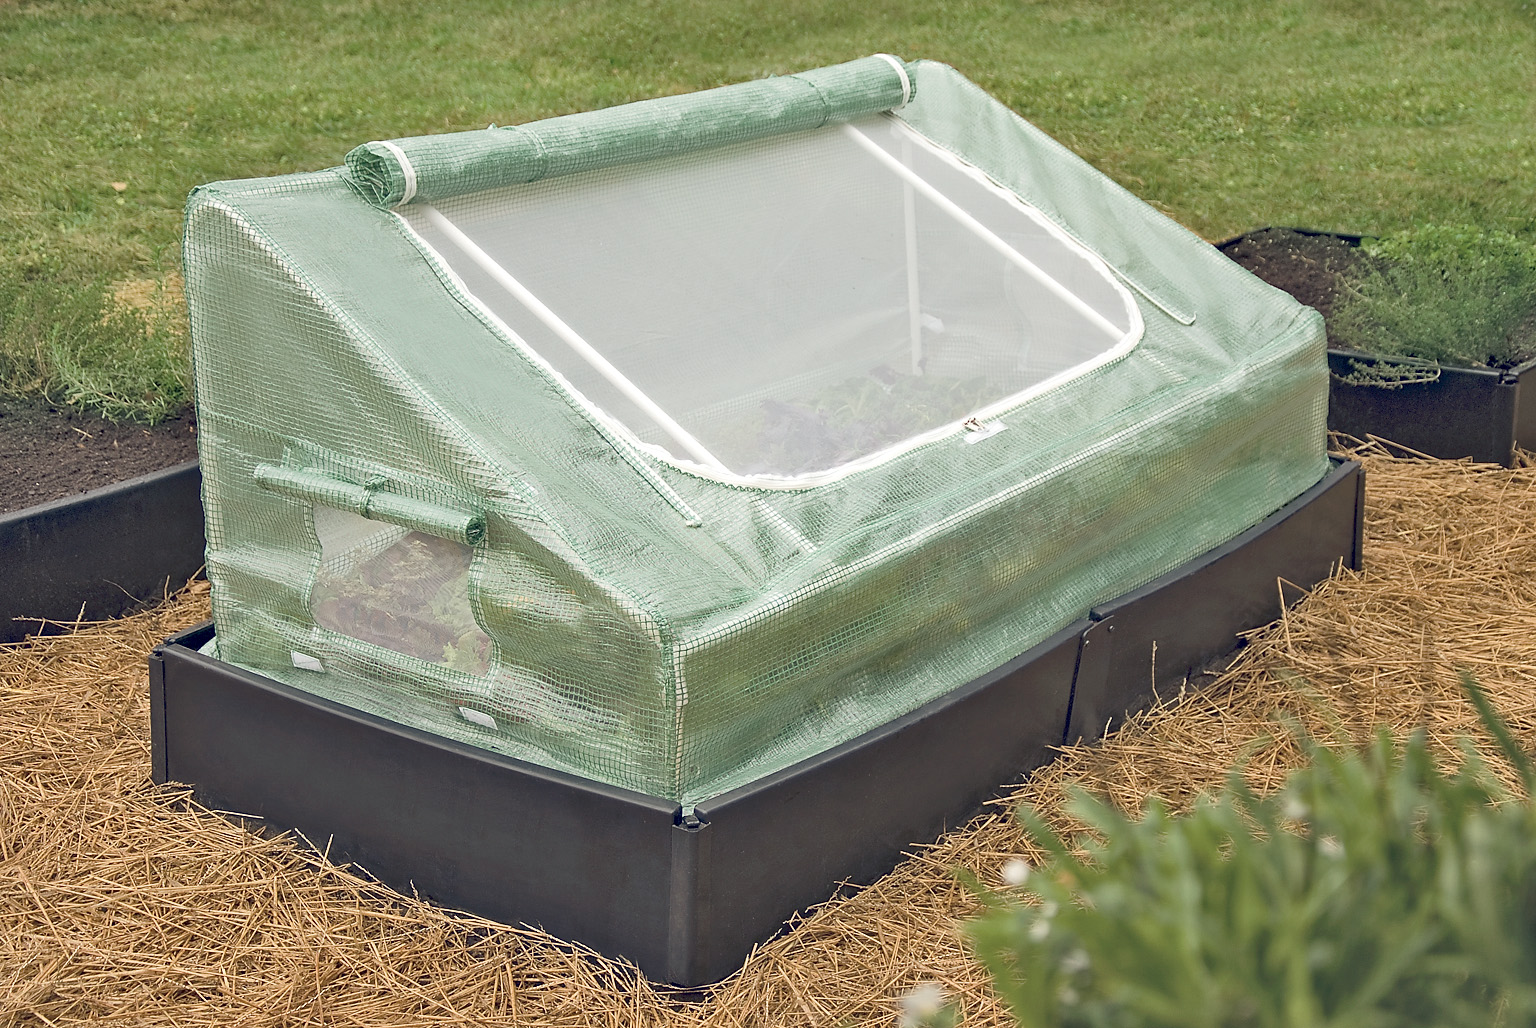 |
If you have a small number of plants to provide a little shelter you may want to consider a cold frame. These provide a few extra degrees of protecting during the cold nights but also protect the plants from high winds and hard rains. You can also use this as a little hot box for your peppers once your tomatoes are more established. |
 |
If you really want to go all out you can also consider soil warming cable this is simply a cable you bury into the ground and plug it in and will provide heat underground where the roots need it most. Now I will be the first to admit this may be more of an extreme measure for your tomato plants but if you are considering growing crops all year round this could be a good investment. |
6. Grow your tomatoes in upside down planters. One of the advantages of growing tomatoes upside down is the planter is exposed to the heat from the sun thus increasing the soils temperature providing better temperatures for the roots of your tomato plants to grow. Now whether you opt to make your own upside down planter or use one of the commercial versions such as the TopsyTurvy, this can be a great way to sneak your plants out at least a couple of weeks earlier.

7. Don’t let your tomato plants get wet. Living in the Northwest, rain happens and there is not much we can do about it. This moisture can spread disease and promote fungal growth so the less moisture you can get on your plants leaves the better. There are a few things you can do to reduce the amount of moisture on your plants. First, when watering your plants avoid getting water on the leaves. Simply water the soil right at the surface, this can be easily done with a soaker hose, long wand spray nozzle, or even a simple watering can. If you are experiencing some hard rains at the end of your season you may be able to delay blight by installing a slight overhang over your tomato plants. By taking some rigid clear plastic and installing over your plants you can reduce the amount of rain that falls directly on your plants while not inhibiting light getting to your plants.
8. Fertilize. Providing the right nutrients to the plants as they need them can help encourage their growth and provide vigorous plants in the shorter period of time. The problem with tomatoes is if you over fertilize your plants will simply grow larger and fail to produce fruit as can be seen from this tomato plant I had growing out of my compost bin.

I provide a weak balanced fertilizer such as alfalfa pellet applied every couple weeks to the top of the soil allowing them to break down and provide nutrients on each watering.

Once the plant begins to set flowers I switch to applying about a 1/4 cup of bone meal to each of the plants about every 3 weeks to allow the plants to get the phosphorous they need during for reproductive function at this this time.
9. Many plants with less tomatoes. The less tomatoes your plants has ripening on its vines the more energy it has to get them to that nice delicious red color for picking. By pinching off all the suckers not on the main vine you will get your tomatoes to ripen more quickly while taking less space. By doing this I can plant my tomatoes 18-24” apart allowing me to get a few extra plants in to make up for some of this lost yield ending up with less green tomatoes at the end of the season.
10. Get supermarket quality tomatoes from your garden. Of course tomatoes ripened on the vine will have the better taste but when your season runs out and your tomatoes are still green what can you do? One option is to take any flawless tomatoes (no bruises, no cracks) place them very gently in a cardboard box padded on bottom with newspaper and place in a cool humid location. You may also add a ripe banana to speed up the process by adding a little extra ethylene. If you are luck in a couple/few weeks you should have some red tomatoes.
Building of an indoor computerized grow box
13 years ago indoor growbox
Before going into my latest version of the grow box, I think it would be good to go through the brief history of my computerized grow boxes.
Version 1: PC Grow Box
It all started with my daughter’s question for her science project “Why don’t strawberries grow during the wintertime?” After some discussion she decided because it was too dark and too cold (pretty smart for a kindergartener) To prove her hypothesis we created the original computer grow box.

Now the only thing computerized about this one was the fact that it was made from an old PC case using a simple lamp timer hooked up to control the CFL lights and a incandescent to provide a little extra heat. This system worked great the strawberry plant thrived and produced about a dozen berries and we had proven that yes you can grow strawberries during the wintertime.

As with any iterative development process I did look at some of the shortcomings of this design and made some improvements. Though this was the perfect size for this experiment when I started consider using this for starting some of my seedlings the plants quickly overgrew this small space. The other problem was the ability to maintain ideal temperatures for growing. As the ambient temperature rose in my garage so did the grow box (by plus 15F normally) so this became a maintenance issue trying to keep this in check. This led to the next version.
Version 2: The True Computerized Growbox

This is where things started to get a little technical, my primary concern was temperature control. This would allow me to create the perfect growing environment for my seedlings and plants by using a pretty simple software program, an arduino prototyping board for the electronics, and a few solid state relays I was able to achieve pretty consistent temperature in the grow box.
This design led to a couple of issues; first it worked great for seedlings but as the plants matured I ran out of room fast. Second was temperature control, the CFL/incandescent combo was good at adding 10-15 degrees to the ambient temperature but when weather got very cold or hot there was not much that could be done to get the box out of these extremes. These we the inspirations for the most recent build.
Version #3: The deluxe computerized grow box

Space: First off the new box is over 3 times bigger than its predecessor. This allows ample space for plants to grow up and out as needed. Specially the dimensions are 4 feet wide and tall with a depth of 2 feet. It is constructed underneath my workbench which is supported from studs in the wall and 2”X2” posts as legs supporting the actual workbench. The walls of the grow box is made from a single sheet of quarter inch plywood…I probably should have spend a couple extra dollars for half inch for a little more insulation but hey this is the Cheap Vegetable Gardener. Speaking of insulation…there is none, I might rethinking this while growing peppers over the summer to save a little on heating costs but for now I don’t need it.

Lighting and Heating: Here are a couple more major improvements in this build. I have installed a 120 watt LED system from Advanced LED Lights and picked up a pair of 150 watt ceramic reptile heaters for $17 each on Amazon. Now for me this was a pretty big purchase but they were a steal provided they normally sell for $40 each at my local pet store. Between the very cool LEDs putting almost no heat and the heaters pumping out as much as I can need, this grow box is ready for any adverse weather that comes my way no matter what season.

Ventilation: I went simple with this high performance CPU fan dangling from a couple of wires…this is on my list to create a better install of this but hey I have a newborn at home give me a break =)

Watering: I really liked the bottom feeding system that I had in the old grow box but provided that now I have four separate trays to fill this makes things a little more complicated. For the watering system material I chose to go with PVC pipe because it is easy to work with and is fairly inexpensive. Another benefit is because I am using a low pressure system to pump the water in (low end pond pump) just making them hand tight is good enough to prevent leaks and allows me to make quick and easy modifications as needed.

This was good when I made the misfortune of making the intake (see picture above) a little two low and accidentally created a syphon and if I wouldn’t happened to have been in the garage when it kicked on I would have had nearly my entire 5 gallon bucket of water on the floor of my garage.

The next problem was that water will simply flow out the first free flowing outlet, so to create a small amount of water pressure to ensure the trays were getting filled evenly I used a threaded 1/2” cap with an 1/8” hole in the middle to restrict the flow enough for even distribution. The rest of the piping included a couple of elbows, 4 T-joints for each tray and an end cap to stop the flow of water at the end of the pipe.
Hardware: The PC I scraped together from spare parts and was showing an end in life was near, so I upgraded the 12 year old desktop with my 7 year old laptop. Which added a little performance but also cleaned up the need for LCD display, keyboard, mouse. As an added bonus this made the brains of grow box much more portable which allowed more evenings of troubleshooting in my living room versus cold garage.
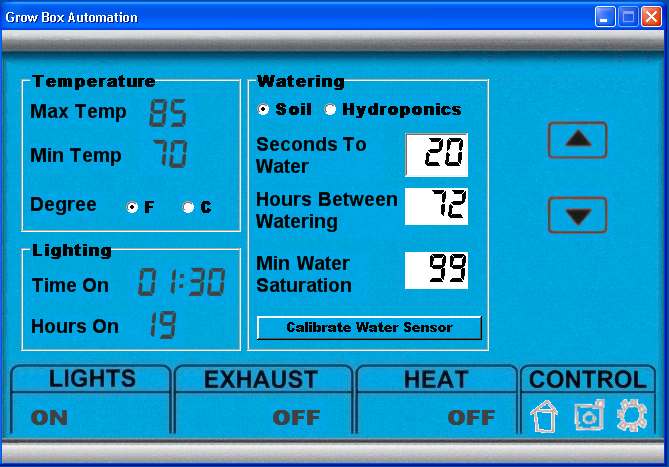
Software: This is an area where I will be the first to admit I went overboard on, but when you find something you are passionate about it is very easy to do. Building upon the previous version of my software for the old grow box I made some cosmetic changes to give the UI a design that is similar to a thermostat. I also included some temperature trending (up/down arrows next to the temperature) along with some basic (Min/Max/Avg) information for quick analysis for the climate of the grow box on that day.

To have easy access to see how the plants have been doing while I have been away I have the ability to view the current conditions inside the box but also to check on images taken in the past.

Finally we have the “Settings” screen which allows the ability to change optimum temperature range, lighting conditions, and watering configurations. I also added an hydroponics mode which works on timed on/off cycles versus being based on moisture content in the soil.
Lastly as I mentioned previously I have implemented Windows Phone 7 mobile support, which I am still limited to using on an emulator given Verizon taking their sweet time bring a model for to market for me to purchase…this provides a view into the grow box and also allows me to remotely turn on/off the controls watering, lighting, heating, and the fans within the grow box.


Overall I couldn’t be more pleased with my current configuration and the plants are thriving in their closely monitored and controlled climate…now I just have to hope that the temperatures outside will fall into some reasonable ranges to they can thrive outside of this box.
WetCircuits water resistant power strip giveaway
13.1 years ago free, giveaway, indoor growbox, wet circuits

I previously reviewed the WetCircuits water resistant power strip and risked death by electrocution to prove the products worth. In acknowledgement of my valiant bravery they have agreed to provide another power strip for me to giveaway to the great readers of CheapVegetableGardener.com
If you haven’t heard of the WetCircuits power strip it built to be shock resistant so pouring water on it, pushing tweezers into the outlets will not shock you. This may seem like a pointless feature but if you have ever spilled coffee (or dumped a watering can of water) on an outlet you will appreciate these features greatly. Now I must say it is much more entertaining to see this in action so check out the video from WetCircuits.
If you think their video was done with camera angles and expensive video editing, here is my own independent recreation of one of their experiments.
So if you are in the continental United States, just enter a comment below and I will pick a winner at random on 04/23/2011 Midnight PST.
There are multiple ways to enter:
- 1. Add a comment to this post
- 2. Like CheapVegetableGardener on Facebook (add an additional comment to the post)
- 3. Like this contest in facebook (add an additional comment to the post)
- 4. Mention this giveaway on your site/Twitter (add an additional comment to the post)
Seedlings thriving in the grow box
13.1 years ago indoor growbox, indoor seed starting, onions, peppers, tomato

I have almost everything planted at least germinating in my grow box. As you may be able to see from the labels I am growing a variety of peppers this year as well as a few different onions and tomatoes. I also have garlic and some onions I overwintered already outside and peas already in the ground.

I did successfully grow some peppers in the grow box over the winter, though as you can see below their size was lacking and the plant has been perking up a bit with some new growth once I added some better controlled heating and the LED lights.

Tags: grow lights, growbox
Computer grow box gets 120 watts of LEDs
13.2 years ago computer, indoor growbox, LEDs

Always running out of room in my grow box I needed to expand it some. Though the CFL lights I was using worked great for my 3 square foot space, though by nearly tripling the square footage CFLs wouldn’t scale out anymore. Looking at my other options such as HPS (High Pressure Sodium) or Metal Halide I really didn’t want to deal with ballasts and cooling I decided on going with LEDs. After doing some research I came upon the 120w Extreme Flower LED grow light and after talking to the great people at Advanced LED Lights they were gracious enough send me with one of their lights to try out.
Now as soon as I opened the box I noticed the sticker that said "Do not look directly at light.” Being a moron I just had to plug it in and test out this warning, now it was not like staring at the sun but it was definitely much brighter than my Christmas grow light and I would not recommend others to do this.

The light offers a unique blend of 11+ wavelengths of color ranging from 380nm to 760nm and if you read my post of the importance of wavelength to plant growth this is critical for vegetative and flowing plant growth. The great thing about growing with LEDs if you can pick the specific wavelength produced for maximum yields, though other lights also provide this spectrum they also produce much in the range that is appealing to our eyes (yellow and green) which the plants could live without. This is the reason why this 120 watt grow light can produce the results of a comparable 250w High Pressure Sodium light.

I still have some work to do on my new bigger grow box before I can move this years plants in, but I am excited to see the results this new light will bring. Stay tuned for more updates.
Tags: grow lights, growbox


